Navigation
Install the app
How to install the app on iOS
Follow along with the video below to see how to install our site as a web app on your home screen.
Note: This feature may not be available in some browsers.
More options
You are using an out of date browser. It may not display this or other websites correctly.
You should upgrade or use an alternative browser.
You should upgrade or use an alternative browser.
Ontario License Plate on My C8?
- Thread starter CTRL_CV
- Start date
I had not heard of this license plate bracket scratching prior to this ... just walked out to the garage and holy hell it will eventually scratch my bumper. THANK YOU! Immediately removed it. $110 no plate ticket is cheaper than the body shop in the meantime. Does anyone have a step by step solution for me to follow to adhere the plate properly?
If you want to display your front plate in the bumper recess, there are a few different ways to do it. Here is just one, that I did...
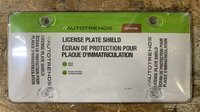
I bought silicon plate mounts on Amazon so the bumper doesn't get scratched. (see post #8 in this thread) They also have raise bosses on them which reduces the amount of "bend" your plate will require when you mount it. Also, they have a black frame around the plate making the finished look neat and tidy. For protection, I went to Canadian Tire and bought a clear cover to add to the plate as well. If you like they also have tinted ones. This is the one I bought and it bent easily with the plate. All plate edges tucked neatly into the black silicon frame.

While your at Canadian Tire, if you want, pick-up 4 Stainless Steel Licence plate screws and some of these black plastic caps for the heads of your screws.

Step 1: If you haven't already removed the front licence plate cover, use a plastic pry tool to gently work it off.
Step 2: If you don't already have 4 holes in your bumper to mount the plate, you need to drill these holes. The size of the dill/hole will depend on the size of your mounting screws. There are raised bosses on the bumper were you need to drill. If it makes you feel any better, you can hold your plate in the appropriate area and mark dead centre on each boss. If you decide you don't want to display your front plate in the future, the cover for this area will hide the 4 holes you have drilled.
Step 3: Work the edges of the silicon frame around the plate (Drainage holes on bottom).
Step 4: Work the edges of the clear plate cover into the silicon frame with the plate. Don't worry about bending anything yet.
Step 5: Attach plate using 2 screws and cap retainers on one side of the plate.
Step 6: Gently push in and HOLD other side of the plate to attach final 2 screws and cap washers. The plate will bend in the middle here and follow the contour of your bumper.
Step 7: Push the decretive black screw caps over screw heads.
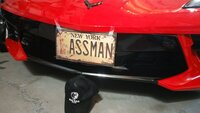
This is the final look...
gone
Power User
If you want to display your front plate in the bumper recess, there are a few different ways to do it. Here is just one, that I did...
I bought silicon plate mounts on Amazon so the bumper doesn't get scratched. (see post #8 in this thread) They also have raise bosses on them which reduces the amount of "bend" your plate will require when you mount it. Also, they have a black frame around the plate making the finished look neat and tidy. For protection, I went to Canadian Tire and bought a clear cover to add to the plate as well. If you like they also have tinted ones. This is the one I bought and it bent easily with the plate. All plate edges tucked neatly into the black silicon frame.
View attachment 44729
While your at Canadian Tire, if you want, pick-up 4 Stainless Steel Licence plate screws and some of these black plastic caps for the heads of your screws.
View attachment 44728
Step 1: If you haven't already removed the front licence plate cover, use a plastic pry tool to gently work it off.
Step 2: If you don't already have 4 holes in your bumper to mount the plate, you need to drill these holes. The size of the dill/hole will depend on the size of your mounting screws. There are raised bosses on the bumper were you need to drill. If it makes you feel any better, you can hold your plate in the appropriate area and mark dead centre on each boss. If you decide you don't want to display your front plate in the future, the cover for this area will hide the 4 holes you have drilled.
Step 3: Work the edges of the silicon frame around the plate (Drainage holes on bottom).
Step 4: Work the edges of the clear plate cover into the silicon frame with the plate. Don't worry about bending anything yet.
Step 5: Attach plate using 2 screws and cap retainers on one side of the plate.
Step 6: Gently push in and HOLD other side of the plate to attach final 2 screws and cap washers. The plate will bend in the middle here and follow the contour of your bumper.
Step 7: Push the decretive black screw caps over screw heads.
This is the final look...
View attachment 44732.
NICE plate; great looking install; but I wonder why you chose that plate name?
Last edited:
I heard he was Jewish. "Bucket OY!!!!!!"...
NICE plate; great looking install; but I wonder why you chose that plate name?Nice of you to provide the advice. I'll know what to do if front plates ever return to Alberta, which is discussed every now and then.
I've always been a Chevy guy, and the Corvette has always been on my Bucket List. That plate was taken so the car became my BUCKET TOY.
This forum has been a tremendous source of information for me. I'm just trying to pay it forward.
I heard he was Jewish. "Bucket OY!!!!!!"...
... and you and I have the high hair hats to prove it!

I went without a front plate for several years on my C6. Got stopped a couple of times and was given warnings. The last stop the officer asked if I had been stopped for no plate before. Although tempted to say no, I fessed up and said yes. It was a bit of a test because he already knew from his on board computer. He gave me a ticket and told me to put the front plate on. He also told me how to report that the plate was on and that the ticket would be cancelled. I had a sense that if I had lied to him he would have been much tougher. I was tempted to go without one on my C7 but the dealer had it installed and I just left it. Haven't decided what to do if my C8 ever arrives but will probably put it on but I'm not sure how.
gone
Power User
Love the name (Bucketoy) even more now with that explanation: a unique handle with personal meaning; well done!
I have not installed my front plate yet. Just keep it in the frunk. I know its a risk but I have certainly passed many a PC with no issues. It would have to be a very slow day for them to bother I think.
Having a conversation with some friends. Remembered that I was pulled over for no front plate in 1981 on the way home from night shift. Pick your battles people. Life can turn the wrong way on a dime...
I had no front plate on my dodge viper for years and then 1 summer i got pulled over and got the ticket. After that I got pulled over 3 more times that summer with 3 more tickets. I had no choice at that point but to mount it. Once they get you, they will continue to as it will pop up on their screen.
But they have to catch me 1stCertainly lots of good info in regards to installing front license plate without using factory bracket. I do like the tinted cover over the license plate, but the legality could be a problem. Just tightening plate thru screws to flex plate looks fine to me, just requires a black frame around license plate and black screws.
Radio... faster-than-rubber.But they have to catch me 1st
In 1985 my now departed father suggested this plate for the 1967 Corvette Roadster I restored. Later it was on my C5 convertible, and will some day be on my 2021 HTC, hopefully in February. And yes, I will be getting a new set of plates before the C8 arrives. This is the second set, and looking a bit ragged.
Attachments
Ok, living near Quebec helps, but in 27 years with no front plates on various cars, I’ve only had 1 ticket.
Ok, living near Quebec helps, but in 27 years with no front plates on various cars, I’ve only had 1 ticket.
I managed 19 years with no front plate on my Mustang Cobra and I was pulled over twice specifically for having been observed with no front plate however after explaining to the cops that it makes the car look ugly, they both let me go with no ticket being issued.
I had two summers now with my Corvette, pulled over once for rapid acceleration and no tickets yet! Ha ha............I'll continue to drive with no front plate. If I'm pulled over, no b.s., I'll state the truth and roll the dice! Ha ha
Remind me not to walk in front of you...
Users who are viewing this thread
Total: 2 (members: 0, guests: 2)

