Looking forward to seeing the progress! Hopefully our Canadian dollar will help out when the summer rush settles down. Great project so far!
Navigation
Install the app
How to install the app on iOS
Follow along with the video below to see how to install our site as a web app on your home screen.
Note: This feature may not be available in some browsers.
More options
Style variation
You are using an out of date browser. It may not display this or other websites correctly.
You should upgrade or use an alternative browser.
You should upgrade or use an alternative browser.
And it begins....Body off
- Thread starter taylorsk8
- Start date
- Thread starter
- #243
I was lucky and I could get it done at work. It is pretty expensive but Commercial Sandblast and Paint could do it. I guess we could do it here to depending on timing. I think our rates are around $315 per hour (includes blast media which is a coal slag). It would take about 1-1/2 to 2 hour if you are doing all the control arms and misc. parts with the frame. I would think under an hour for just the frame. We could get an actual quote though.
T
T
- Thread starter
- #245
Well it has been far to long. I have the vette back into the "work" bay of the shop. Plan to get the pedals finished up and firewall work done tonight. I though I should share why I haven't been working on the vette, beside life in general.
First we added onto our house staring in 2014 finishing last summer.


Also I decided to fix up my old Ranger (after breaking the window by accident!) at the end of 2015. The white is how it was. Red is now. It was in worse shape than the pictures show too:


Plus many other little projects. Anyway...I am hoping to get a lot done on the vette before summer so stay posted!
T
First we added onto our house staring in 2014 finishing last summer.
Also I decided to fix up my old Ranger (after breaking the window by accident!) at the end of 2015. The white is how it was. Red is now. It was in worse shape than the pictures show too:
Plus many other little projects. Anyway...I am hoping to get a lot done on the vette before summer so stay posted!
T
- Thread starter
- #246
I may even get some help!
.jpg")

T
T
Sooooo. My question is now that the truck is up and going, when do we get to go out and get our trucks stuck in the slew? 
Also wondering. How did you pin the new foundation walls to the old walls? Or do they just butt up against each other?
Also wondering. How did you pin the new foundation walls to the old walls? Or do they just butt up against each other?
I look forward to more pics and work done, I like your style.
- Thread starter
- #249
I drilled 6" deep into the old walls for rebar (in the new walls) to go into about every 12" veritcally. Other than that just butted and sealed outside the ICF's with Blueskin. Spray foamed inside although more for insulating.
- Thread starter
- #250
Well got the clutch all figured out after putting many hours into trying to get the Camaro pedal set up to fit and scraping that idea. I had to guess at how much stroke the pedal should have. I based it off my Ranger clutch and adjusted for feel. (educated guess) Feels good while pretending to drive, and I did quite a bit of that. Piggy backed the clutch off the brake pedal shaft just like the stock set up, however I made my own pedal arm and reused the pads (for both brake and clutch) off the camaro pedals. The tricky part was fitting all the Camaro switches to work with the Camaro wiring harness I am planning to reuse. All aligning to the master cylinder (again from the Camaro) running through the stock clutch rod hole in the firewall with a really odd looking adapter to fit it. All in all I am happy with the results. I don't have a finished pic yet due to wanting to put in new bushings when I put it back together. Oh and a couple nice coats of black paint on the parts.


- Thread starter
- #251
Oh and for any interested...I also added a cabin to my home made pontoon boat during the last year.
T
T
That pedal set up looks great!
Also, thanks for explaining the tie in of the new foundation into the old foundation. I figured as much but wasn't sure.
Also, thanks for explaining the tie in of the new foundation into the old foundation. I figured as much but wasn't sure.
- Thread starter
- #253
Well some progress is better than no progress. Got the pedal bushings in and put the pedals back together. Note all the switches for the Camaro wiring.
![20160409_094959[1].jpg](https://data.canadiancorvetteforums.com/attachments/6/6951-ad816cc3491364cd1f34d36ea85d0f70.jpg?hash=rYFsw0kTZM "20160409_094959[1].jpg")
![20160409_095004[1].jpg](https://data.canadiancorvetteforums.com/attachments/6/6952-ebe9867f4c88d456a154511ed08b1c1e.jpg?hash=6-mGf0yI1F "20160409_095004[1].jpg")
![20160409_095115[1].jpg](https://data.canadiancorvetteforums.com/attachments/6/6953-9d9fdecec9b42569503d6bee73f17507.jpg?hash=nZ_ezsm0JW "20160409_095115[1].jpg")
![20160409_095123[1].jpg](https://data.canadiancorvetteforums.com/attachments/6/6954-e6a3fded837fb0986ed2ba2767dd8edf.jpg?hash=5qP97YN_sJ "20160409_095123[1].jpg")
Also got my new poly body mounts so I can do a "real" check on my tunnel clearance.
That's all for now
T
Also got my new poly body mounts so I can do a "real" check on my tunnel clearance.
That's all for now
T
That '73 is going to be one awesome vette when done.....beauty job so far Taylor.....
I also peeked at the house addition -- very nice job.
C.
I also peeked at the house addition -- very nice job.
C.
Nice work on the pedals! They look great! If you need help with the body or anything, let me know!
- Thread starter
- #256
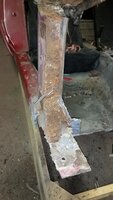
So got some time in the shop on Friday night. Tackled a "big" job. I took the firewall off the birdcage. Big shout out to corvette-restoration.com as I used his experience and documented process to help, especially with rivet locations! I guess it was big because I was nervous about what I was going to find underneath. Luckily, and not usual for this car, it was way better than expected. The lower corners of the birdcage at the windsheild are not rusted through and the pillars look fine. The bottom of the pillars will need some work but I can handle that. Also the top corners of the windsheild mount are rusted but I already knew that. All in all the birdcage looks very usable and I have decided to not go any further in pulling off body panels. I also pulled out the seats and the floor boards look better than I thought they were too! A few holes and cracks but definitely fixable. Here is some pics:


And after a touch of wire wheeling:


Hope I can keep finding time. Getting closer and closer to making it look like a car instead of the opposite!
T
And after a touch of wire wheeling:
Hope I can keep finding time. Getting closer and closer to making it look like a car instead of the opposite!
T
Attachments
NICE WORK T! Nice to find the cage is in good shape. Are you going to POR 15 the cage after the couple repairs or what is your plan for sealing the metal?
Nice skills T.. Impressed.
Graham
Graham
- Thread starter
- #259
Ya paint at a minimum. Probably POR it though. Not sure about where it needs to bond to the firewall, either leave it bare or scratch up the paint?
T
T
Good question. As you've probably already thought about, I guess it depends on the thickness of the por15, (which you already know) and if the por15 sticks as well or better than the bonding agent to the metal and if the bonding agent sticks to the por15, but as you stated, you could scratch up the surface.
If you do the por15, let me know and I can send you some money as I have to por15 the bottoms of the doors on my truck, if you're alright with me borrowing a door bottom's worth of por15.
If you do the por15, let me know and I can send you some money as I have to por15 the bottoms of the doors on my truck, if you're alright with me borrowing a door bottom's worth of por15.
Users who are viewing this thread
Total: 1 (members: 0, guests: 1)