Featured Thread
Very interesting guys.
You want to keep the fuel pump and injectors running up to snuff?
Use Stanadyne Performance formula or now there is Alliant power fuel additive. For those in Edmonton you can get it at GCL Diesel Injection Service. Stick to those two.
Stanadyne Power Products was sold to Clarecor which was then bought out by Racor. Anyone in marine or power gen applications knows Racor.
What you do not want is anything that has alcohol in it or anything that says It makes water disappear. Don't believe me. We can discuss this all you want but logic is what carries the day.
Have doubts about the claims for fuel mileage? I always took it with a grain of salt (bad for blood pressure) but when a guy with a 15L Detroit Diesel swears he gets more mileage per Litre (I know, it is hard to fathom how he gets more miles rather than kilometers but what the hell) and buys it in 5Litre pails I have a tendency to believe him as a real world owner/operator.
Don't bother with all the other crap out on the market as additves. Stick to Stanadyne or Alliant Power.


Richard
Master Trainer - Stanadyne Diesel Systems
Delphi Diesel Products

P.S. I trained about half of Canada on the Stanadyne DS pump, 6.2L-6.5L GM
 
... what I did today ...
During my week-long hunt for the hidden hand-out candy ... :Shrug2:
on this day before ... I finally sold a junky Decorative Halloween Novelty on Kijiji for $20.00
and now celebrating at tiny bit less clutter in our basement storage room (no candy joy there).
Wife will get the $20 bill only if she :Rage: notices something is missing ... along with an ...
"oh sorry, I meant to give this to you honey" :Shy:

... until which time it's $20 toward my "winter add-on fund"
with hope of adding another message in the @ddgermann thread ...
Winter Add Ons :joyful:

and the candy hunt continues ... :Watching:
Need more Candy
Maybe some CCF digital currency
 
Never ever give up the search Spence.
PAY DAY 😁
Oh CRAP 😳
I already tore the storage room apart
and now I’m hearing someone named
“I don’t know” got to them first 😂

Gonna bring out the bribes tomorrow night offer candy or a hot wheels corvette.
For every corvette handed out, I am eating a candy. 😁👍🏻

Oh yes photographic crime scene evidence ....
4C11F96B-6600-488F-9C45-8BD205C381F8.jpeg
 
Last edited:
I spent another day trying to solve problems that apparently nobody else that I talk to has ever experienced before. Clearly, I am talking to the wrong people, but where do you find the people who do know?

My first issue was that I'm trying to install a bathtub that has a threaded drain, into a threaded drainpipe. Sounds pretty simple, doesn't it? I thought so too. I already redid the drainpipe a few weeks ago to get rid of the overflow pipe, and I knew that the new tub was going to use a threaded drain, so I plumbed it accordingly and mounted the flange flush with the floor. As I got the tub upstairs and started to install it, I found that the tub drain does not go to the floor at all. It's 2-5/8" short of even touching the floor, let alone how far it needs to thread in. The brass tailpiece that was included with it isn't much good to me because it is not threaded, and I'm not willing to just let it 'sit' in the drain hole. I thought about just extending the drain pipe up (not just pull it up, but actually plumb it higher), but I came to realize that won't work either because once I thread the tub drain into the drain pipe, I have no way to tighten the bottom nut to seal the bottom layer of the tub which houses the overflow. I'm really not interested in cutting a hole in my kitchen ceiling to get access to that nut from the floor below.

I have been so frustrated with talking to people about this and finding no solutions. I'm not talking about making inquiries at Home Depot or Rona or Home Hardware. I'm talking about plumbing suppliers who claim to be professionals at plumbing like Emco, Wolsely, and Bartle and Gibson. I finally stumbled across an island drain that is designed for exactly this issue. It's not a cheap solution, but it will absolutely solve my problem. I am still going to have to change the plumbing again to accommodate this, but it will also allow me to put a patch in the floor to pretty much completely cover the huge hole that was existing for the previous drain, and had I know about this earlier, it would have allowed me to tile all the way around this drain and made a very pretty drain that no one but me would ever see.

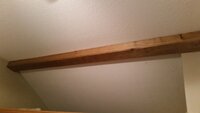
The second issue that I dealt with today revolved around trying to mount a beam box at the peak of a vaulted ceiling. Of course the problem that I am having is that the angles are not 90 degrees (or 45 either), so I can't just use corner brackets or angle brackets. I do have an angle finder, but the space I am working with is too short to allow me to use it. So I'm pretty much guessing and experimenting. I didn't enjoy mathematics in school, and trying to determine the angle of a triangle 3 feet by 15 feet is harder to calculate than I remember. Of course, the length of the rafter is longer than 15 feet because it overhangs to the roof, but I don't know how much. Anyway, I found that short bit of 2x4 cut at 13 degrees looked pretty good. It worked for one side of the box, on the longer side of the peak. I used 2-1/2" screws to mount them through the drywall and into the rafters and the cut edge would give me a decent vertical edge to mount that side of the box to. The other side of the box is closer to the peak, so I cut my bits of 2x4 a fair bit narrower so that they would fit between the peak and the other side, but of course when I ran a screw into it, the piece was too narrow and it just split.

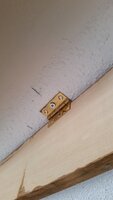
So I wondered long and hard about how I could make an arbitrary angle work in a narrow space, and a solution came to me. Hinges! I could use a 1-3/4" screw to run through the hinge and into the rafter, and a 3/4" screw to run into the plank for the box. The hinges allow the plank to hang at whatever angle I want, and gravity makes it want to hang fairly close to straight. Of course my new solution left me with a problem of needing the screws to run into the plank at the ceiling level and it being a box meant that I had about 5 inches to work in to drive a screw in straight, which I wasn't going to be able to do with my drill or my pneumatic nailgun. I solved that issue with a little 1/4" ratchet handle with a small Robertson bit.

As lame as this story might sound to any of you plumbers and carpenters out there, these were both big deal accomplishments to me today. I very proudly explained my endeavors and solutions to my wife, who nodded and said, "Nice job dear.", and likely understood little or none of it.
 

Attachments

  • 20181030_150828.jpg
    20181030_150828.jpg
    226.2 KB · Views: 10
  • 20181030_212657.jpg
    20181030_212657.jpg
    340.9 KB · Views: 10
  • 20181030_212708.jpg
    20181030_212708.jpg
    372.2 KB · Views: 10
  • 20181030_212731.jpg
    20181030_212731.jpg
    284.6 KB · Views: 10
  • 20181030_212814.jpg
    20181030_212814.jpg
    155.9 KB · Views: 9
I spent another day trying to solve problems that apparently nobody else that I talk to has ever experienced before. Clearly, I am talking to the wrong people, but where do you find the people who do know?
… damn draftsman heh ? … probably owns a Corvette too :angelic:

I am sure admiring your dedication and effort on your Bathroom J :thumbs:
 
Last edited:
  • Like
Reactions: ddgermann
I spent another day trying to solve problems that apparently nobody else that I talk to has ever experienced before. Clearly, I am talking to the wrong people, but where do you find the people who do know?

My first issue was that I'm trying to install a bathtub that has a threaded drain, into a threaded drainpipe. Sounds pretty simple, doesn't it? I thought so too. I already redid the drainpipe a few weeks ago to get rid of the overflow pipe, and I knew that the new tub was going to use a threaded drain, so I plumbed it accordingly and mounted the flange flush with the floor. As I got the tub upstairs and started to install it, I found that the tub drain does not go to the floor at all. It's 2-5/8" short of even touching the floor, let alone how far it needs to thread in. The brass tailpiece that was included with it isn't much good to me because it is not threaded, and I'm not willing to just let it 'sit' in the drain hole. I thought about just extending the drain pipe up (not just pull it up, but actually plumb it higher), but I came to realize that won't work either because once I thread the tub drain into the drain pipe, I have no way to tighten the bottom nut to seal the bottom layer of the tub which houses the overflow. I'm really not interested in cutting a hole in my kitchen ceiling to get access to that nut from the floor below.

I have been so frustrated with talking to people about this and finding no solutions. I'm not talking about making inquiries at Home Depot or Rona or Home Hardware. I'm talking about plumbing suppliers who claim to be professionals at plumbing like Emco, Wolsely, and Bartle and Gibson. I finally stumbled across an island drain that is designed for exactly this issue. It's not a cheap solution, but it will absolutely solve my problem. I am still going to have to change the plumbing again to accommodate this, but it will also allow me to put a patch in the floor to pretty much completely cover the huge hole that was existing for the previous drain, and had I know about this earlier, it would have allowed me to tile all the way around this drain and made a very pretty drain that no one but me would ever see.

The second issue that I dealt with today revolved around trying to mount a beam box at the peak of a vaulted ceiling. Of course the problem that I am having is that the angles are not 90 degrees (or 45 either), so I can't just use corner brackets or angle brackets. I do have an angle finder, but the space I am working with is too short to allow me to use it. So I'm pretty much guessing and experimenting. I didn't enjoy mathematics in school, and trying to determine the angle of a triangle 3 feet by 15 feet is harder to calculate than I remember. Of course, the length of the rafter is longer than 15 feet because it overhangs to the roof, but I don't know how much. Anyway, I found that short bit of 2x4 cut at 13 degrees looked pretty good. It worked for one side of the box, on the longer side of the peak. I used 2-1/2" screws to mount them through the drywall and into the rafters and the cut edge would give me a decent vertical edge to mount that side of the box to. The other side of the box is closer to the peak, so I cut my bits of 2x4 a fair bit narrower so that they would fit between the peak and the other side, but of course when I ran a screw into it, the piece was too narrow and it just split.

So I wondered long and hard about how I could make an arbitrary angle work in a narrow space, and a solution came to me. Hinges! I could use a 1-3/4" screw to run through the hinge and into the rafter, and a 3/4" screw to run into the plank for the box. The hinges allow the plank to hang at whatever angle I want, and gravity makes it want to hang fairly close to straight. Of course my new solution left me with a problem of needing the screws to run into the plank at the ceiling level and it being a box meant that I had about 5 inches to work in to drive a screw in straight, which I wasn't going to be able to do with my drill or my pneumatic nailgun. I solved that issue with a little 1/4" ratchet handle with a small Robertson bit.

As lame as this story might sound to any of you plumbers and carpenters out there, these were both big deal accomplishments to me today. I very proudly explained my endeavors and solutions to my wife, who nodded and said, "Nice job dear.", and likely understood little or none of it.

Well done Jord. Kudos for even attempting to do that work yourself. It took me a lot of years to realize that my math was great but I had inherited none of my Dad's finish carpenter skills, nor any of my uncles plumbing skills.... I'm fine when it comes to using a chainsaw or a big hammer but that's about it. :Beatdeadhorse:
 
Thanks Eric.

This is just two small little puzzles in the grand scheme of what I have been working on here. When I have some more time, I will probably post up a storyline to show you all the rest of this project. It's a big one. Spence has been following along on that other social network. He's seen quite a bit more than the rest of you, so he's a bit more 'in the know'.
 
  • Like
Reactions: YFCvii
It's a big one. Spence has been following along on that other social network

It's my favorite thing that I "tune in to" and makes FB worthy :thumbs: ... but I'm saying nothing about the journey as it's all yours for taking the honors "J" ... I will tease CCF with one awesome thing though and that is the project ....
has required New Tools :Smuggrin:
 
YESSSS!!!! RESURRECTION!!!!

Thank you Michael. I love your stories!

Yes, the C4 was a bit of a mish-mash of engineering design and production cost-savings. It is the unfortunate story of most American cars from the mid-70's until the late 90's. Your 93 has an LT1 so it is good power and really decent handling, but has a hard ride. Mag-ride suspension was still being developed, so yours unfortunately does not have it. Unfortunately, nothing that you put that low profile of tires on is going to have a nice ride in that day and age.

But it IS fun though, isn't it? Don't lie to us. It has a bit of gumption when you step into it, doesn't it?
 
......thanks Jeremiad . I don't know what mag ride is so can't comment on that. Is it a rough rider, yes it is . Engineering mistakes, it has many, really disappointed in how some of it is made compared to the older cars. As far as power, it does have some but I never floored it to know what it can do as that does not draw me to any car and I don't abuse anything I own. I can tell in the city that it can be abit of a toy to play in but that is not the place to show off my opinion. On the highway it is kinda like a fat old cow , slow handling and wide in stance looking at the hood compared to my Crossfire 82. The wind noise is crazy, I have to take the doors apart again ( 5th time ) and try move the glass to seal against the new weatherstripping better. I've been slotting out the adjustment holes but these flimsy plastic doors are not solid and just bend when the motor pushes up against the stoppers. Ear plugs are probably the best solution. I don't like the guage lay out either. The place I like to have the wheel tilted down at kinda blocks the view of all 4 guages on the right side , so it is drive with the wheel up or drive more comfortable but can't see the guages. The digital speedo is hard to see at times cause of the drabby color. And I really hate the sunvisors as when the sun is on your left side and you struggle to flip the thing to the side, it still has almost a 2" gap on top not blocking out the sun so is mostly useless. And going east or south in the morning like my one hour trip drive to Saskatoon, the reflection on the inside of the windshield shows the complete dash pad and is very distracting , if I hold my hand on top of the wheel I can read the time on my wrist watch no problem near the top of the windshield. Really have to watch the road cause it blocks alot of visibility. The glass is wrong angle, the dash pad is too shiney.......very poor design my opinion. And that controll for the heat / AC is another dumb creation. Some other things that are not great either but it does have some good features too. But overall it is the worst car I ever owned and I can say 4 sure I will never buy a newer one than this . I tell it as it is . If I can't fix it I don't want it , and the newer stuff is out of my league both mechanically and I don't like the looks of them either. I really like my 82 . I know I'm the only guy on here that degrades his car , but you have to put up with my posts whenever I tell another story. Oh, Rosie is good on gas, I just did a 504 km test combined highway and a little city , it made 29.7 mpg on co-op premium, that I can not complain about.

Duct tape the glass to the window frame will reduce that wind noise.... sit on a pillow and look over the wheel to see the gauges..... glue a 2" piece of cardboard to the top of the sun visor to block the gap...glue a piece of black fabric on the dash to reduce the glare...I'm not familiar with the AC/heat control or could probably offer a fix for that too Michael.... ;)
 
Well, good on you for enjoying the 82, and that is a fine looking Merc as well, I do like that color, even if it isn't right.

I finally fired up the old TA today and moved it off the street so that they could sweep. Yay, spring!
 
  • Like
Reactions: YFCvii
Wrapped up full-circle teaching my Daughter to do her first ever tax return ...
all of it the old school pencil way as one's first (initial return) has to be mailed.
Now we get to do all the automated stuff like linking to a bank account and what not.
We also get to submit electronically next year now that this one is done.
She is all for the electronic method as this hand written initial tax return was just way too much work for ... 🤣
4D5264F8-7AC4-4DB0-84F9-91B360981515.jpeg
But that’s $3 that is not entitled to and away from the hands of the Federal Government. 👍🏻
... That’s the real lesson I’m sure most will agree.

Now to find a $3 frame to display her first "refund" on the wall as we are not going to the bank
with it but rather eDeposit the cheque so that she can keep it. 🤣
 
Last edited:
Old Thread: Hello . There have been no replies in this thread for 100 days.
Content in this thread may no longer be relevant.
Perhaps it would be better to start a new thread instead.

Users who are viewing this thread