I will say you are definitely no Dave Kindig when it comes to drawing, much better than me I can't draw a stick man. I like what you are doing to your ride you have a lot of thought into your project. I am excited to see the finished project. Please keep us posted and the pics coming. I have a C6 now but had and loved a 74 white C3 that my son in law bought which means it is not totally gone. Love working on that far cause I can.Hey guys,
Hope everyone is doing ok inspite of Covid right now.
It's that time of the year again and I've decided to do one last winter project thread this year. One last hurrah before I've completely finished my Corvette. I don't know if I'll ever truely be done with this car but I may leave it alone after this year and finish saving for a house and maybe a new project car to give my Corvette some company.
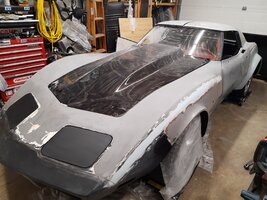
This winter I've decided to paint my car. I'll also be doing some body modifications that will keep the spirt of the 77 Corvette but will make it look meaner and cleaner. The way I think GM could have designed it if it weren't for crash regulations.
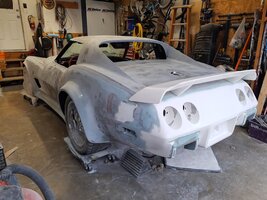
With that being said I will be making the front bumper-ettes flush with the bumper. I will also be adding a turbo high rise hood but I will likely be glassing in the NACA ducts. Next I've ordered some 2.5" flared quarter panels that retain the same lines. Lastly I've ordered a new fiberglass rear bumper and I will be opening up the bumperettes and widening them to run the exhaust through them. I got some dual double walled 3.5" exhaust tips. It should make the rear end look a lot cleaner than it does now. Then I'll be replacing the pudgy C3 rear lettering with the lettering from a C5 corvette. Hopefully all of those changes will help it to look a bit wider and cleaner.
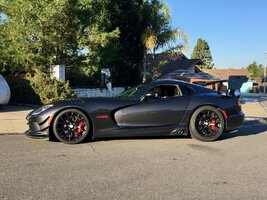
Once I'm done with the body work I'll epoxy primer the body, fill, then apply a 2k high build primer and sand that down. Once that's all done I have a buddy who has an enclosed trailer so we'll load it up and take it to the body shop for the rest of the painting. I'll likely be going with a dodge viper gunmetal pearl or some dark silver that flashes bright silver in the light.
In addition to painting the car I'm also getting a new custom aluminum fuel tank that will be baffled, and have an in tank fuel pump. It'll also be around 25 gallons replacing the small 17 gallon tank. I'll also be going with some flow forged wheels with 275/35/19 up front and 315-325/30/19 in the rear and I'll be installing a keyless entry remote.
If I have time I have some other little ideas but these are my plans right now. Here are some sketches I did of what my car will hopefully look like. I'll keep this thread updated on my progress this winter.
Navigation
Install the app
How to install the app on iOS
Follow along with the video below to see how to install our site as a web app on your home screen.
Note: This feature may not be available in some browsers.
More options
Style variation
You are using an out of date browser. It may not display this or other websites correctly.
You should upgrade or use an alternative browser.
You should upgrade or use an alternative browser.
Final Winter Project 2020-2021
- Thread starter Jr. Corvette
- Start date
- Thread starter
- #42
Hey guys,
Just a little update this week.
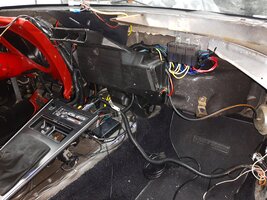
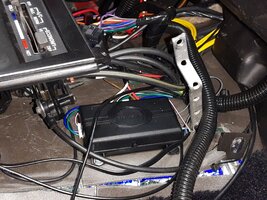
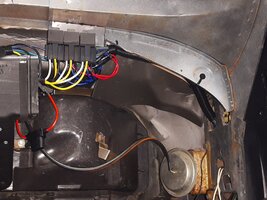
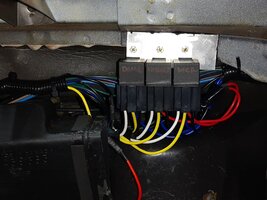
I installed my alarm system this week. I had to wire in the door locks then wire up the alarm system to the factory horn, exterior lights, interior lights, and antenna. I also had to wire up a relay so that my alarm system can activate the relay which will turn the dome lights on upon unlocking the car, as well two other relays for lock and unlock. I have very little room under the dash so in order to mount the relays I cut a piece of aluminum and epoxied it into place. This spot for the relays also works perfectly with the air duct that runs across there and doesn't obstruct it at all.
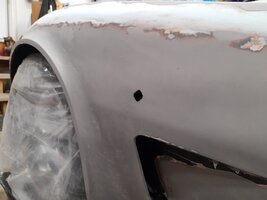
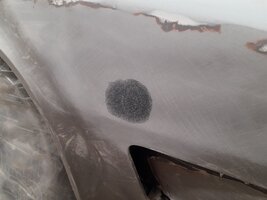
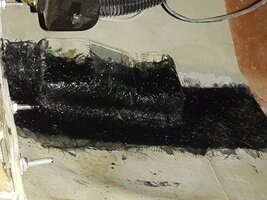
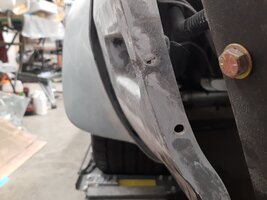
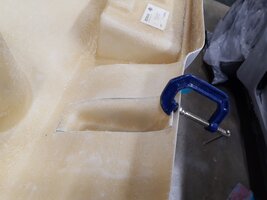
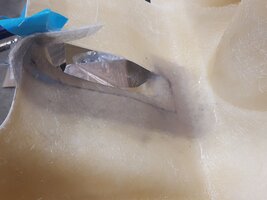
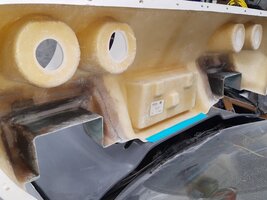
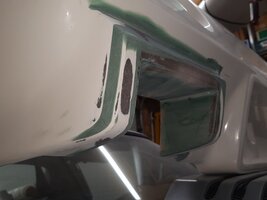
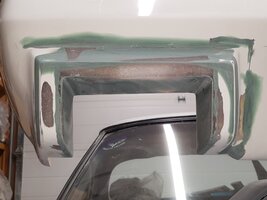
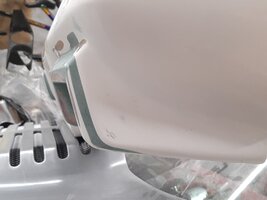
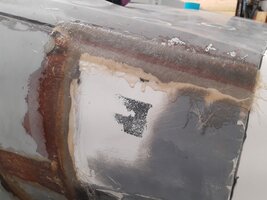
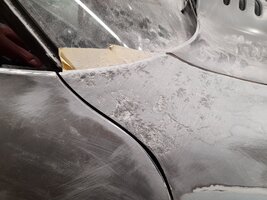
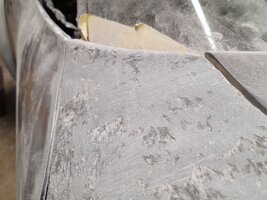
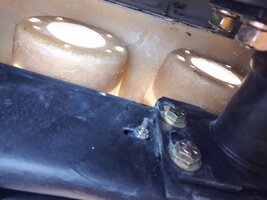
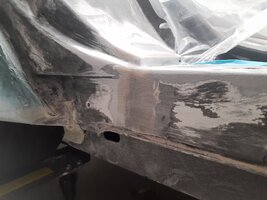
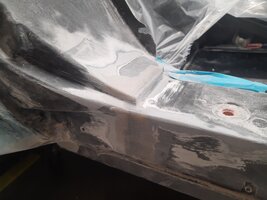
My initial plan was to retain the factory front fender alarm. However after I removed the lock, so that I could strip the paint, one of the contacts broke on the cylinder which would have been very difficult to properly repair. In addition to that my dad was looking at the broken lock and noticed that the key didn't even work. It's probably for the best as the lock is so obtrusive. So, I grooved out the fiberglass around the hole and laid three layers of 1.5oz fiberglass mat and sanded it flat.
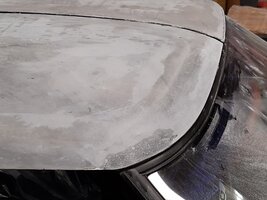
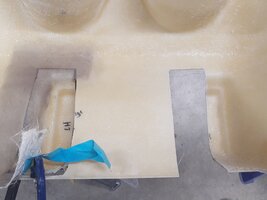
I also added a few more layers of fiberglass to my T-top and then contoured it to match the other T-top. It's not perfect yet but very close. I also sanded down the ridge along the front of the T-tops to finish the trim delete and give it a smooth look.
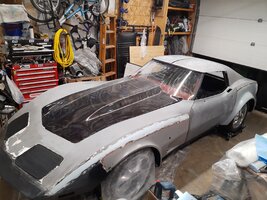
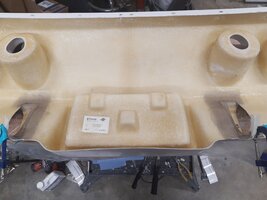
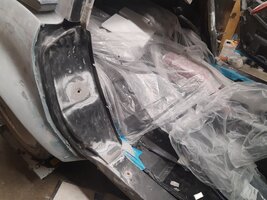
I also finished the paint stripping and removed almost all of the interior panels. That wasn't my initial plan either but I had to remove a lot of them to wire in the alarm so I figured I'd just keep them out.
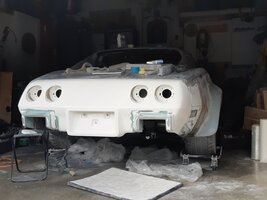
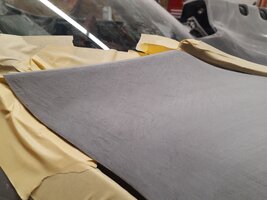
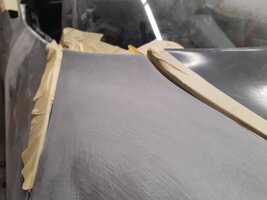
That's about all for this week. I'm starting to apply my first layer of reinforced long strand fiberglass filler to the car. I'm starting at the bumper and working my way back from there. I should have the front half of the car done sometime next week.
Just a little update this week.
I installed my alarm system this week. I had to wire in the door locks then wire up the alarm system to the factory horn, exterior lights, interior lights, and antenna. I also had to wire up a relay so that my alarm system can activate the relay which will turn the dome lights on upon unlocking the car, as well two other relays for lock and unlock. I have very little room under the dash so in order to mount the relays I cut a piece of aluminum and epoxied it into place. This spot for the relays also works perfectly with the air duct that runs across there and doesn't obstruct it at all.
My initial plan was to retain the factory front fender alarm. However after I removed the lock, so that I could strip the paint, one of the contacts broke on the cylinder which would have been very difficult to properly repair. In addition to that my dad was looking at the broken lock and noticed that the key didn't even work. It's probably for the best as the lock is so obtrusive. So, I grooved out the fiberglass around the hole and laid three layers of 1.5oz fiberglass mat and sanded it flat.
I also added a few more layers of fiberglass to my T-top and then contoured it to match the other T-top. It's not perfect yet but very close. I also sanded down the ridge along the front of the T-tops to finish the trim delete and give it a smooth look.
I also finished the paint stripping and removed almost all of the interior panels. That wasn't my initial plan either but I had to remove a lot of them to wire in the alarm so I figured I'd just keep them out.
That's about all for this week. I'm starting to apply my first layer of reinforced long strand fiberglass filler to the car. I'm starting at the bumper and working my way back from there. I should have the front half of the car done sometime next week.
Attachments
-
 IMG_20210104_163437304.jpg528.5 KB · Views: 120
 -
 IMG_20210105_164419136.jpg764.9 KB · Views: 108
 -
 IMG_20210105_155847212.jpg758.7 KB · Views: 97
 -
 IMG_20210105_155823291.jpg567.6 KB · Views: 90
 -
 IMG_20210103_203539118.jpg888.3 KB · Views: 96
 -
 IMG_20210103_203618961.jpg939.6 KB · Views: 84
 -
 IMG_20210112_222749341.jpg1 MB · Views: 80
 -
 IMG_20210112_222815316.jpg874.7 KB · Views: 72
 -
 IMG_20210112_223019310.jpg754 KB · Views: 78
 -
 IMG_20210112_223037430.jpg658.2 KB · Views: 87
Last edited:
Y
YFCvii
Awesome to read your update & keep it coming my friend 
Sharing this Winter Project of yours is definitely helping those feeling isolated
and who are trying really very hard to detox away from CNN (etc) at this time
Sharing this Winter Project of yours is definitely helping those feeling isolated
and who are trying really very hard to detox away from CNN (etc) at this time
- Thread starter
- #44
Hey guys!
Lots has happened over the past couple weeks so let's dive into it!
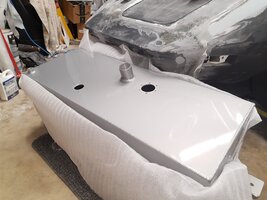
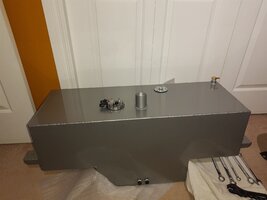
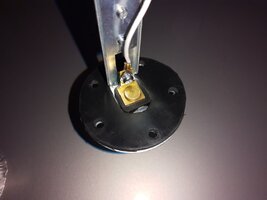
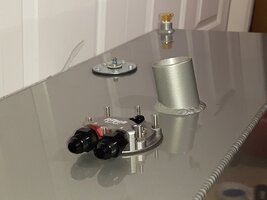
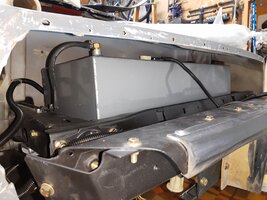
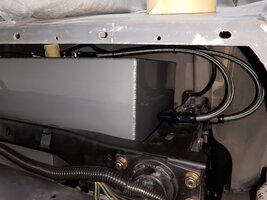
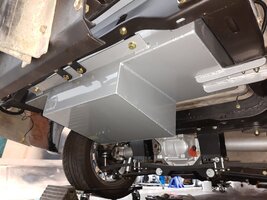
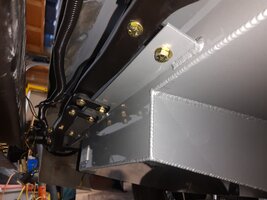
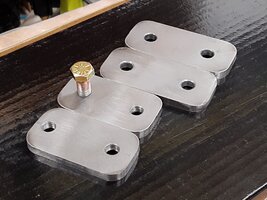
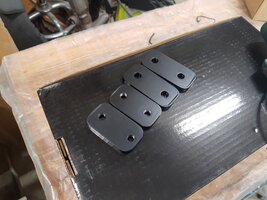
I got my gas tank back from being powder coated and I absolutely love it. I got it coated in a slightly darker and flatter grey then my drivetrain to make it stand out and also got a clear powder coat over the color to really make it pop. I had to clean up the powder coating by the fittings and openings so that nothing fell into the tank while I was installing everything. Once that was done my parents let me wash out the tank in my bathtub which was quite the workout. Spent about an hour filling the tank, shaking and sloshing it around, then dumping it out. Once I got it washed out, I let it dry overnight and finished drying it with a blow dryer. I then setup and installed my FiTech in tank fuel pump, all my fittings, and the level sender. When I took the sendor out, the cork gasket ripped slightly so I made a new gasket out of neoprene rubber. When I was all done assembling the tank I needed to make up some PTFE lines from the tank to the frame and from the FiTech to the frame. After that was done I partially installed the tank and finished making some custom mounts for the rear of the tank. I ended up altering these mounts after I painted them to more easily install the tank. You can't see it very well in the pictures but I isolated the entire tank with some neoprene rubber on the sides and little rubber bushings on the rear mounts.
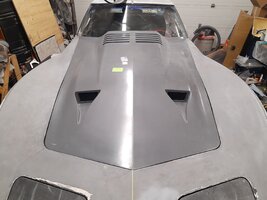
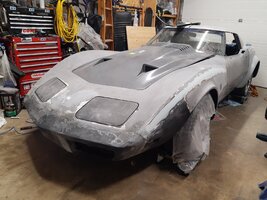
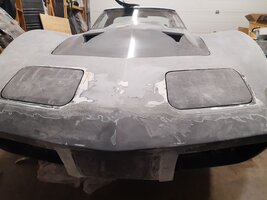
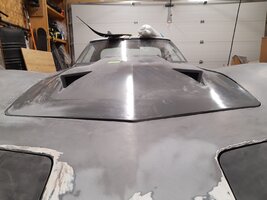
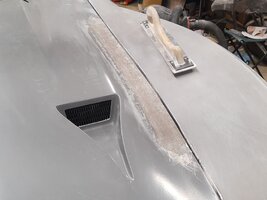
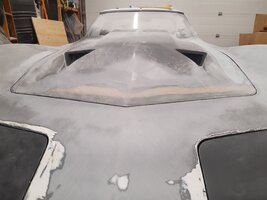
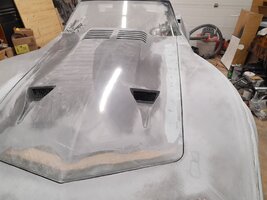
I finally got my hood after waiting since Oct 8th! My dad and I put the hood on this weekend and got it as closely aligned as possible. I was planning on deleting the NACA ducts but I really like the look of them. Plus it'll bring some colder air into the engine bay and get that hot air outta there. They did cause some problems over the radiator and I had to remove my fan shroud trim piece. My air cleaner also hits now so I'll either have to take off my 1" carb spacer and maybe try a 0.5", or I'll have to go from my 4" air filter to a 3". The new hoods also aren't clearanced like the factory hoods around the radiator so I had to carve out a little hole in the hood frame because the corner of the radiator was hitting it.
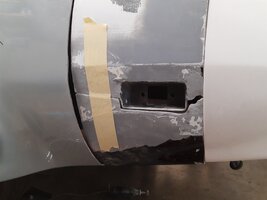
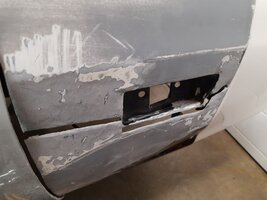
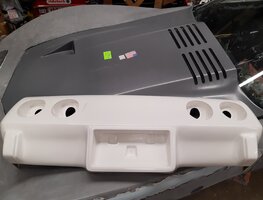
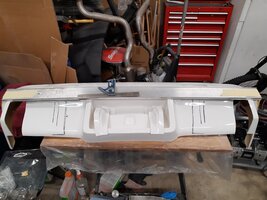
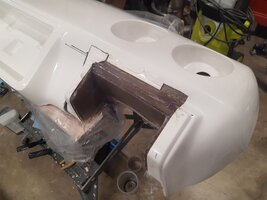
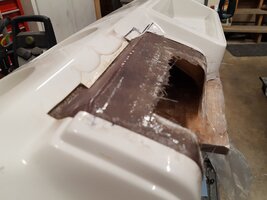
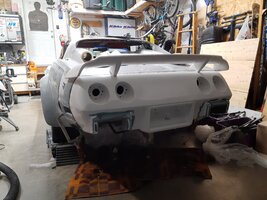
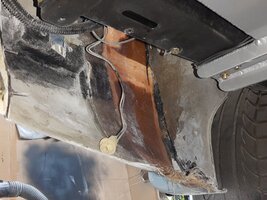
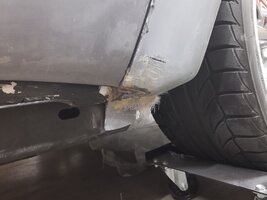
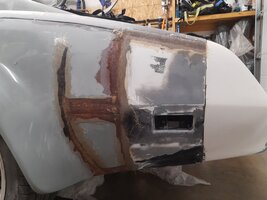
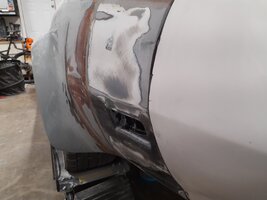
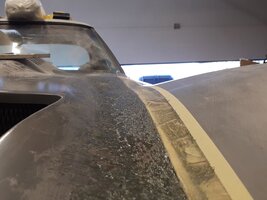
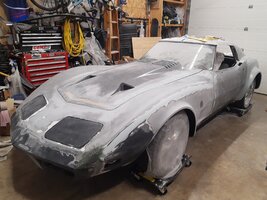
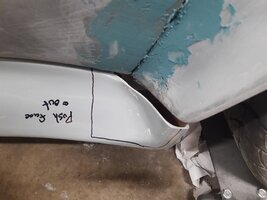
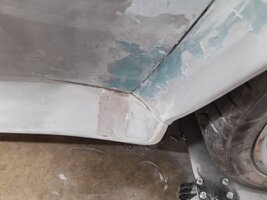
Next I got my new fiberglass bumper so I test fit it into place. It actually lined up perfectly on passenger side and the driver side was only out by an 1/8" at most. There was one big issue. It looks like the previous owner got hit slightly on the driver side quarter. Judging by the damage it looks like a parking lot bump but it broke the fiberglass. Instead of cutting out the damage and fiberglassing the section back on, they just filled over the area with some panel adhesive.... Needless to say they screwed up the panel and it didn't match the bumper at all. So I cut the panel off where it was broken, cleaned up the edges, bolted it to the bumper so it matched the lines, then fiberglassed it back into place. It's not perfect yet as it needs a layer of long strand fiberglass filler to get the final shape but it lines up now and is extremely strong. I still have to fiberglass the new quarters to this section so once that's done I can make it look pretty.
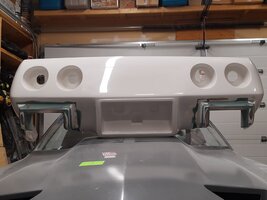
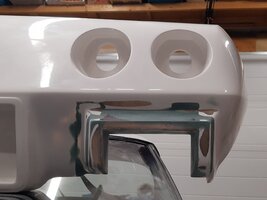
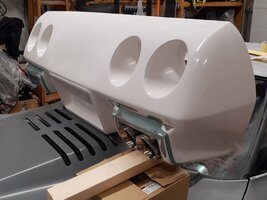
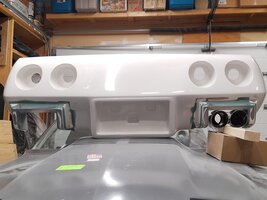
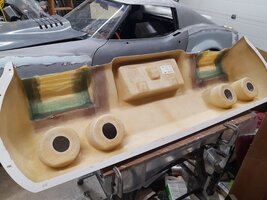
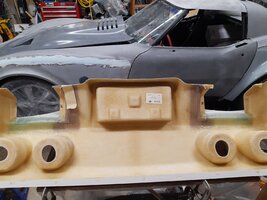
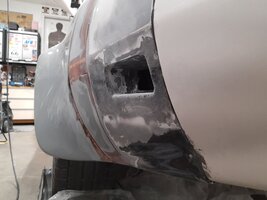
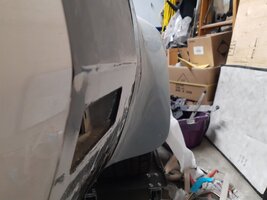
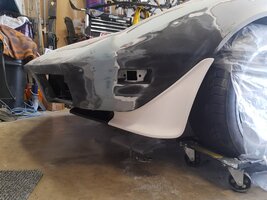
Next I took the bumper off and started one of my most ambitious projects yet. I cut off half of the bumperettes and moved them over 10.25". This was part of my redesign so that I can run my dual tips through the bumper giving it a smoother, beefier look. I just did this work today so I don't have a ton of pictures. I should finish the bumper by the end of the week and I will post some pictures once it's done.
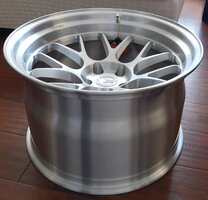
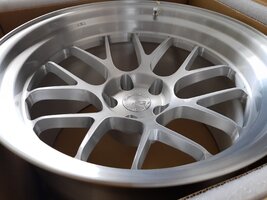
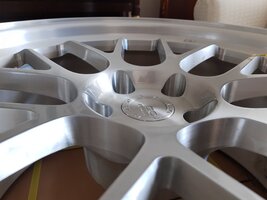
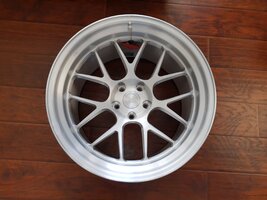
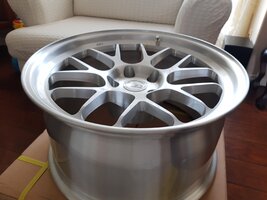
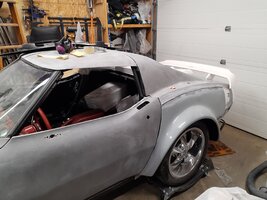
I've saved the best for last. I got my new wheels on Friday!!! BC forged wheels, powder coated clear. I am so happy with how they look and they're going to have a great flop against the new dodge viper gunmetal pearl.
Lots has happened over the past couple weeks so let's dive into it!
I got my gas tank back from being powder coated and I absolutely love it. I got it coated in a slightly darker and flatter grey then my drivetrain to make it stand out and also got a clear powder coat over the color to really make it pop. I had to clean up the powder coating by the fittings and openings so that nothing fell into the tank while I was installing everything. Once that was done my parents let me wash out the tank in my bathtub which was quite the workout. Spent about an hour filling the tank, shaking and sloshing it around, then dumping it out. Once I got it washed out, I let it dry overnight and finished drying it with a blow dryer. I then setup and installed my FiTech in tank fuel pump, all my fittings, and the level sender. When I took the sendor out, the cork gasket ripped slightly so I made a new gasket out of neoprene rubber. When I was all done assembling the tank I needed to make up some PTFE lines from the tank to the frame and from the FiTech to the frame. After that was done I partially installed the tank and finished making some custom mounts for the rear of the tank. I ended up altering these mounts after I painted them to more easily install the tank. You can't see it very well in the pictures but I isolated the entire tank with some neoprene rubber on the sides and little rubber bushings on the rear mounts.
I finally got my hood after waiting since Oct 8th! My dad and I put the hood on this weekend and got it as closely aligned as possible. I was planning on deleting the NACA ducts but I really like the look of them. Plus it'll bring some colder air into the engine bay and get that hot air outta there. They did cause some problems over the radiator and I had to remove my fan shroud trim piece. My air cleaner also hits now so I'll either have to take off my 1" carb spacer and maybe try a 0.5", or I'll have to go from my 4" air filter to a 3". The new hoods also aren't clearanced like the factory hoods around the radiator so I had to carve out a little hole in the hood frame because the corner of the radiator was hitting it.
Next I got my new fiberglass bumper so I test fit it into place. It actually lined up perfectly on passenger side and the driver side was only out by an 1/8" at most. There was one big issue. It looks like the previous owner got hit slightly on the driver side quarter. Judging by the damage it looks like a parking lot bump but it broke the fiberglass. Instead of cutting out the damage and fiberglassing the section back on, they just filled over the area with some panel adhesive.... Needless to say they screwed up the panel and it didn't match the bumper at all. So I cut the panel off where it was broken, cleaned up the edges, bolted it to the bumper so it matched the lines, then fiberglassed it back into place. It's not perfect yet as it needs a layer of long strand fiberglass filler to get the final shape but it lines up now and is extremely strong. I still have to fiberglass the new quarters to this section so once that's done I can make it look pretty.
Next I took the bumper off and started one of my most ambitious projects yet. I cut off half of the bumperettes and moved them over 10.25". This was part of my redesign so that I can run my dual tips through the bumper giving it a smoother, beefier look. I just did this work today so I don't have a ton of pictures. I should finish the bumper by the end of the week and I will post some pictures once it's done.
I've saved the best for last. I got my new wheels on Friday!!! BC forged wheels, powder coated clear. I am so happy with how they look and they're going to have a great flop against the new dodge viper gunmetal pearl.
Attachments
-
 IMG_20210115_191553098.jpg821.8 KB · Views: 71
 -
 IMG_20210117_162444518.jpg675.1 KB · Views: 73
 -
 IMG_20210117_154310905.jpg397.4 KB · Views: 69
 -
 IMG_20210117_162638867.jpg547.4 KB · Views: 76
 -
 IMG_20210119_155310326.jpg825 KB · Views: 72
 -
 IMG_20210119_155337519.jpg643.7 KB · Views: 69
 -
 IMG_20210120_164407796.jpg756.2 KB · Views: 70
 -
 IMG_20210120_164427743.jpg635.1 KB · Views: 66
 -
 IMG_20210118_184307562.jpg651.6 KB · Views: 66
 -
 IMG_20210120_140229067.jpg835.7 KB · Views: 74
 -
 IMG_20210124_222813294.jpg707.6 KB · Views: 74
 -
 IMG_20210124_222830271.jpg848 KB · Views: 69
 -
 IMG_20210124_222854864.jpg669.3 KB · Views: 69
 -
 IMG_20210124_222836281.jpg837.1 KB · Views: 69
 -
 IMG_20210122_165729043.jpg564.9 KB · Views: 71
 -
 IMG_20210122_164639275.jpg693.1 KB · Views: 70
 -
 IMG_20210122_175259264.jpg575.5 KB · Views: 63
 -
 IMG_20210124_222708464.jpg874.6 KB · Views: 59
 -
 IMG_20210124_222733430.jpg647 KB · Views: 70
 -
 IMG_20210124_145135295.jpg431.2 KB · Views: 58
 -
 IMG_20210124_153702164.jpg634.8 KB · Views: 61
 -
 IMG_20210124_162047586.jpg693.3 KB · Views: 62
 -
 IMG_20210124_162052724.jpg614.7 KB · Views: 70
 -
 IMG_20210124_222036823.jpg700.3 KB · Views: 57
 -
 IMG_20210124_222051028.jpg517.3 KB · Views: 61
 -
 IMG_20210124_222112347.jpg562.5 KB · Views: 70
 -
 IMG_20210122_141321084.jpg543.1 KB · Views: 62
 -
 IMG_20210122_151343490.jpg691.6 KB · Views: 66
 -
 IMG_20210122_143147800.jpg535.2 KB · Views: 65
 -
 IMG_20210122_141309490.jpg768.4 KB · Views: 64
 -
 IMG_20210122_143123074.jpg560.6 KB · Views: 83
Hey Cody, nice choice on tank, wheels and hood. It's a shame that tank will be hidden. Maybe it should be bolted on the rear deck to show it off.  kidding! Fantastic work as usual. Your ride will be art on wheels my friend and will definitely look sleek with a touch of sinister. Keep the pictures coming. I am hoping you will be able to join on the RMCC. Take care and stay safe.
kidding! Fantastic work as usual. Your ride will be art on wheels my friend and will definitely look sleek with a touch of sinister. Keep the pictures coming. I am hoping you will be able to join on the RMCC. Take care and stay safe.
R
RockyPM
Amazing work Cody! Your car is coming together and to have your abilities to repair the fiberglass is impressive. Looking forward to seeing the car completed and the smile on your face.
- Thread starter
- #47
Hi guys!
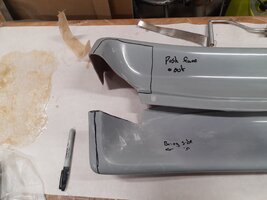
So it took a little longer than I thought but I finished the bumper!
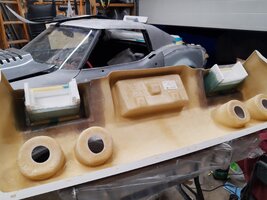
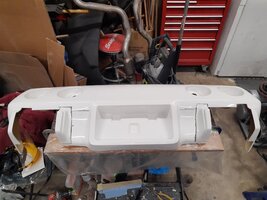
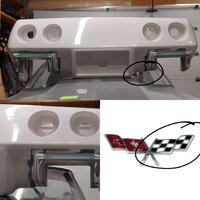
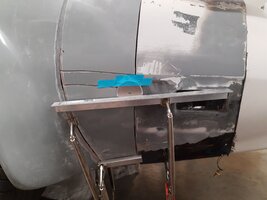
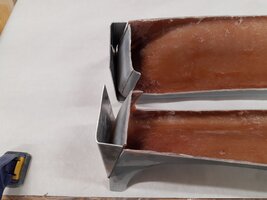
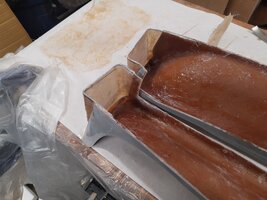
After I glassed the cut halves of the bumperettes over, I made a mold using two pieces of steel and some parchment paper and glassed the top of the exhaust exits. Then I trimmed the fiberglass and made another mold using masking and packing tape then glassed the front of the exhaust exit. Finally I made a third mold using styrofoam to get the shape of the inside of the exhaust exits. Once that was all done I applied some short strand filler to get the shape. I am extremely happy with how this bumper came out. It's just like I imagined it. One little touch that will go largely unnoticed is the double bump on each side, on the bottom of the bumper. I designed this after the closed flags emblem (see picture below).
After the bumper was all done I epoxied it in place. After that I marked the location of the new wing, drilled some holes, and mounted it in place. It's starting to look really close to my concept drawing.
Next I'm going to finish fiberglassing the quarter panels. I have to do a bit of work in this area as the new flared fenders have the wrong body lines and are missing some details.
So it took a little longer than I thought but I finished the bumper!
After I glassed the cut halves of the bumperettes over, I made a mold using two pieces of steel and some parchment paper and glassed the top of the exhaust exits. Then I trimmed the fiberglass and made another mold using masking and packing tape then glassed the front of the exhaust exit. Finally I made a third mold using styrofoam to get the shape of the inside of the exhaust exits. Once that was all done I applied some short strand filler to get the shape. I am extremely happy with how this bumper came out. It's just like I imagined it. One little touch that will go largely unnoticed is the double bump on each side, on the bottom of the bumper. I designed this after the closed flags emblem (see picture below).
After the bumper was all done I epoxied it in place. After that I marked the location of the new wing, drilled some holes, and mounted it in place. It's starting to look really close to my concept drawing.
Next I'm going to finish fiberglassing the quarter panels. I have to do a bit of work in this area as the new flared fenders have the wrong body lines and are missing some details.
Attachments
-
 IMG_20210206_212001356.jpg499.7 KB · Views: 71
 -
 IMG_20210206_212019228.jpg433.8 KB · Views: 58
 -
 IMG_20210206_212915442.jpg568.1 KB · Views: 62
 -
 IMG_20210206_212901178.jpg542.4 KB · Views: 65
 -
 IMG_20210206_212422678.jpg671.5 KB · Views: 65
 -
 IMG_20210206_212401910.jpg419.1 KB · Views: 68
 -
 IMG_20210206_212239701.jpg564.3 KB · Views: 61
 -
 IMG_20210206_212056028.jpg513.6 KB · Views: 70
 -
 IMG_20210130_233447911.jpg528.2 KB · Views: 70
 -
 IMG_20210130_175558059.jpg592 KB · Views: 68
 -
 IMG_20210129_133011253.jpg494.4 KB · Views: 66
 -
 IMG_20210128_212449027.jpg756.7 KB · Views: 61
 -
 IMG_20210125_223348565.jpg737.5 KB · Views: 64
 -
 IMG_20210125_205851104.jpg679 KB · Views: 71
 -
 IMG_20210208_205231177.jpg853 KB · Views: 67
 -
 IMG_20210208_205236133.jpg898.7 KB · Views: 71
 -
 IMG_20210208_205259048.jpg733 KB · Views: 63
 -
 IMG_20210209_203455~2.jpg205.7 KB · Views: 58
Wow just doesn't do it or you justice anymore...but WOW anyway...Hi guys!
So it took a little longer than I thought but I finished the bumper!
After I glassed the cut halves of the bumperettes over, I made a mold using two pieces of steel and some parchment paper and glassed the top of the exhaust exits. Then I trimmed the fiberglass and made another mold using masking and packing tape then glassed the front of the exhaust exit. Finally I made a third mold using styrofoam to get the shape of the inside of the exhaust exits. Once that was all done I applied some short strand filler to get the shape. I am extremely happy with how this bumper came out. It's just like I imagined it. One little touch that will go largely unnoticed is the double bump on each side, on the bottom of the bumper. I designed this after the closed flags emblem (see picture below).
After the bumper was all done I epoxied it in place. After that I marked the location of the new wing, drilled some holes, and mounted it in place. It's starting to look really close to my concept drawing.
Next I'm going to finish fiberglassing the quarter panels. I have to do a bit of work in this area as the new flared fenders have the wrong body lines and are missing some details.
Awesome mods. Very similar as the 68-72 Vettes are for exhaust panel.
R
RockyPM
We are watching a creative artist at work. Thanks for bringing us along your journey through this update/modernization of a classic!
I got to this post late and felt like I just binge watched Season One and Two, and next Season is months away. I can't wait.
Amazjng work, Cody! You are very talented and committed!
Amazjng work, Cody! You are very talented and committed!
- Thread starter
- #52
Hey guys,
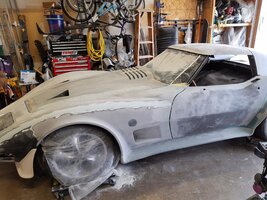
Well it's been a while since I've posted and there hasn't been huge progress, just lots of fiberglass. It all looks pretty rough right now but it has to get uglier before it gets better.
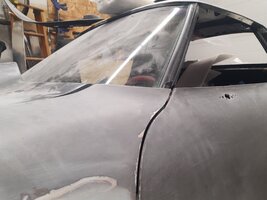
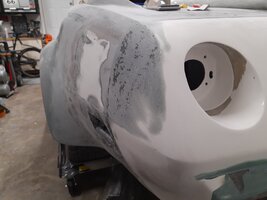
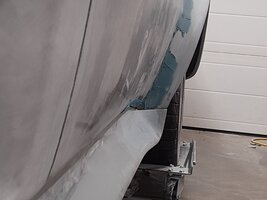
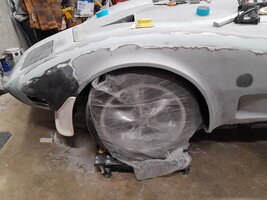
I'm getting close to finishing my rear quarter panels. There was a gap about an inch wide between the end of the flared quarter panel and the small section of the original quarter. Originally I was just going to clamp the panel and glass it in place but it took about 20lbs of force to close the gap and I was worried that glassing a panel under stress could create big problems down the road. Another issue was the fact that the body line of the flared quarters was an inch lower than the factory line. This wasn't a mistake I made when I attached the quarters as I literally couldn't lift the quarters up any higher because of the splash guards. The bottoms of the panels also line up perfectly so I know I placed it properly it was just poorly made. So to correct these two problems I cut the flared panel about halfway up and I scored the quarter on the existing body line and where the body line should be. That allowed me to alter the body line and move the quarter so everything lined up. Once that was done I glassed the backside of the quarter and then grooved and glassed the front. While I was grooving the front I also grooved the remaining seem between the quarter and the rear deck so I could fiberglass the seem to stop any cracking. The driver's side is all done, I just have to sand it down and fill any low spots. I still have to glass the outside of the passenger quarter.
I also spent 4 hours trying to align my new hood. It fits great along the passenger side and sits fairly flush at the front and rear on the drivers side but right in the middle of the hood on the driver's side it sits a 1/4" low! On top of that I noticed that the manufacturer installed RH grill 90 degrees off so the diamond grill runs horizontally instead of vertically. They also made a mess of the epoxy which I will have to fix. The manufacturer is sending a replacement grille which I will have to cut out and epoxy in... Nothing like paying extra for an under hood finish and the finish is crappy. Anyway, I've layed down five layers of glass to build up the hood but I'm still between a 1/16" and 3/16" low so I will have to lay more glass or build it up with long strand filler. Fiberglass is a more correct fix to me but filler can allow me to get the contour closer without a bunch of sanding.
One other problem I've dealt with is the quarter panel has a different profile then the door. So the body line of the bottom of the door runs into the quarter and it doesn't look proper. So I've cut out a little notch in the quarter so the body line carries on into it. I've glassed up this notch and will smooth it out but I think it looks a lot better.
One top of those things I've also fitted the front valance which required me to shave an 1/8" off the front RH side to get it to sit properly. I've also sanded down top of the door so that it aligns with the top of the fender. It's still not perfect yet but a lot closer then it was.
So I'll be finishing up the hood over the next week or so as well as he quarters and then hopefully I can start making some molds for the side skirts. I also have some Morimoto lights coming in and I'll be modifying them to make some one of kind tail lights!!!
Well it's been a while since I've posted and there hasn't been huge progress, just lots of fiberglass. It all looks pretty rough right now but it has to get uglier before it gets better.
I'm getting close to finishing my rear quarter panels. There was a gap about an inch wide between the end of the flared quarter panel and the small section of the original quarter. Originally I was just going to clamp the panel and glass it in place but it took about 20lbs of force to close the gap and I was worried that glassing a panel under stress could create big problems down the road. Another issue was the fact that the body line of the flared quarters was an inch lower than the factory line. This wasn't a mistake I made when I attached the quarters as I literally couldn't lift the quarters up any higher because of the splash guards. The bottoms of the panels also line up perfectly so I know I placed it properly it was just poorly made. So to correct these two problems I cut the flared panel about halfway up and I scored the quarter on the existing body line and where the body line should be. That allowed me to alter the body line and move the quarter so everything lined up. Once that was done I glassed the backside of the quarter and then grooved and glassed the front. While I was grooving the front I also grooved the remaining seem between the quarter and the rear deck so I could fiberglass the seem to stop any cracking. The driver's side is all done, I just have to sand it down and fill any low spots. I still have to glass the outside of the passenger quarter.
I also spent 4 hours trying to align my new hood. It fits great along the passenger side and sits fairly flush at the front and rear on the drivers side but right in the middle of the hood on the driver's side it sits a 1/4" low! On top of that I noticed that the manufacturer installed RH grill 90 degrees off so the diamond grill runs horizontally instead of vertically. They also made a mess of the epoxy which I will have to fix. The manufacturer is sending a replacement grille which I will have to cut out and epoxy in... Nothing like paying extra for an under hood finish and the finish is crappy. Anyway, I've layed down five layers of glass to build up the hood but I'm still between a 1/16" and 3/16" low so I will have to lay more glass or build it up with long strand filler. Fiberglass is a more correct fix to me but filler can allow me to get the contour closer without a bunch of sanding.
One other problem I've dealt with is the quarter panel has a different profile then the door. So the body line of the bottom of the door runs into the quarter and it doesn't look proper. So I've cut out a little notch in the quarter so the body line carries on into it. I've glassed up this notch and will smooth it out but I think it looks a lot better.
One top of those things I've also fitted the front valance which required me to shave an 1/8" off the front RH side to get it to sit properly. I've also sanded down top of the door so that it aligns with the top of the fender. It's still not perfect yet but a lot closer then it was.
So I'll be finishing up the hood over the next week or so as well as he quarters and then hopefully I can start making some molds for the side skirts. I also have some Morimoto lights coming in and I'll be modifying them to make some one of kind tail lights!!!
Attachments
-
 IMG_20210217_200440628.jpg837 KB · Views: 68
 -
 IMG_20210217_200435898.jpg697.6 KB · Views: 61
 -
 IMG_20210217_200524921.jpg896.2 KB · Views: 59
 -
 IMG_20210215_183931369.jpg671.6 KB · Views: 60
 -
 IMG_20210215_183945450.jpg620.5 KB · Views: 64
 -
 IMG_20210213_150433858.jpg744 KB · Views: 55
 -
 IMG_20210215_182457590.jpg570.9 KB · Views: 52
 -
 IMG_20210217_213100905.jpg498.8 KB · Views: 52
 -
 IMG_20210217_202516178.jpg407.9 KB · Views: 53
 -
 IMG_20210218_205624600.jpg613.1 KB · Views: 57
 -
 IMG_20210218_205851303.jpg627.8 KB · Views: 66
Nice work, body gap is a lot of fiddling
You're very patient & dedicated.
Especially when you have to fix expensive parts of questionable quality.
Especially when you have to fix expensive parts of questionable quality.
- Thread starter
- #55
Hey guys,
So I've finished up all of the fiberglass work (for the most part). I've decided to go a different route with the side skirts and instead of making my own I ordered some LT skirts and I'll modify them slightly to work with the flares. This saves me a ton of time making the molds and casting the parts and I think it'll look better and tie the flares into the car more.
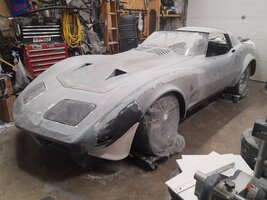
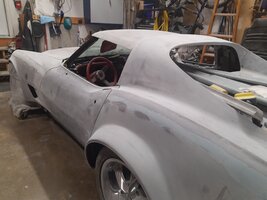
I've finished up the glass work on both of the quarters and have sanded them down and applied some long strand fiberglass filler to fix some areas. They're all ready for some short strand filler but I'm going to do all the long strand repairs before carrying on with short strand. I'm really happy with how they turned out.
I've also fixed the tops of the front fenders. As many of you know this is a common problem right from the factory where the tops of the front fenders don't align with the door or the hood. I know some have cut this section and fiberglassed it but the fender is actually narrower then the door so it's needs to be built up. I thought it would be better and easier to build up the difference with some long strand. It turned out really well though and the door, fender, and hood are finally aligned (for the most part).
I've also corrected the hood. I built up the lowest area with 5 layers of fiberglass which got me to within 1/8" of the fender. Then I masked off the fender and applied the long strand to build it up the rest of the way. Once that was sanded down I cleaned it up with some short strand. Through each step I expanded the area I was filling so that it all blended together and has the same contour as the other side. Next I took my dad huge orbital sander and knocked down the front of the hood with an 8" disc. This actually worked extremely well and I made sure the blend the hood in so I don't have any huge dips.
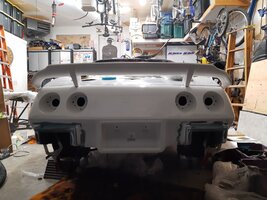
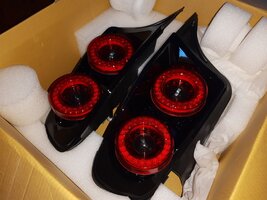
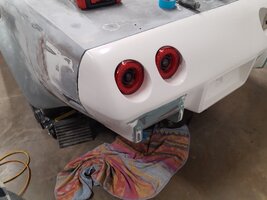
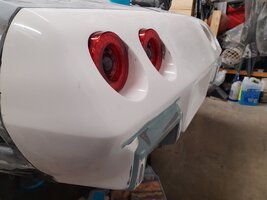
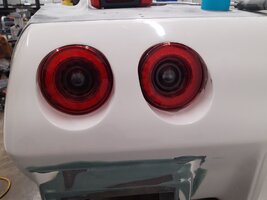
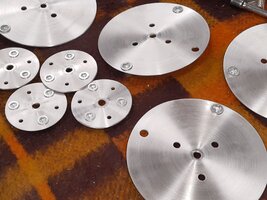
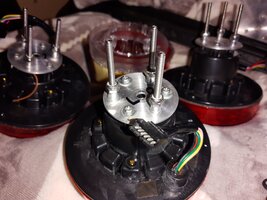
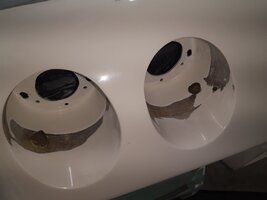
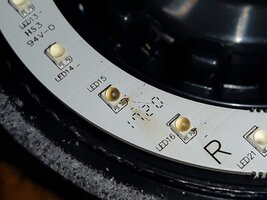
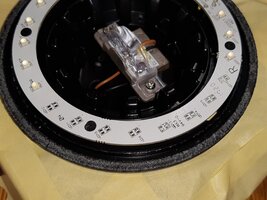
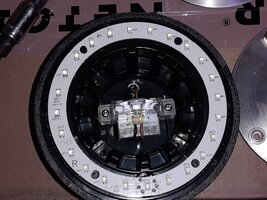
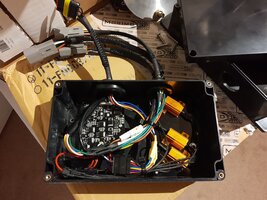
Now I've saved the best for last. I ordered up these Morimoto tail lights. They aren't for a Corvette so I had to cut the housings and remove the round tail lights as well as the circuit boards. The tail lights were slightly bigger then the holes in my bumper so I make a sanding wheel out of polyethylene. I don't have a lathe so I cut out the general shape with a hack saw and then made a homemade lathe with a drill clamped in a vice. Once I had my sanding disc I enlarged the holes but this thinned the fiberglass in a few areas. So much so that there were some pretty big holes which meant I would have to fiberglass the inside of the bumper around the tail lights. Bare in mind that at this point the bumper is epoxied onto the car so there is no removing it. I had to drill 6 holes though the bumper in order to remove the tail light reinforcements that sit behind the bumper. Once that was done I scuffed the inside of the bumper, cleaned it, masked off the frame, then fiberglassed around the tail lights. It was a little tight but not impossible. I also had to make some mounts for the tail lights out of aluminum and made them adjustable so that the style of the lights can be changed. I can alter the way they mount so that the light has more of a Ferrari look (like in the pictures) or I can adjust them so that they top of the light sits flush with bumper. I had little issue with one light when I tried to test it without the circuit boards. I put 12V to it....turns out the circuit boards reduce the voltage to 2.5V so I fried a bank of 8 LED's. I ordered some replacements, desoldered the old ones, and then soldered the new ones on. Each LED measures 2mm by 3mm and has 4 contacts so it took me few hours to fix it but it works now. I'm just building but some boxes right now to house the circuit boards. I won't disclose too much about this conversion because I'd like to keep it unique and I might do up some kits upon special request.
Next up I'll be finishing up any areas that need long strand fiberglass and then I'll be moving to short strand. My goal is to have the car primed this month and sent off to paint. I'll be busy trying to meet this deadline so I'll posted again before and then after I prime. I'm changing my mind on the color and I might switch to a dodge viper billet metallic. I'm interested to hear what you guys think. I'll post some pictures of the gunmetal pearl and billet metallic below. The gunmetal actually looks almost black in day light.
So I've finished up all of the fiberglass work (for the most part). I've decided to go a different route with the side skirts and instead of making my own I ordered some LT skirts and I'll modify them slightly to work with the flares. This saves me a ton of time making the molds and casting the parts and I think it'll look better and tie the flares into the car more.
I've finished up the glass work on both of the quarters and have sanded them down and applied some long strand fiberglass filler to fix some areas. They're all ready for some short strand filler but I'm going to do all the long strand repairs before carrying on with short strand. I'm really happy with how they turned out.
I've also fixed the tops of the front fenders. As many of you know this is a common problem right from the factory where the tops of the front fenders don't align with the door or the hood. I know some have cut this section and fiberglassed it but the fender is actually narrower then the door so it's needs to be built up. I thought it would be better and easier to build up the difference with some long strand. It turned out really well though and the door, fender, and hood are finally aligned (for the most part).
I've also corrected the hood. I built up the lowest area with 5 layers of fiberglass which got me to within 1/8" of the fender. Then I masked off the fender and applied the long strand to build it up the rest of the way. Once that was sanded down I cleaned it up with some short strand. Through each step I expanded the area I was filling so that it all blended together and has the same contour as the other side. Next I took my dad huge orbital sander and knocked down the front of the hood with an 8" disc. This actually worked extremely well and I made sure the blend the hood in so I don't have any huge dips.
Now I've saved the best for last. I ordered up these Morimoto tail lights. They aren't for a Corvette so I had to cut the housings and remove the round tail lights as well as the circuit boards. The tail lights were slightly bigger then the holes in my bumper so I make a sanding wheel out of polyethylene. I don't have a lathe so I cut out the general shape with a hack saw and then made a homemade lathe with a drill clamped in a vice. Once I had my sanding disc I enlarged the holes but this thinned the fiberglass in a few areas. So much so that there were some pretty big holes which meant I would have to fiberglass the inside of the bumper around the tail lights. Bare in mind that at this point the bumper is epoxied onto the car so there is no removing it. I had to drill 6 holes though the bumper in order to remove the tail light reinforcements that sit behind the bumper. Once that was done I scuffed the inside of the bumper, cleaned it, masked off the frame, then fiberglassed around the tail lights. It was a little tight but not impossible. I also had to make some mounts for the tail lights out of aluminum and made them adjustable so that the style of the lights can be changed. I can alter the way they mount so that the light has more of a Ferrari look (like in the pictures) or I can adjust them so that they top of the light sits flush with bumper. I had little issue with one light when I tried to test it without the circuit boards. I put 12V to it....turns out the circuit boards reduce the voltage to 2.5V so I fried a bank of 8 LED's. I ordered some replacements, desoldered the old ones, and then soldered the new ones on. Each LED measures 2mm by 3mm and has 4 contacts so it took me few hours to fix it but it works now. I'm just building but some boxes right now to house the circuit boards. I won't disclose too much about this conversion because I'd like to keep it unique and I might do up some kits upon special request.
Next up I'll be finishing up any areas that need long strand fiberglass and then I'll be moving to short strand. My goal is to have the car primed this month and sent off to paint. I'll be busy trying to meet this deadline so I'll posted again before and then after I prime. I'm changing my mind on the color and I might switch to a dodge viper billet metallic. I'm interested to hear what you guys think. I'll post some pictures of the gunmetal pearl and billet metallic below. The gunmetal actually looks almost black in day light.
Attachments
-
 IMG_20210217_200435898.jpg697.6 KB · Views: 56
 -
 IMG_20210228_210727323.jpg526.5 KB · Views: 55
 -
 IMG_20210302_165022217.jpg812.8 KB · Views: 60
 -
 IMG_20210302_165027607.jpg569.1 KB · Views: 59
 -
 IMG_20210304_215900523.jpg869.4 KB · Views: 64
 -
 IMG_20210305_113604995.jpg473.6 KB · Views: 56
 -
 IMG_20210304_162543887.jpg711.1 KB · Views: 60
 -
 IMG_20210304_162537251.jpg606.3 KB · Views: 58
 -
 IMG_20210306_175721214.jpg1.1 MB · Views: 51
 -
 IMG_20210306_175726281.jpg942.5 KB · Views: 54
 -
 IMG_20210217_202423040.jpg625.5 KB · Views: 51
 -
 IMG_20210220_155223632.jpg558.9 KB · Views: 63
 -
 IMG_20210304_215705341.jpg659.2 KB · Views: 52
 -
 IMG_20210302_164959079.jpg758 KB · Views: 51
 -
 IMG_20210304_215827862.jpg820.5 KB · Views: 50
 -
 IMG_20210219_173857952.jpg780.7 KB · Views: 61
 -
 IMG_20210228_165753719.jpg585.9 KB · Views: 51
 -
 IMG_20210228_165625316.jpg439.3 KB · Views: 55
 -
 IMG_20210228_165638261.jpg467.6 KB · Views: 57
 -
 IMG_20210226_233849252.jpg628.2 KB · Views: 46
 -
 IMG_20210224_172636574.jpg623.9 KB · Views: 59
 -
 IMG_20210305_151910688.jpg635.2 KB · Views: 57
 -
 IMG_20210304_220009641.jpg341.5 KB · Views: 55
 -
 IMG_20210223_233432479.jpg398.7 KB · Views: 60
 -
 IMG_20210305_180032425.jpg573.4 KB · Views: 66
 -
 IMG_20210305_194326746.jpg628.4 KB · Views: 57
 -
 IMG_20210304_215936128_compress55.jpg149.2 KB · Views: 55
 -
 cache (2).jpeg633.5 KB · Views: 61
 -
 IMG_4054.jpg461.5 KB · Views: 56
12cents
Power User
I can hardly wait for the finish.
Looking better and better every post Cody.Hey guys,
So I've finished up all of the fiberglass work (for the most part). I've decided to go a different route with the side skirts and instead of making my own I ordered some LT skirts and I'll modify them slightly to work with the flares. This saves me a ton of time making the molds and casting the parts and I think it'll look better and tie the flares into the car more.
I've finished up the glass work on both of the quarters and have sanded them down and applied some long strand fiberglass filler to fix some areas. They're all ready for some short strand filler but I'm going to do all the long strand repairs before carrying on with short strand. I'm really happy with how they turned out.
I've also fixed the tops of the front fenders. As many of you know this is a common problem right from the factory where the tops of the front fenders don't align with the door or the hood. I know some have cut this section and fiberglassed it but the fender is actually narrower then the door so it's needs to be built up. I thought it would be better and easier to build up the difference with some long strand. It turned out really well though and the door, fender, and hood are finally aligned (for the most part).
I've also corrected the hood. I built up the lowest area with 5 layers of fiberglass which got me to within 1/8" of the fender. Then I masked off the fender and applied the long strand to build it up the rest of the way. Once that was sanded down I cleaned it up with some short strand. Through each step I expanded the area I was filling so that it all blended together and has the same contour as the other side. Next I took my dad huge orbital sander and knocked down the front of the hood with an 8" disc. This actually worked extremely well and I made sure the blend the hood in so I don't have any huge dips.
Now I've saved the best for last. I ordered up these Morimoto tail lights. They aren't for a Corvette so I had to cut the housings and remove the round tail lights as well as the circuit boards. The tail lights were slightly bigger then the holes in my bumper so I make a sanding wheel out of polyethylene. I don't have a lathe so I cut out the general shape with a hack saw and then made a homemade lathe with a drill clamped in a vice. Once I had my sanding disc I enlarged the holes but this thinned the fiberglass in a few areas. So much so that there were some pretty big holes which meant I would have to fiberglass the inside of the bumper around the tail lights. Bare in mind that at this point the bumper is epoxied onto the car so there is no removing it. I had to drill 6 holes though the bumper in order to remove the tail light reinforcements that sit behind the bumper. Once that was done I scuffed the inside of the bumper, cleaned it, masked off the frame, then fiberglassed around the tail lights. It was a little tight but not impossible. I also had to make some mounts for the tail lights out of aluminum and made them adjustable so that the style of the lights can be changed. I can alter the way they mount so that the light has more of a Ferrari look (like in the pictures) or I can adjust them so that they top of the light sits flush with bumper. I had little issue with one light when I tried to test it without the circuit boards. I put 12V to it....turns out the circuit boards reduce the voltage to 2.5V so I fried a bank of 8 LED's. I ordered some replacements, desoldered the old ones, and then soldered the new ones on. Each LED measures 2mm by 3mm and has 4 contacts so it took me few hours to fix it but it works now. I'm just building but some boxes right now to house the circuit boards. I won't disclose too much about this conversion because I'd like to keep it unique and I might do up some kits upon special request.
Next up I'll be finishing up any areas that need long strand fiberglass and then I'll be moving to short strand. My goal is to have the car primed this month and sent off to paint. I'll be busy trying to meet this deadline so I'll posted again before and then after I prime. I'm changing my mind on the color and I might switch to a dodge viper billet metallic. I'm interested to hear what you guys think. I'll post some pictures of the gunmetal pearl and billet metallic below. The gunmetal actually looks almost black in day light.
Nice fiberglass work Cody. I am itching just reading your thread.
Cody, this build could be the feature of a new 2021 Corvette Summer!
- Thread starter
- #60
Hey guys,
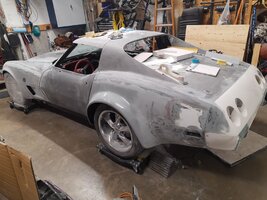
So, I have the car about 2 weeks away from primer (hopefully) so I thought I'd do a post on the progress I've made.
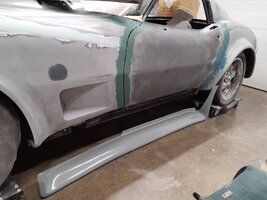
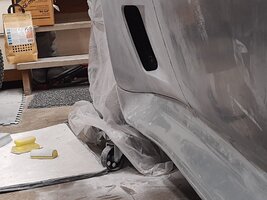
First, I decided to buy some side skirts instead of making them to save me some time. I had to modify them to work with my flared quarters so I had to cut off the uprights on the rear of skirts. Then I had to narrow the skirts in the rear as the edge of the quarter is 1/2" wide and the skirts were 1" wide. The passenger side was fairly easy to modify but the driver's side took some more work as the skirts aren't symmetrical. I then had to correct the front of the skirts as they curled in. I cut off the sides and made some molds out of aluminum and then glassed in the new sides. After that I had to build up the edge of the skirts so that they sat flush with the edge of the quarter panels.
After I had the skirts looking decent, I put on my super spoiler to get an idea of what it looked like. However, the spoiler just didn't go with the side skirts and flares. Thankfully I was able to source a pace car spoiler quickly and fitted it to the car. The pace car spoiler fits the car a little different so I had to cut the front fenders to match the spoiler. This worked great and also allows me a little more room for those 275's on the front. I still need to sand the spoiler a little more but I love how it fits with the car.
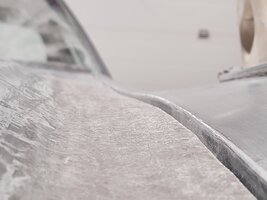
I also noticed a crack on the side of the roof where the fiberglass meets the steel reinforcement. So I grooved out the edge and stuck some shims in between the roof and the steel reinforcement, then applied some panel adhesive in between the two and clamped it in place. Now that seem will never separate.
I've fixed some issues on the lock pillars. The fiberglass by the strikers were broken as the holes were opened up too big. So I grooved the fiberglass and glassed over it then sanded it down. At the bottom of the lock pillar there is another seem. On the passenger side the lock pillar had a lot movement as it was never adhered in place. The driver's side had been adhered but it was cracking. I used panel adhesive on the passenger side and clamped it in place. Then I grooved both sides and glassed them so it will never crack again. Now the lock pillars are extremely solid.
I also opened up the hood vents on the front of the car as well as sanded 90% of the car. I've also finished one of the boxes that houses the electronics for the tail lights. The box is 100% water proof with waterproof Deutsch connectors. There are 132 splices to be made on these lights so it's taking a long time but it's a fun side project.
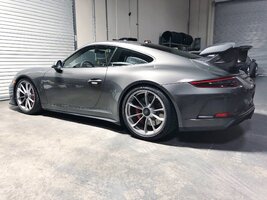
Lastly, I also got some spray outs of the Dodge viper gunmetal Grey and billet metallic but I don't think they suit the car. So I think I've decided on Porsche Agate Grey instead. I'm just waiting on another spray out to make sure it's a good fit.
So, I have the car about 2 weeks away from primer (hopefully) so I thought I'd do a post on the progress I've made.
First, I decided to buy some side skirts instead of making them to save me some time. I had to modify them to work with my flared quarters so I had to cut off the uprights on the rear of skirts. Then I had to narrow the skirts in the rear as the edge of the quarter is 1/2" wide and the skirts were 1" wide. The passenger side was fairly easy to modify but the driver's side took some more work as the skirts aren't symmetrical. I then had to correct the front of the skirts as they curled in. I cut off the sides and made some molds out of aluminum and then glassed in the new sides. After that I had to build up the edge of the skirts so that they sat flush with the edge of the quarter panels.
After I had the skirts looking decent, I put on my super spoiler to get an idea of what it looked like. However, the spoiler just didn't go with the side skirts and flares. Thankfully I was able to source a pace car spoiler quickly and fitted it to the car. The pace car spoiler fits the car a little different so I had to cut the front fenders to match the spoiler. This worked great and also allows me a little more room for those 275's on the front. I still need to sand the spoiler a little more but I love how it fits with the car.
I also noticed a crack on the side of the roof where the fiberglass meets the steel reinforcement. So I grooved out the edge and stuck some shims in between the roof and the steel reinforcement, then applied some panel adhesive in between the two and clamped it in place. Now that seem will never separate.
I've fixed some issues on the lock pillars. The fiberglass by the strikers were broken as the holes were opened up too big. So I grooved the fiberglass and glassed over it then sanded it down. At the bottom of the lock pillar there is another seem. On the passenger side the lock pillar had a lot movement as it was never adhered in place. The driver's side had been adhered but it was cracking. I used panel adhesive on the passenger side and clamped it in place. Then I grooved both sides and glassed them so it will never crack again. Now the lock pillars are extremely solid.
I also opened up the hood vents on the front of the car as well as sanded 90% of the car. I've also finished one of the boxes that houses the electronics for the tail lights. The box is 100% water proof with waterproof Deutsch connectors. There are 132 splices to be made on these lights so it's taking a long time but it's a fun side project.
Lastly, I also got some spray outs of the Dodge viper gunmetal Grey and billet metallic but I don't think they suit the car. So I think I've decided on Porsche Agate Grey instead. I'm just waiting on another spray out to make sure it's a good fit.
Attachments
-
 IMG_20210402_164341767.jpg742.5 KB · Views: 48
 -
 IMG_20210402_164305327.jpg624.3 KB · Views: 48
 -
 IMG_20210327_160316116_HDR.jpg596.9 KB · Views: 50
 -
 IMG_20210310_145015602.jpg670.6 KB · Views: 65
 -
 IMG_20210311_221520703.jpg475 KB · Views: 47
 -
 IMG_20210313_142000679.jpg706.5 KB · Views: 50
 -
 IMG_20210313_144216445.jpg528.4 KB · Views: 48
 -
 IMG_20210313_144305274.jpg713.7 KB · Views: 50
 -
 IMG_20210315_174742420.jpg627.3 KB · Views: 40
 -
 IMG_20210322_181420351.jpg405.2 KB · Views: 46
 -
 IMG_20210322_181410548.jpg564.1 KB · Views: 50
 -
 IMG_20210322_173008020.jpg880.2 KB · Views: 58
 -
 IMG_20210402_150023631.jpg791.3 KB · Views: 59
 -
 IMG_20210402_145918818.jpg801.1 KB · Views: 48
 -
 IMG_20210402_145858158.jpg908.8 KB · Views: 61
 -
 IMG_20210327_160940780.jpg774.8 KB · Views: 45
 -
 IMG_20210328_183215450.jpg812.1 KB · Views: 40
 -
 IMG_20210327_160512028.jpg998.9 KB · Views: 58
 -
 IMG_20210329_214547718.jpg957.5 KB · Views: 48
 -
 1lOVMJA.jpg336.6 KB · Views: 60
 -
 IMG_9618-medium.jpg91.4 KB · Views: 52
Last edited:
Users who are viewing this thread
Total: 1 (members: 0, guests: 1)