Jan 27, 2009
3,987
3,864
Township of Langley, BC
VetteCoins
35,877
Car
1975 coupe/2003 vert
Province
BC
My '75 coupe rear bumper cover was disintegrating bad. It is time for replacement with a flexi-fibreglass product. The local CL had one listed a couple of weeks ago. NIB... I got it for a good deal..no shipping costs..and the fellow had the brackets as well. It is from Ecklers.
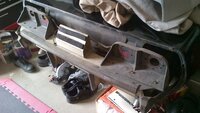
here's the old cover..original poly product. many cracks to say the least.

IMG_00000292.jpg

It came off sort of in one piece. I was hoping to salvage it and make a wall hanging, maybe even get the tailites working for display.
IMG_00000298.jpg


I started to wash it up a bit and this is how it ended up!!
IMG_00000012.jpg


Just fell apart as I touched it.
not much to salvage.
This is what I bought..NIB.

IMG_00000291.jpg

Now to test mount the new cover..
graham.
 

Attachments

  • IMG_00000297.jpg
    IMG_00000297.jpg
    597.3 KB · Views: 45
Last edited:
  • Like
Reactions: YFCvii
Bumper Cover Part 2..(pic heavy!)

This is what is hiding behind the bumper cover:
I found out that ALL of these supports neither fit, nor are required, with the new fibreglass cover! No instructions to tell you that with the cover?
The tail-lights normally are fastened to the rings that are sandwiched thru the cover and around the right/left supports. The new cover doesn't use any of this and the lenses just screw directly into the fibreglass. I thought this was odd but it just might work.
IMG_00000297.jpg

Cleaning more parts:
IMG_00000301.jpg


All the bracket/supports removed:
IMG_00000304.jpg


Inside passenger side rear fender.. Look I found that darn Key Box!!!
IMG_00000305.jpg

Inside drivers side rear fender: note alarm horn..I removed and repainted it and made sure it worked.
IMG_00000306.jpg
IMG_00000309.jpg


Here are the mounting brackets that go around the perimiter of the cover to fasten it to the car body.
IMG_00000117.jpg


Stay tuned for part #3.....
thanx for looking.
graham
 
Last edited:
Great pics. My rear bumper was replaced a couple of years ago. The front is still original and is on my to do list someday.
 
I can't believe how the rear cover just feel apart! That is nuts! The new cover looks pretty good. You just might need to get one of those color matching waxes as the color appears to be off a bit.:D
 
Here's a couple of pics...

011-1.jpg


010-1.jpg


Mine use the mounting rings with the screws going through the plastic "tubes"

Hope this helps.

Greg.
 
CASE.. Thanx for doing that for me.
That is the way I thought it should work...BUT Ecklers couldn't tell me for sure. I believe they intend the two lens screws to just go into the fibreglass.
No rings or standoffs like the factory install.
I thought that was bad. I'm going to do it just like yours.
thanx again pal.
That helps a lot.
graham

No problem Graham. Us C3'ers have to stick together! :D

Looking forward to the final result.

Greg.
 
Bumper Cover Part 3..Laser Fun!

Welcome back.
I had an issue the other day with my new bumper cover.
How can I transfer the required holes(3) behind the license plate to the new cover? Three bolts go thru these holes into the aluminum bumper structure.
I tried measuring from a known point but that wasn't working for me....In the middle of the nite(again!) it came to me...I could hardly wait to get up in the morning to try it.
IMG_00000296.jpg


I got out my laser level and set it up at the back of the car and pointed it at one of the holes.
IMG_00000025.jpg


IMG_00000016.jpg


Then carefully put the f/g bumper cover in place...and marked the hole location(s). I did this three times.... Slick & Quick...!!!!!
IMG_00000024.jpg


Drilled the holes and mounted the cover.
Next we're on to the peripheral holes to sandwhich the cover to the car body.
Then transfer the license plate mounting hardware to the new cover.
i wonder if I'll get to use the laser again? lol
thanx for looking......................graham

IMG_00000062.jpg
 
Last edited:
Great idea Graham. It's amazing what we can come up with sometimes to solve a problem. Looks like you're making good progress. Let me know if there's anymore I can do to help. :)

Greg.
 
Bumper Cover to body Fitment.

I did some more trimming to make the Ecklers bumper cover fit properly.
The vertical structural bumper pieces needed to be trimmed to allow the cover to sit high enough. Marked with tape.
IMG_00000057.jpg
Here they are trimmed..
IMG_00000059.jpg

Re-install verts and the cover fits much better now.
Now to mark the holes in the body with stripe-tape..put cover in-place and mark cover....
IMG_00000069.jpg

Then transfer these locations to the mating edge and drill..(18 holes)
Here is the stud kit from Ecklers......I also made some aluminum spreader bars for the body side on the 'sandwich.
IMG_00000197.jpg


thanx for looking... graham
 
Last edited:
  • Like
Reactions: YFCvii
Tail-Light Fitting........

Thanx to pictures from CASE I decided to use the factory mounting rings to fit the tail-lights to the cover. I believe Ecklers intended the lens' to be simply screwed into two holes in the fibreglass. I found that odd!
IMG_00000068.jpg
IMG_00000070.jpg
Added a couple more holes for the license plate lamp.
IMG_00000103.jpg
IMG_00000082.jpg
Here are the brackets and lens' in-place....job done....
IMG_00000190.jpg
Here's the holes all done.
IMG_00000116.jpg
Here is their supplied template....... I didn't use it at all...
IMG_00000077.jpg
Then drilled the proper size holes from the back of the cover.
IMG_00000080.jpg
The license lamp broke..so I guess I'll order a new one.
IMG_00000082.jpg


Now to go and put all the studs into place.The passenger side rear fender needs to be pulled in about a 1/4" to fit properly.
We'll see how that goes very soon.

thanx for looking.........................graham
 
Last edited:
  • Like
Reactions: YFCvii
Very cool to see the progress at work! This will definitely help anyone looking to replace their bumper and it also shows some good tips for other jobs. Great write up Graham!
 
Old Thread: Hello . There have been no replies in this thread for 100 days.
Content in this thread may no longer be relevant.
Perhaps it would be better to start a new thread instead.

Users who are viewing this thread