Nice to know. Thanks for the share. I’ll check that pump out at Cabelas.everbody has little things they come up with to make life easier.when working on our cars these little things become invaluable,wanna share yours ? it's always handy to have a little advance knowledge. i'll start with a couple. plastic bread bag clips numbered 1-8 make great plug wire markers. when filling a differential, use a marine gear case pump. it screws onto the bottle of lube. remove the gear case fitting and insert the hose into diff. pump about half bottle in then add your posi additive to the bottle. resume filling till you reach the level. these pumps are available every where marine stuff is sold for about 12 bucks.
Navigation
Install the app
How to install the app on iOS
Follow along with the video below to see how to install our site as a web app on your home screen.
Note: This feature may not be available in some browsers.
More options
You are using an out of date browser. It may not display this or other websites correctly.
You should upgrade or use an alternative browser.
You should upgrade or use an alternative browser.
tips & tricks
- Thread starter buckhorn76
- Start date
Thanks for the share!!!everbody has little things they come up with to make life easier.when working on our cars these little things become invaluable,wanna share yours ? it's always handy to have a little advance knowledge. i'll start with a couple. plastic bread bag clips numbered 1-8 make great plug wire markers. when filling a differential, use a marine gear case pump. it screws onto the bottle of lube. remove the gear case fitting and insert the hose into diff. pump about half bottle in then add your posi additive to the bottle. resume filling till you reach the level. these pumps are available every where marine stuff is sold for about 12 bucks.
Black 03 Z06
Power User
Moderator
RIP
@2KforeverC5 the changing of the diff fluid is one of those jobs that takes more preparation than actual work.
Jack the car up and secure it with axle stands, wood blocks whatever have you. Just make sure the car cannot move in any direction. You need it up fairly high to comfortable do the work.
There are two plugs on the C5 diff one on the bottom to drain one on the top at the back to fill. Both of these plugs have unique"crush" washers, the washers were the cause of mine leaking. The washers are available from GM and a stupid expensive, other types might work but not sure.
I used Mobil 1 gear lube with the limited slip additive already in. The gear oil is very heavy so I got a pail of very hot water and put the bottle in that. With the pump screwed in and the bottom plug re installed I started pumping the marine pump with the hose just barely inside the filling hole. What ever you do do not drop the tube inside the housing, everything is very slippery and the pump has enough pressure to blow the feed tube off the connection.
Once the housing is full replace the top plug and washer. These things have a specific torque value but I will have to look it up. Clean up the housing inspect the side seals where the axle shafts coming out to the housing (notorious for leaking).
Once the car is back on the ground you need to do figure "8" to ensure the additive has covered the clutches. GM also suggests NO full throttle runs for I think 200 kms.
Great to see Doug's long ago thread still pops up with great information.
Power Antenna Rebuildeverbody has little things they come up with to make life easier.when working on our cars these little things become invaluable,wanna share yours ? it's always handy to have a little advance knowledge. i'll start with a couple. plastic bread bag clips numbered 1-8 make great plug wire markers. when filling a differential, use a marine gear case pump. it screws onto the bottle of lube. remove the gear case fitting and insert the hose into diff. pump about half bottle in then add your posi additive to the bottle. resume filling till you reach the level. these pumps are available every where marine stuff is sold for about 12 bucks.
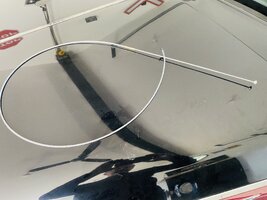
I was looking rebuild the power antenna and this would be #3.
I got prices over $100 Cdn and $52 US. Instead I saw some 1/8” aircraft cable and bought it for $2 and change.
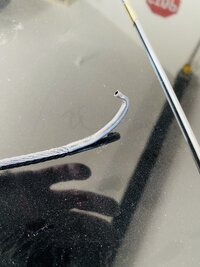
With a little work I got the aircraft cable to fit in both ends that I removed from the broken one.
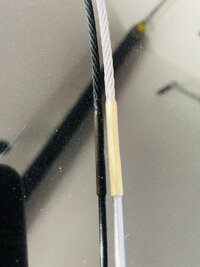
A test on lead free solder and matching flux bonded through the aircraft cable just as it would through copper.
I then soldered the antenna end and crimped the steel tube end.
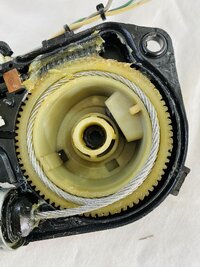
After a little fitting on the steel end and a little filing on the antenna end I got together. I did a bench test and it goes up and down perfectly.
Attachments
Power Antenna Rebuild
I was looking rebuild the power antenna and this would be #3.
I got prices over $100 Cdn and $52 US. Instead I saw some 1/8” aircraft cable and bought it for $2 and change.
With a little work I got the aircraft cable to fit in both ends that I removed from the broken one.
A test on lead free solder and matching flux bonded through the aircraft cable just as it would through copper.
I then soldered the antenna end and crimped the steel tube end.
After a little fitting on the steel end and a little filing on the antenna end I got together. I did a bench test and it goes up and down perfectly.
Attachments
Users who are viewing this thread
Total: 1 (members: 0, guests: 1)


