Y
YFCvii
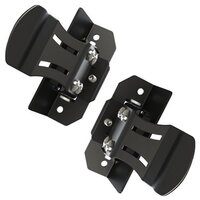
THIS WAS THE EASIEST SET OF SPLASH GUARDS / MUD FLAPS THAT I HAVE INSTALLED SO FAR !!!
DID NOT HAVE TO LIFT THE VEHICLE NOR REMOVE A WHEEL ... AND AN AWESOME MONEY SAVER.
So you gotta be just a little handy with tools to do this. You will need a 7mm socket and a cleaning cloth. The Splash Guard parts are listed on many on-line dealership accessory lists with an installed price of very close to $200 each for the front set and the back set. The parts purchase price from the Parts Counter for about $90 each pair. So a DIY install will save you 50%
I would recommend that you have the correct tool for this Job (a 7mm socket/wrench). Some might think to use pliers or an adjustable wrench to remove 1 bolt for each splash guard but I would not recommend it ... besides, I am always one to be front-of-the-line for a DIY project that endorses my having to add a new tool to my Tool Box. Having the right tools always makes it look like you know what you are doing (when the "boss" walks by - if you know what I mean)
I completed my Splash Guard Mod in about an hour; not including my picture taking and a break in-between to sit in a lawn chair and sip a pop while admiring the job that was 1/2 completed.
I am posting the instruction page and a few pictures of the install.
I would recommend to begin with the
FRONT SPLASH GUARDS
First I would recommend to wash the wheels and wheel well liners.
For the Front set, you will find one bolt on the underside to remove (photo below).
You will know which bolt to remove because you will be it fastening a tab of the factory wheel well cover.
Then you can use your fingers to grab the factory cover and pop it out (pulling toward the tire)
Be careful not to let the existing guard twist so that the retainer clips are able to rub (or scratch) your painted body side.
Once the bolt is removed the factory cover, wipe the area clean of debris that might remain behind.


To install the Front Splash Guard you will find that there is a tab that fits into a slot in the wheel well liner (see photo below). Make sure that you get the tab is in place before you start to clip the splash guard in. Missing this part of having the tab in the slot might result in this project becoming "Splash (mud) Flaps"! Be careful not to let the metal clips rub and scratch your painted surfaces. Once you insert the tab into the wheel well liner slot, pop the top retainer into its place. Then you can pop the retainers in place from top to the bottom. Then reinstall the bolt than you previously removed. You have now completed one splash guard installation. Repeat for the opposite front splash guard.


Now that you have taken a break to admire your front installations, it is time for the
REAR SPLASH GUARDS
Looking at the underside, you will likely find that there are 3 bolts. You will also notice that the tab that the bolt secures is not visible. I am hoping the photo below will help knowing that the bolt to remove is the one furthest from the body side (see photo). With the bolt removed, you can know pop of the factory cover with your fingers. You will notice that there is a slot where the bottom tab fit in and this is also where the bottom tab of your splash guard goes as well.

[/ATTACH]


Now with the existing rear wheel well cover removed you can pop in your new Rear Splash Guard starting at the top clip and working your way down. Making sure that you do not allow the metal clips to rub/scratch your painted surfaces. Making sure the bottom tab is put into the slot (arrow in above photo). Then replace the bolt that you removed. Repeat for the opposite side Rear Wheel.

I know many readers are handy and find this installation a no-brainer. A few would say this is so easy (because it actually is) but until you have done it, to others, "saying" and "doing" are two different things.
I am one that always pre-plans my approach to DIY. It's like making an awesome Homemade Chinese Dinner
"it's all in the preparation - as the cooking part just flows through" - yum ... I am hungry now!
Last but not least. My "boss" sometimes asks at one point during some of my DIY projects,
"Have you read the instructions"?
... so here they are ...

I am normally proud of my instruction pages that never have a dirt or grease mark on it.
All the ones that I do get dirt or grease on, is a reminder that I was an absolute "fumble fart" on that project.
This project has a clean instruction page (above)
Hoping you all enjoyed this ...
let me know if you find something I should mention on this so that anyone taking on this project will have a lot of confidence knowing what they are taking on ...
DID NOT HAVE TO LIFT THE VEHICLE NOR REMOVE A WHEEL ... AND AN AWESOME MONEY SAVER.
So you gotta be just a little handy with tools to do this. You will need a 7mm socket and a cleaning cloth. The Splash Guard parts are listed on many on-line dealership accessory lists with an installed price of very close to $200 each for the front set and the back set. The parts purchase price from the Parts Counter for about $90 each pair. So a DIY install will save you 50%
I would recommend that you have the correct tool for this Job (a 7mm socket/wrench). Some might think to use pliers or an adjustable wrench to remove 1 bolt for each splash guard but I would not recommend it ... besides, I am always one to be front-of-the-line for a DIY project that endorses my having to add a new tool to my Tool Box. Having the right tools always makes it look like you know what you are doing (when the "boss" walks by - if you know what I mean)
I completed my Splash Guard Mod in about an hour; not including my picture taking and a break in-between to sit in a lawn chair and sip a pop while admiring the job that was 1/2 completed.
I am posting the instruction page and a few pictures of the install.
I would recommend to begin with the
FRONT SPLASH GUARDS
First I would recommend to wash the wheels and wheel well liners.
For the Front set, you will find one bolt on the underside to remove (photo below).
You will know which bolt to remove because you will be it fastening a tab of the factory wheel well cover.
Then you can use your fingers to grab the factory cover and pop it out (pulling toward the tire)
Be careful not to let the existing guard twist so that the retainer clips are able to rub (or scratch) your painted body side.
Once the bolt is removed the factory cover, wipe the area clean of debris that might remain behind.
To install the Front Splash Guard you will find that there is a tab that fits into a slot in the wheel well liner (see photo below). Make sure that you get the tab is in place before you start to clip the splash guard in. Missing this part of having the tab in the slot might result in this project becoming "Splash (mud) Flaps"! Be careful not to let the metal clips rub and scratch your painted surfaces. Once you insert the tab into the wheel well liner slot, pop the top retainer into its place. Then you can pop the retainers in place from top to the bottom. Then reinstall the bolt than you previously removed. You have now completed one splash guard installation. Repeat for the opposite front splash guard.
Now that you have taken a break to admire your front installations, it is time for the
REAR SPLASH GUARDS
Looking at the underside, you will likely find that there are 3 bolts. You will also notice that the tab that the bolt secures is not visible. I am hoping the photo below will help knowing that the bolt to remove is the one furthest from the body side (see photo). With the bolt removed, you can know pop of the factory cover with your fingers. You will notice that there is a slot where the bottom tab fit in and this is also where the bottom tab of your splash guard goes as well.
[/ATTACH]
Now with the existing rear wheel well cover removed you can pop in your new Rear Splash Guard starting at the top clip and working your way down. Making sure that you do not allow the metal clips to rub/scratch your painted surfaces. Making sure the bottom tab is put into the slot (arrow in above photo). Then replace the bolt that you removed. Repeat for the opposite side Rear Wheel.
I know many readers are handy and find this installation a no-brainer. A few would say this is so easy (because it actually is) but until you have done it, to others, "saying" and "doing" are two different things.
I am one that always pre-plans my approach to DIY. It's like making an awesome Homemade Chinese Dinner
"it's all in the preparation - as the cooking part just flows through" - yum ... I am hungry now!
Last but not least. My "boss" sometimes asks at one point during some of my DIY projects,
"Have you read the instructions"?
... so here they are ...
I am normally proud of my instruction pages that never have a dirt or grease mark on it.
All the ones that I do get dirt or grease on, is a reminder that I was an absolute "fumble fart" on that project.
This project has a clean instruction page (above)
Hoping you all enjoyed this ...
let me know if you find something I should mention on this so that anyone taking on this project will have a lot of confidence knowing what they are taking on ...
Last edited by a moderator:
")
")
 lingered and evoked his...
 ...
...