

I'm going to be swapping out the chrome badges on my car for carbon flash ones. I've been watching videos on how to do it and it looks pretty straight forward, just curious if anyone has any personal experience with it and maybe any tips/tricks? First time I've ever attempted anything like it. I also have back lug nuts to replace the chrome, but I'll just have the dealer do them when I take it for an oil change in the spring.
Badge Swap on Grand Sport
- Thread starter Shorlaw
- Start date
You are using an out of date browser. It may not display this or other websites correctly.
You should upgrade or use an alternative browser.
You should upgrade or use an alternative browser.

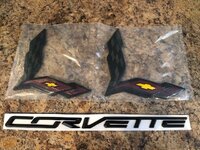

I did it and it is not difficult. The one you have to be careful with is the rear "CORVETTE" , the part you received should have the letters in a Template.
I used a heat gun and Dental Floss, heat the badges keeping the heat gun about 10" away from the Original badges and move the heat gun back and forth so the Paint does not get too hot in one area. Once the badges get warm (about 30 seconds) slide the Dental Floss between the Badge and the Body and move it in a sawing motion keeping the Floss towards the Badge and not the Paint. If it does not come off easily then heat it a bit more.
Once the Badges are off, some 3M Tape may remain on the car, heat this up a bit and remove as much as possible with your fingernail, Clean area with 3M Adhesive Remover or Goo Gone.
Once all the old 3M Adhesive has been removed inspect the paint for any shadowing of the Original logo. You can use some Polishing Compound to remove that.
Once the area is all clean, use some 100% rubbing alcohol to clean any wax / polish off the area. The area is now prepped for the new Badge.
I used green masking Tape as a jig to align the Template that the Letters are held in for the rear script logo. You need accurately measure out where to apply the Tape. You can try and see which method of doing this works for you. I did something like this |______________| and aligned the bottom of the Template to the bottom line and the first and last letters to the right and left lines respectively.
Hope this helps, please ask any question that you may have.

I did it and it is not difficult. The one you have to be careful with is the rear "CORVETTE" , the part you received should have the letters in a Template.
I used a heat gun and Dental Floss, heat the badges keeping the heat gun about 10" away from the Original badges and move the heat gun back and forth so the Paint does not get too hot in one area. Once the badges get warm (about 30 seconds) slide the Dental Floss between the Badge and the Body and move it in a sawing motion keeping the Floss towards the Badge and not the Paint. If it does not come off easily then heat it a bit more.
Once the Badges are off, some 3M Tape may remain on the car, heat this up a bit and remove as much as possible with your fingernail, Clean area with 3M Adhesive Remover or Goo Gone.
Once all the old 3M Adhesive has been removed inspect the paint for any shadowing of the Original logo. You can use some Polishing Compound to remove that.
Once the area is all clean, use some 100% rubbing alcohol to clean any wax / polish off the area. The area is now prepped for the new Badge.
I used green masking Tape as a jig to align the Template that the Letters are held in for the rear script logo. You need accurately measure out where to apply the Tape. You can try and see which method of doing this works for you. I did something like this |______________| and aligned the bottom of the Template to the bottom line and the first and last letters to the right and left lines respectively.
Hope this helps, please ask any question that you may have.
Great Info, Thanks so much!
I'm going to be swapping out the chrome badges on my car for carbon flash ones. I've been watching videos on how to do it and it looks pretty straight forward, just curious if anyone has any personal experience with it and maybe any tips/tricks? First time I've ever attempted anything like it. I also have back lug nuts to replace the chrome, but I'll just have the dealer do them when I take it for an oil change in the spring.
Not to sure if you were also planning to remove the Corvette lettering on the rear fascia.... I'm kind of thinking of getting rid of it. The carbon flash will look great on your car and Kanuck laid out the process perfectly! Here are a couple of images of C7's without the corvette script on the rear fascia...
Attachments


I like the look without the Corvette script.
I actually like it on mine. It’s black on black however so very subtle.

Mine is chrome on black. A little too much. The black on black would be cool.I actually like it on mine. It’s black on black however so very subtle.
Similar threads
Users who are viewing this thread
Total: 1 (members: 0, guests: 1)