What an intro, welcome to the Corvette world. As a obsessive compulsive rebuilder you'll fit right in with the rest of us who have varying degrees of OCD in various facets of Corvette life.Time to do some future planning.
The OEM TPI is great for street driving, but it's a known fact that it limits power to the mid 200 hp range. There's really no way around that intake, unless you add boost and I'm not going down that road with this car.
There are lots of aftermarket options, if you can find one used or want to pay 1-2 grand on something. No thank you.
I've actually got 2 complete sets of tpi intakes on the shelf, but there's not a whole lot of sense to doing any work on them. Gains are fairly minuscule for the work you have to put into it. I used to put TPI's on trucks and run them with a 411 PCM, but they were still limited by the basic runner design. Not a big deal in a pickup truck, where you want lots of torque down low. But in a 3200 lb car, you can give up some of that for more RPM (and HP).
So, what do we do?
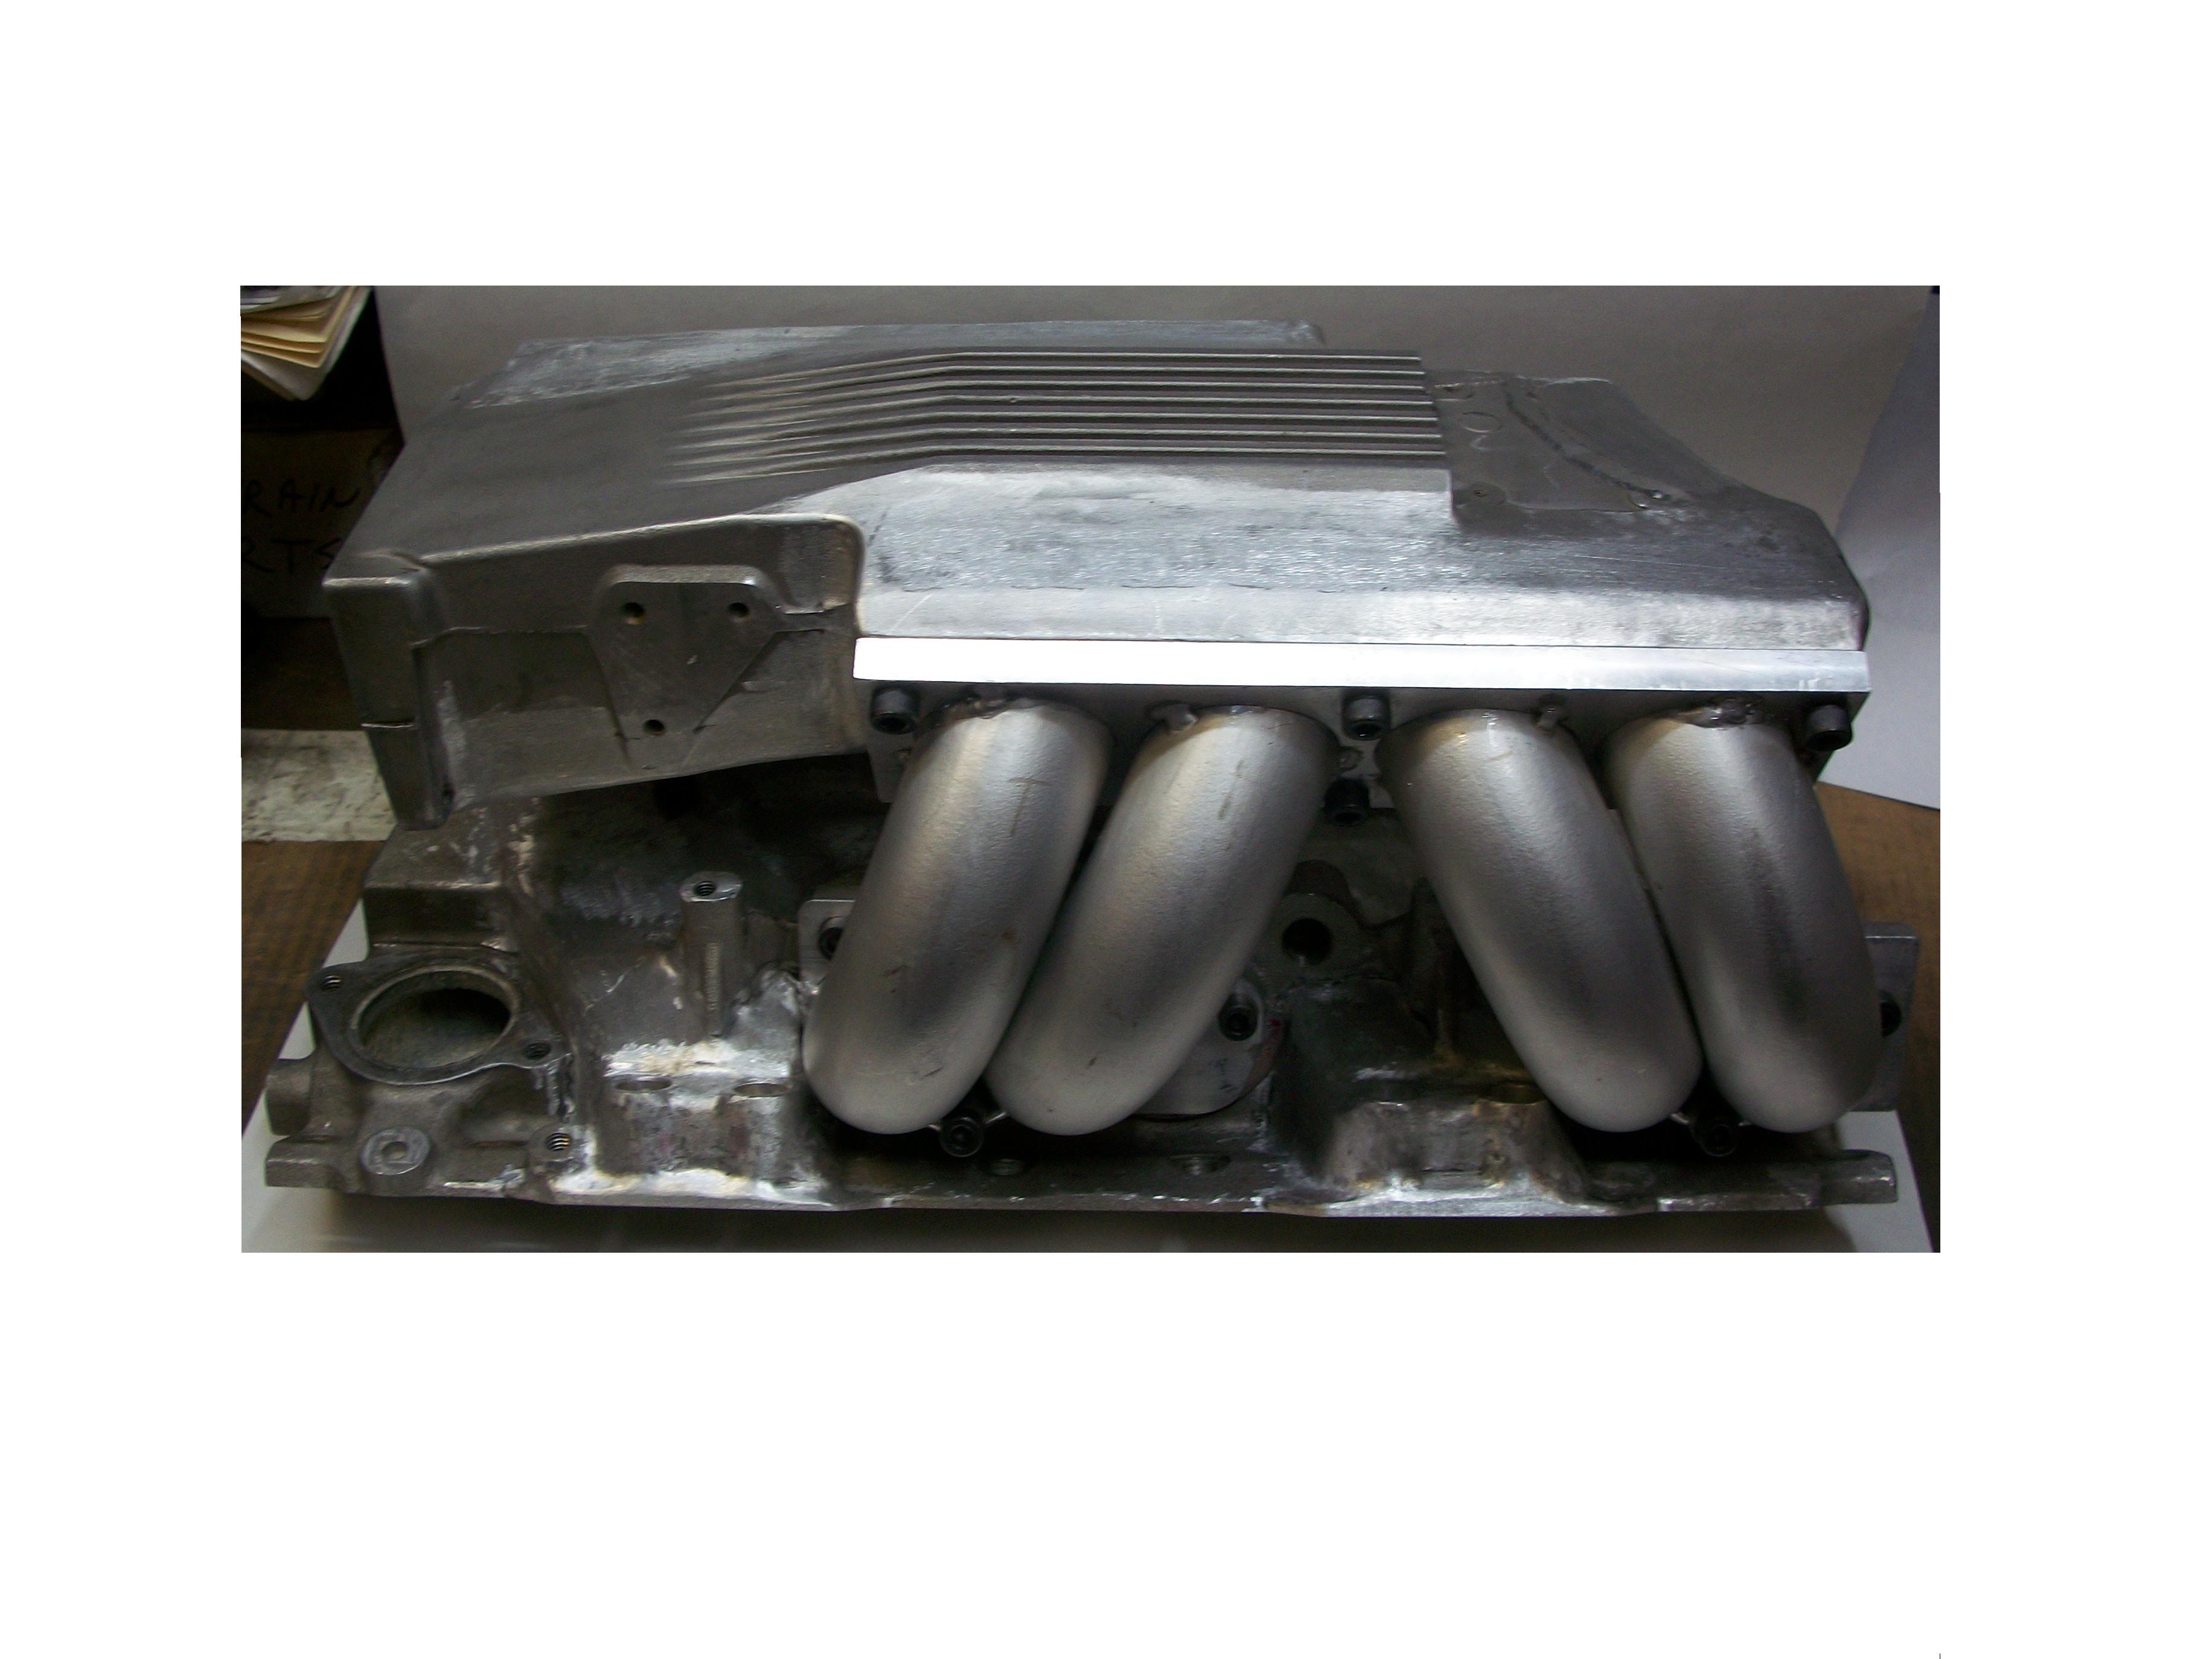
Fortunately, GM essentially installed a "mini ram" on the LT1. while cruising ebay for the audio stuff, I ran across a complete LT1 intake for 70 bucks:
View attachment 29853
Injectors, rails, Egr, etc. All of it, complete. I just couldn't pass it up for 70 bucks.
Now, the LT1 TPI intake doesn't just "bolt on" to an L98, but you can adapt it with a little machine work and then you're good to about the 400 HP range. I'm good with the machine work myself to add the distributor and modfy the mounting holes. Lathe and the mill will make short work of that. Spool gun on the MIG will take care of adding material if I need to. Adding a thermostat housing is a little more difficult, but do able. Or you can go with a remote thermostat housing. 400 hp is more than my Vette will ever make, I just don't want to build for that, too much money. 300 hp crank would be fine by me. Just enough for a good bump up over stock. It would also be much kinder to my 700r4 and dana 28 rear differential.
So maybe a cam and some tuning (I'm more than capable of tuning the ECM) to go with the LT1 intake and she'll be good to go. A little paint and polish and it will look pretty jammy when you lift the hood. I could get a lot wilder with it, but this car is intended to be a driver, not a project so just a little bump over stock will be fine.
")
Navigation
Install the app
How to install the app on iOS
Follow along with the video below to see how to install our site as a web app on your home screen.
Note: This feature may not be available in some browsers.
More options
Style variation
You are using an out of date browser. It may not display this or other websites correctly.
You should upgrade or use an alternative browser.
You should upgrade or use an alternative browser.
1988 Convertible for sunny day drives
- Thread starter Tourmax
- Start date
- Thread starter
- #262
For the large runner tpi, I'm basically modelling off what this gent built for his T/A over on thirdgen:
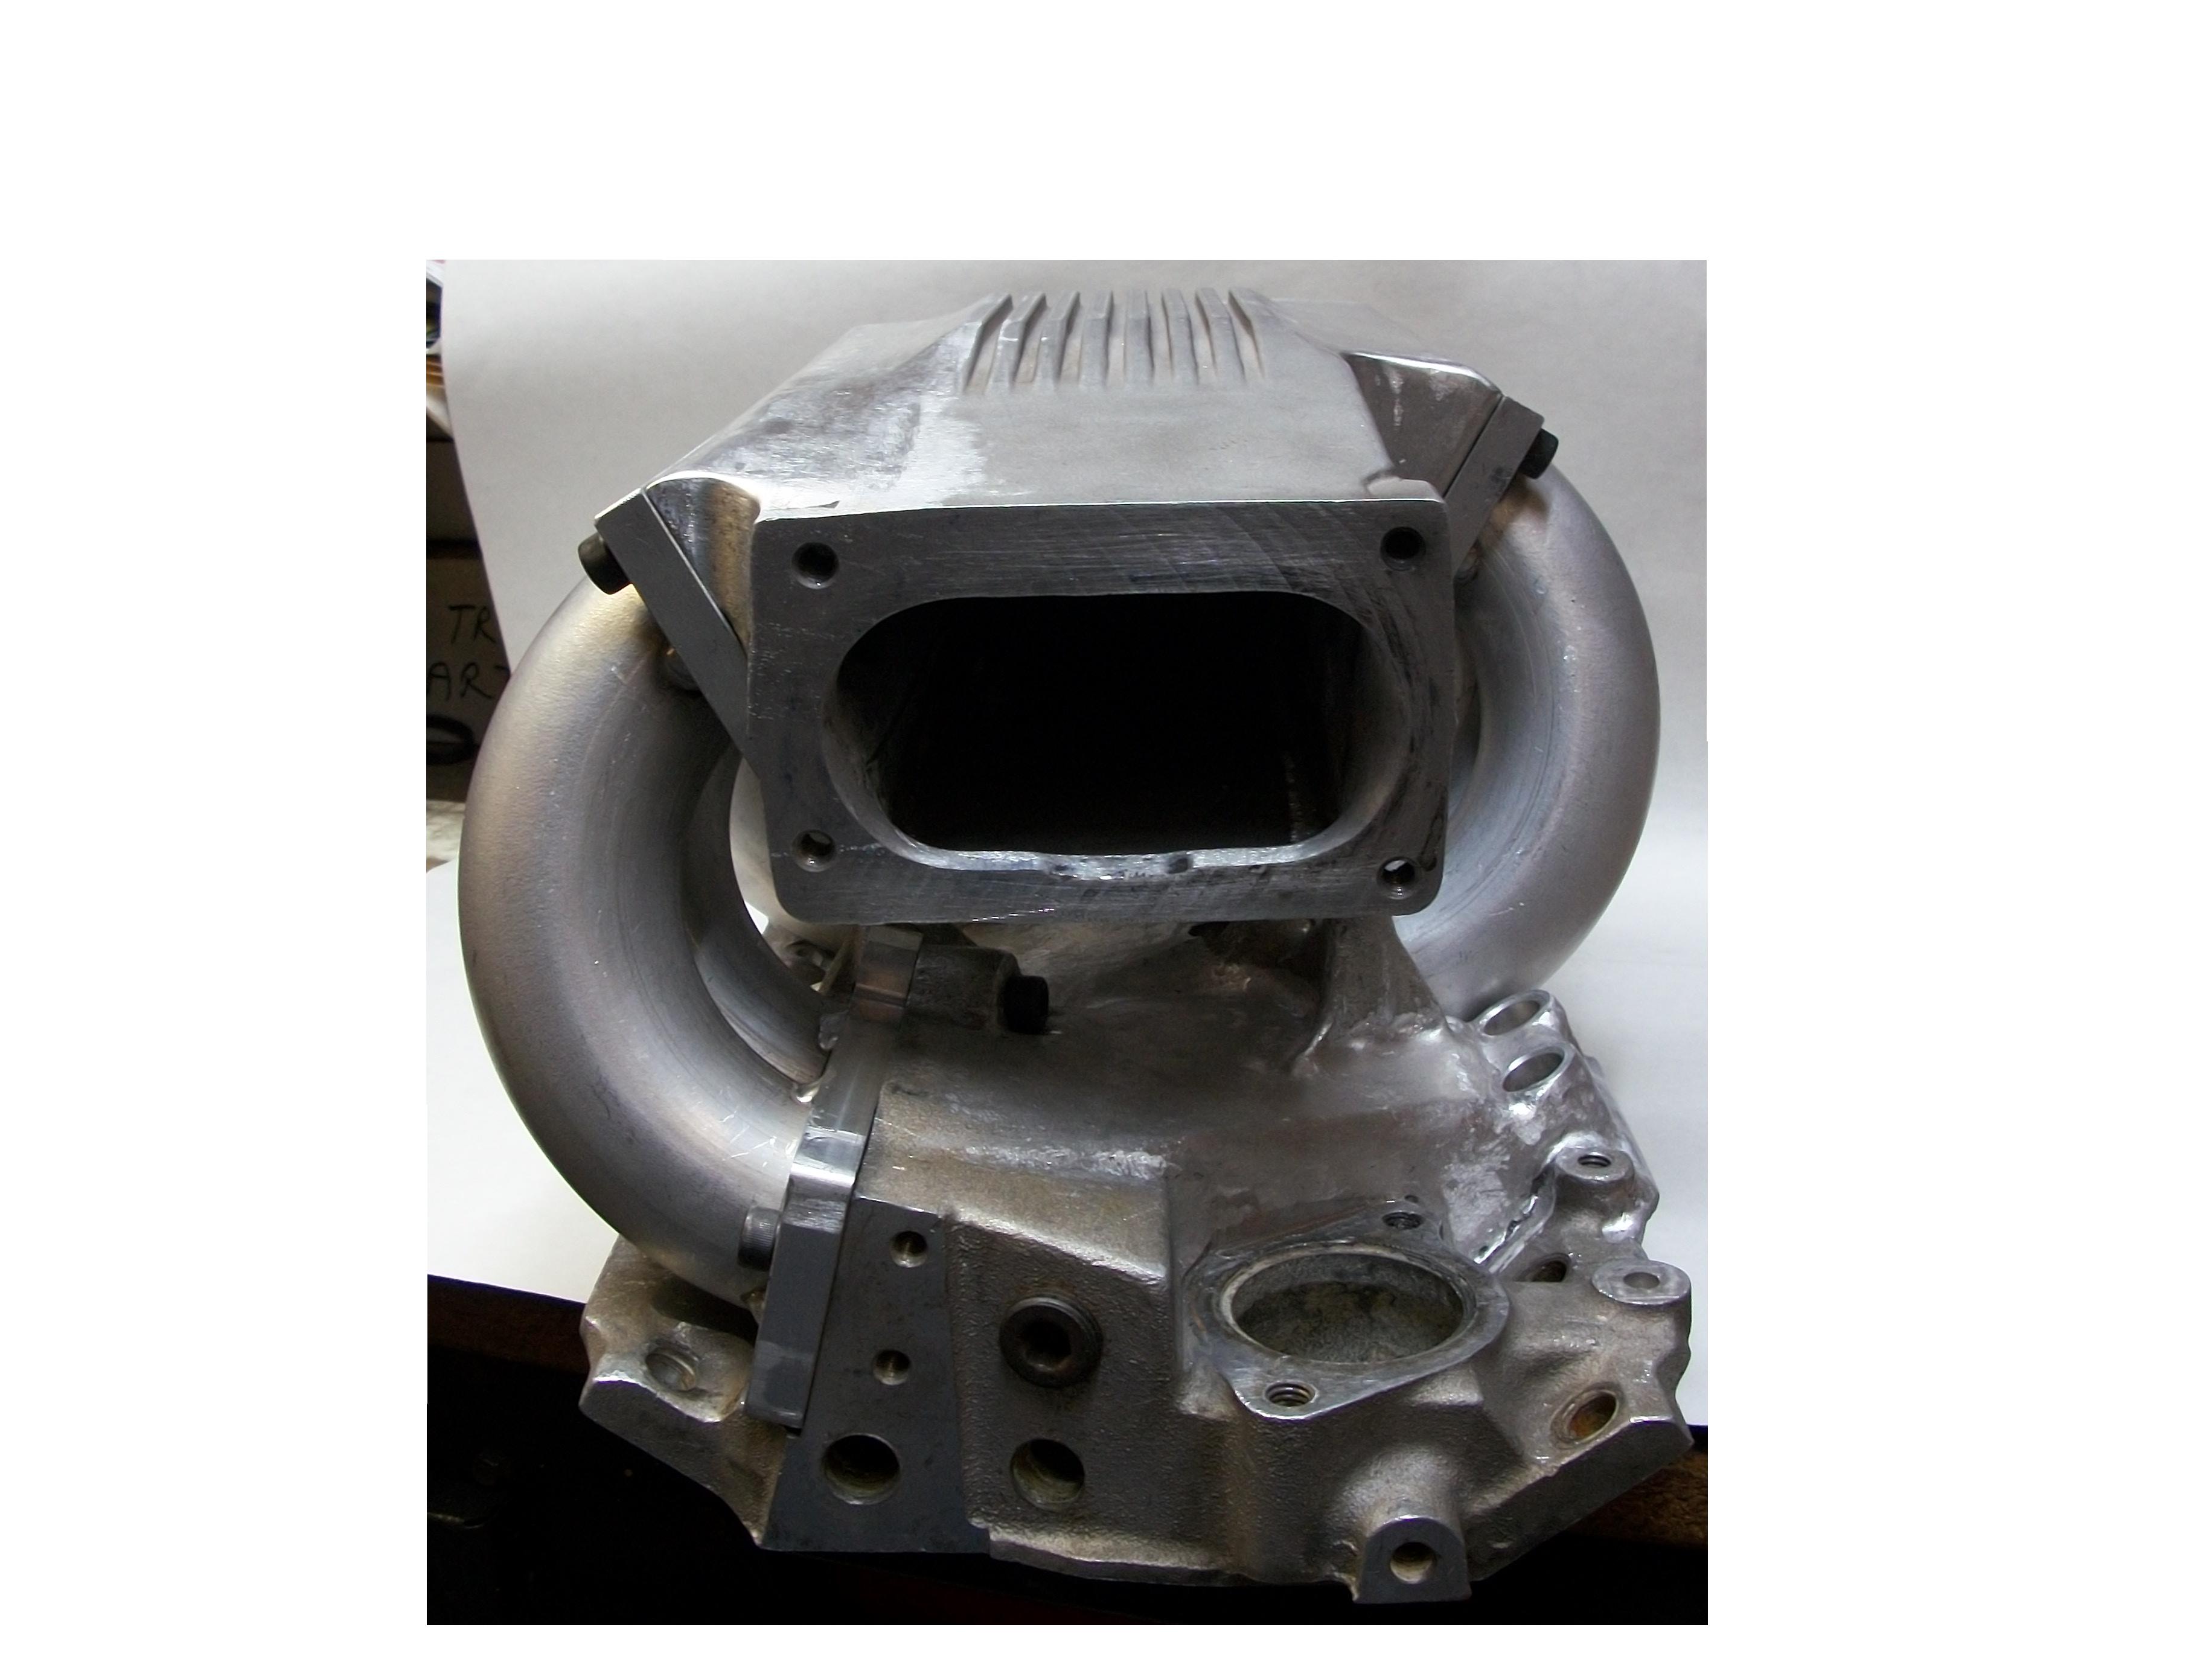
Things to note:
1. runners are a full 2" OD, 1.8" ID
2. Runners shortened a couple inches (moves torque curve up rpm range slightly)
3. Upper plenum extensively reworked to add volume
4. Lower plenum reworked extensively:
a. runners ported out to match 1.8" cross section area
b. Injector bungs raised in order to make a gentler radius where it transitions into the head ports
c. many other "tweeks" to improve flow
He powder coated his, I plan to polish for as near as possible to stock appearance:
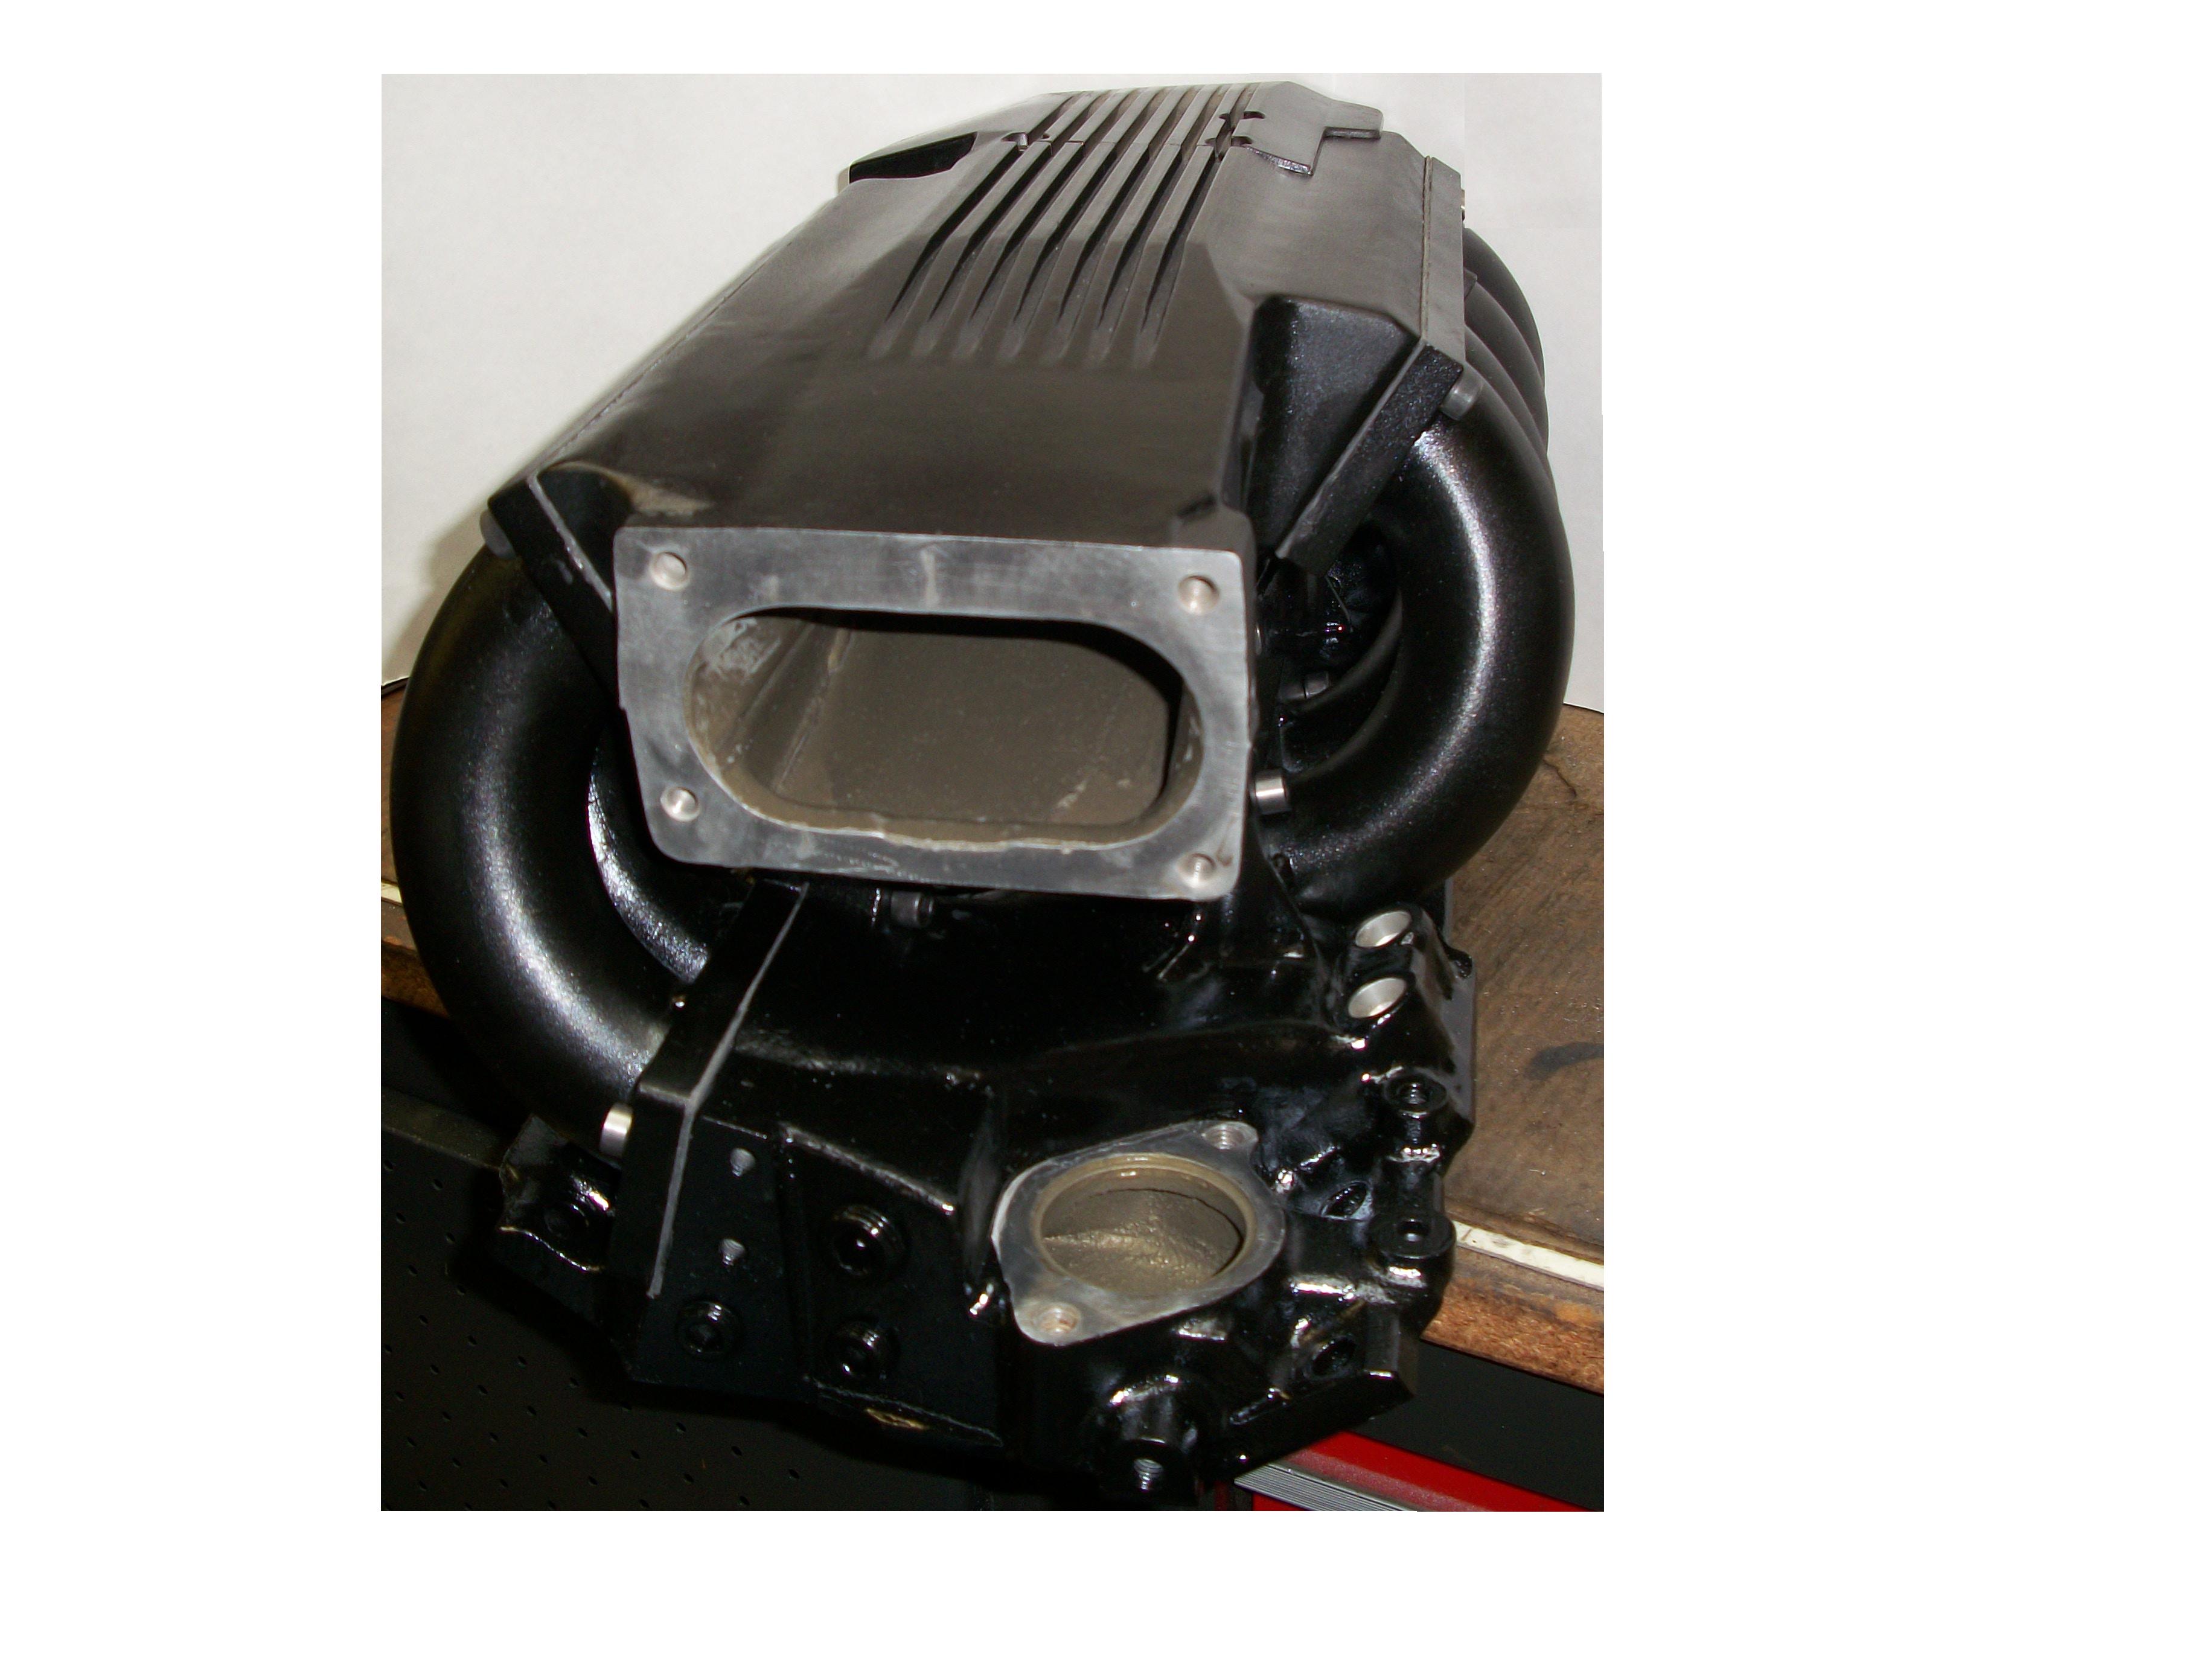
His setup reached 418 RWHP and 421 lb/ft RWTQ.
Granted, he did more work to it than just an intake though....
Things to note:
1. runners are a full 2" OD, 1.8" ID
2. Runners shortened a couple inches (moves torque curve up rpm range slightly)
3. Upper plenum extensively reworked to add volume
4. Lower plenum reworked extensively:
a. runners ported out to match 1.8" cross section area
b. Injector bungs raised in order to make a gentler radius where it transitions into the head ports
c. many other "tweeks" to improve flow
He powder coated his, I plan to polish for as near as possible to stock appearance:
His setup reached 418 RWHP and 421 lb/ft RWTQ.
Granted, he did more work to it than just an intake though....
- Thread starter
- #263
Seats are back from the upholstry guy.
before:


After:

Not too shabby!
they’re not “factory fresh”, but thats not what I wanted. I wanted them to look like originals that were lightly used and well taken care of.
1000 bucks to have both seats done, but worth it!
before:
After:
Not too shabby!
they’re not “factory fresh”, but thats not what I wanted. I wanted them to look like originals that were lightly used and well taken care of.
1000 bucks to have both seats done, but worth it!
- Thread starter
- #264
Recaro replacement lumbar bladders arrived:

They’re a little less wide than the oems, but otherwise, the fit appears to be quite good. The construction is miles better than the “plastic bags” gm originally used and these will probably outlast the car.
Now I just have to buy a set of hog ring pliers and slip the bladders into the seat backs.
Not too shabby, considering I paid less for two (shipping included) than most web sites want for one (USD and shipping not included)…
- Thread starter
- #265
I would assume all c4’s have this issue: the “lid” on the center console cracks inside and makes the whole thing a mess. Like most c4 interior pieces, its 30+ year old crappy plastic and it doesn’t stand up well to either time or use. Especially a pita since we all know getting in and out of a c4 is all about grabbing and pushing yourself out.
Mine had cracked and crumbled inside, where the main support for the lid is little more than a thin sheet of abs plastic. Made it impossible to use it as a way to push my creaky old body out. Every time I tried to put any weight on it at all, you could hear the plastic crunching and breaking even more.
so, a fix was in order.
I pulled the lid out of the car and stripped the vinyl cover and foam off. Sure enough, the plastic piece that was meant to be its structure had cracked and split into no less than 5 separate pieces and multiple cracks that had’t broken a piece off yet.
That just won’t do. I considered buying a nos one, but a quick look at the prices convinced me a “fix” cold be stronger (and more affordable) than an NOS replacement.
I plastic welded the broken pieces back together, but that would just crack and split like the original when any weight was placed on it. Pushing off it with my elbow to get out would certainly shatter it again.
Extra support would be required.
I took a piece of 1/4” aluminum and cut it to the shape of the top of the plastic lid. Then I roughed up the plastic piece and covered it in JB Quick. But that was not going to be enough to make it a permanent fix.
So I drilled through both parts and used pop rivets to hold all the separate broken pieces to the aluminum plate. The plate it on the inside of the arm rest and the pop rivets are hidden under the arm rest underside panel, so theres no way to tell the repair has been made once reassembled.
That took care of the structural issues, but the cosmetics were a different story.
With the aluminum plate in the arm rest, the original foam wasn’t going to fit under the cover. The foam was a wreck anyways. A lot of it was deteriorated from age, collapsed in some places and I destroyed a lot of it getting the cover off. It appears GM had the rest built by “injecting” the foam into the arm rest under the vinyl and also ised it to bond the lid to the cover.
Back to the upholstery days for me then.
I took some left over seat foam from a previous project and bonded it to the aluminum plate. A couple hours of shaving and shaping got it to where I needed it.
Then it was a simple matter of bonding the vinyl cover to the foam and bonding the edges (they had all peeled and lifted before) under the lid. The interior trim plate covers all the work when you open the lid.
Final product turned out pretty good:

Strong enough for me to put my arm on it and push myself up and out and all the lifted and peeling edges which looked so shabby are taken care of.
I had though of making a leather cover for it instead of the vinyl, but that was too much fiddley work for me at the moment. I may revisit the cover over the winter when things slow down.
Mine had cracked and crumbled inside, where the main support for the lid is little more than a thin sheet of abs plastic. Made it impossible to use it as a way to push my creaky old body out. Every time I tried to put any weight on it at all, you could hear the plastic crunching and breaking even more.
so, a fix was in order.
I pulled the lid out of the car and stripped the vinyl cover and foam off. Sure enough, the plastic piece that was meant to be its structure had cracked and split into no less than 5 separate pieces and multiple cracks that had’t broken a piece off yet.
That just won’t do. I considered buying a nos one, but a quick look at the prices convinced me a “fix” cold be stronger (and more affordable) than an NOS replacement.
I plastic welded the broken pieces back together, but that would just crack and split like the original when any weight was placed on it. Pushing off it with my elbow to get out would certainly shatter it again.
Extra support would be required.
I took a piece of 1/4” aluminum and cut it to the shape of the top of the plastic lid. Then I roughed up the plastic piece and covered it in JB Quick. But that was not going to be enough to make it a permanent fix.
So I drilled through both parts and used pop rivets to hold all the separate broken pieces to the aluminum plate. The plate it on the inside of the arm rest and the pop rivets are hidden under the arm rest underside panel, so theres no way to tell the repair has been made once reassembled.
That took care of the structural issues, but the cosmetics were a different story.
With the aluminum plate in the arm rest, the original foam wasn’t going to fit under the cover. The foam was a wreck anyways. A lot of it was deteriorated from age, collapsed in some places and I destroyed a lot of it getting the cover off. It appears GM had the rest built by “injecting” the foam into the arm rest under the vinyl and also ised it to bond the lid to the cover.
Back to the upholstery days for me then.
I took some left over seat foam from a previous project and bonded it to the aluminum plate. A couple hours of shaving and shaping got it to where I needed it.
Then it was a simple matter of bonding the vinyl cover to the foam and bonding the edges (they had all peeled and lifted before) under the lid. The interior trim plate covers all the work when you open the lid.
Final product turned out pretty good:
Strong enough for me to put my arm on it and push myself up and out and all the lifted and peeling edges which looked so shabby are taken care of.
I had though of making a leather cover for it instead of the vinyl, but that was too much fiddley work for me at the moment. I may revisit the cover over the winter when things slow down.
Dave91TM
Power User
Well done, though not simple. I agree replacement cost is steep, $200 U.S. for my 91, so I'm hanging on to the original, its not too bad and certainly not destroyed as you have described.
- Thread starter
- #267
A PO changed out the top on my 88 at some point in the cars past. The car is supposed to be triple black, but they installed a saddle colored top.
Thats irritating (its in good shape so I can’t justify the cost of replacing it yet), but thats not the worst of it.
When they installed it (or had someone install it), they did a piss poor job of it and used products that are “sketchy” at best.
The biggest irritation was the cover on the rear bow was too high and they used what looks like hardware store grade contact cement.
So it had the “peeling corners” look and a good portion of the adhesive had come loose and allowed the cover to shift in several places. The layers and “tabs” had also been installed poorly, with some of them curled back on themselves and bunched up in other places. It just looked like crap all around.
Heres a few examples of improper installation procedures/products that gives you the “lifting edges” on the rear bow:


Just ruins the entire look of the car to my eye. Makes it look shabby, poorly assembled or just plain neglected. It doubly irritates me becuase I put the top up everytime I leave the car in a parking lot to go into a store or restaurant. Every time I put it up, that crap installation just pokes me right in the eye!
I pulled the cover off the rear bow and all it took was a gentle tug. Even the adhesive that was still “holding” was barely hanging on. Then, several days of cleaning the adhesive off the cover and the weather strip channel.
Tip: if you pull your top off and see a yellowish adhesive, its probably some PO committing the sin of contact cement. Get yourself a plastic gasket scraper and a tin of lacquer thinner. Soak a rag with the thinner (make sure you have good ventilation) and hold it against the cement. It will soften and you can “more or less) easily scrape it off. Just keep working your way across the bow, soak, scrape, repeat. Don’t worry about the black paint on the bow itself stripping off. The bow is aluminum and its not black paint: it’s anodized. Lacquer thinner shouldn’t effect it.
Make sure you cover the rear deck painted surfaces with something nice and thick like a beach towel or a good paint drop cloth. Lacquer thinner may damage the paint and at the very least, you don’t want to drop your scraper over the painted surfaces or drag a button on your clothes over it.
To re-bond the top to the rear bow, source some 3m 8005 adhesive. This is the correct bonding agent for convertible tops.
DON’T USE CONTACT CEMENT! IT’S NOT PROPERLY FORMULATED FOR THIS APPLICATION AND IT WILL EVENTUALLY SHIFT OR FAIL COMPLETELY! Leave the contact cement for applying wood veneer and countertop laminates, its not for automotive applications.
Spread a nice thin coat on the top fabric and the rear bow. Be careful you don’t get it on your fingers and touch the outer surface of the top, it will bond and put a big black mark in the fabric you won’t be able to get out. Don’t worry about putting it on the underside surface, it won’t soak through to the other side.
Only put it on the underside of the rear bow, you don’t need it on the top surface.
Allow it to go “tacky” and then start rolling the cover over and under the rear bow.
I use foil tape to hold it in place while the adhesive cures. It will hold when you first touch both surfaces together, but it takes 24hrs to get to full cure. if you don’t do something to hold the cover in place, the tension in the fabric can “pull” itself up and around the rear bow edge. This is usually how you get those curled corners even if you do everything else right: the adhesive isn’t given enough time to get to full cure.
the end result of all this work?

Nice and tight and straight right across the entire rear bow. Theres a couple spots that aren’t exactly right, but they should fall in line after leaving the top up (ie:stretched) for a couple days.
It’s a lot of “grunt work”, but worth it to get the top “right”.
When it gets laid up for winter this year I’ll have to peel and redo the front edge as well.
Yup, they got that wrong too….
Thats irritating (its in good shape so I can’t justify the cost of replacing it yet), but thats not the worst of it.
When they installed it (or had someone install it), they did a piss poor job of it and used products that are “sketchy” at best.
The biggest irritation was the cover on the rear bow was too high and they used what looks like hardware store grade contact cement.
So it had the “peeling corners” look and a good portion of the adhesive had come loose and allowed the cover to shift in several places. The layers and “tabs” had also been installed poorly, with some of them curled back on themselves and bunched up in other places. It just looked like crap all around.
Heres a few examples of improper installation procedures/products that gives you the “lifting edges” on the rear bow:
Just ruins the entire look of the car to my eye. Makes it look shabby, poorly assembled or just plain neglected. It doubly irritates me becuase I put the top up everytime I leave the car in a parking lot to go into a store or restaurant. Every time I put it up, that crap installation just pokes me right in the eye!
I pulled the cover off the rear bow and all it took was a gentle tug. Even the adhesive that was still “holding” was barely hanging on. Then, several days of cleaning the adhesive off the cover and the weather strip channel.
Tip: if you pull your top off and see a yellowish adhesive, its probably some PO committing the sin of contact cement. Get yourself a plastic gasket scraper and a tin of lacquer thinner. Soak a rag with the thinner (make sure you have good ventilation) and hold it against the cement. It will soften and you can “more or less) easily scrape it off. Just keep working your way across the bow, soak, scrape, repeat. Don’t worry about the black paint on the bow itself stripping off. The bow is aluminum and its not black paint: it’s anodized. Lacquer thinner shouldn’t effect it.
Make sure you cover the rear deck painted surfaces with something nice and thick like a beach towel or a good paint drop cloth. Lacquer thinner may damage the paint and at the very least, you don’t want to drop your scraper over the painted surfaces or drag a button on your clothes over it.
To re-bond the top to the rear bow, source some 3m 8005 adhesive. This is the correct bonding agent for convertible tops.
DON’T USE CONTACT CEMENT! IT’S NOT PROPERLY FORMULATED FOR THIS APPLICATION AND IT WILL EVENTUALLY SHIFT OR FAIL COMPLETELY! Leave the contact cement for applying wood veneer and countertop laminates, its not for automotive applications.
Spread a nice thin coat on the top fabric and the rear bow. Be careful you don’t get it on your fingers and touch the outer surface of the top, it will bond and put a big black mark in the fabric you won’t be able to get out. Don’t worry about putting it on the underside surface, it won’t soak through to the other side.
Only put it on the underside of the rear bow, you don’t need it on the top surface.
Allow it to go “tacky” and then start rolling the cover over and under the rear bow.
I use foil tape to hold it in place while the adhesive cures. It will hold when you first touch both surfaces together, but it takes 24hrs to get to full cure. if you don’t do something to hold the cover in place, the tension in the fabric can “pull” itself up and around the rear bow edge. This is usually how you get those curled corners even if you do everything else right: the adhesive isn’t given enough time to get to full cure.
the end result of all this work?
Nice and tight and straight right across the entire rear bow. Theres a couple spots that aren’t exactly right, but they should fall in line after leaving the top up (ie:stretched) for a couple days.
It’s a lot of “grunt work”, but worth it to get the top “right”.
When it gets laid up for winter this year I’ll have to peel and redo the front edge as well.
Yup, they got that wrong too….
Last edited:
- Thread starter
- #268
I do belive the 91 armrest is a little different from the “atari dash” interiors. GM may have redesigned the inner structure (making it a bit stronger) when they redid the interior.Well done, though not simple. I agree replacement cost is steep, $200 U.S. for my 91, so I'm hanging on to the original, its not too bad and certainly not destroyed as you have described.
Excellent info Tourmax.A PO changed out the top on my 88 at some point in the cars past. The car is supposed to be triple black, but they installed a saddle colored top.
Thats irritating (its in good shape so I can’t justify the cost of replacing it yet), but thats not the worst of it.
When they installed it (or had someone install it), they did a piss poor job of it and used products that are “sketchy” at best.
The biggest irritation was the cover on the rear bow was too high and they used what looks like hardware store grade contact cement.
So it had the “peeling corners” look and a good portion of the adhesive had come loose and allowed the cover to shift in several places. The layers and “tabs” had also been installed poorly, with some of them curled back on themselves and bunched up in other places. It just looked like crap all around.
Heres a few examples of improper installation procedures/products that gives you the “lifting edges” on the rear bow:
View attachment 84577
View attachment 84578
View attachment 84579
Just ruins the entire look of the car to my eye. Makes it look shabby, poorly assembled or just plain neglected. It doubly irritates me becuase I put the top up everytime I leave the car in a parking lot to go into a store or restaurant. Every time I put it up, that crap installation just pokes me right in the eye!
I pulled the cover off the rear bow and all it took was a gentle tug. Even the adhesive that was still “holding” was barely hanging on. Then, several days of cleaning the adhesive off the cover and the weather strip channel.
Tip: if you pull your top off and see a yellowish adhesive, its probably some PO committing the sin of contact cement. Get yourself a plastic gasket scraper and a tin of lacquer thinner. Soak a rag with the thinner (make sure you have good ventilation) and hold it against the cement. It will soften and you can “more or less) easily scrape it off. Just keep working your way across the bow, soak, scrape, repeat. Don’t worry about the black paint on the bow itself stripping off. The bow is aluminum and its not black paint: it’s anodized. Lacquer thinner shouldn’t effect it.
Make sure you cover the rear deck painted surfaces with something nice and thick like a beach towel or a good paint drop cloth. Lacquer thinner may damage the paint and at the very least, you don’t want to drop your scraper over the painted surfaces or drag a button on your clothes over it.
To re-bond the top to the rear bow, source some 3m 8005 adhesive. This is the correct bonding agent for convertible tops.
DON’T USE CONTACT CEMENT! IT’S NOT PROPERLY FORMULATED FOR THIS APPLICATION AND IT WILL EVENTUALLY SHIFT OR FAIL COMPLETELY! Leave the contact cement for applying wood veneer and countertop laminates, its not for automotive applications.
Spread a nice thin coat on the top fabric and the rear bow. Be careful you don’t get it on your fingers and touch the outer surface of the top, it will bond and put a big black mark in the fabric you won’t be able to get out. Don’t worry about putting it on the underside surface, it won’t soak through to the other side.
Only put it on the underside of the rear bow, you don’t need it on the top surface.
Allow it to go “tacky” and then start rolling the cover over and under the rear bow.
I use foil tape to hold it in place while the adhesive cures. It will hold when you first touch both surfaces together, but it takes 24hrs to get to full cure. if you don’t do something to hold the cover in place, the tension in the fabric can “pull” itself up and around the rear bow edge. This is usually how you get those curled corners even if you do everything else right: the adhesive isn’t given enough time to get to full cure.
the end result of all this work?
View attachment 84571
Nice and tight and straight right across the entire rear bow. Theres a couple spots that aren’t exactly right, but they should fall in line after leaving the top up (ie:stretched) for a couple days.
It’s a lot of “grunt work”, but worth it to get the top “right”.
When it gets laid up for winter this year I’ll have to peel and redo the front edge as well.
Yup, they got that wrong too….

Thank you very much for posting this, it is very informative.A PO changed out the top on my 88 at some point in the cars past. The car is supposed to be triple black, but they installed a saddle colored top.
Thats irritating (its in good shape so I can’t justify the cost of replacing it yet), but thats not the worst of it.
When they installed it (or had someone install it), they did a piss poor job of it and used products that are “sketchy” at best.
The biggest irritation was the cover on the rear bow was too high and they used what looks like hardware store grade contact cement.
So it had the “peeling corners” look and a good portion of the adhesive had come loose and allowed the cover to shift in several places. The layers and “tabs” had also been installed poorly, with some of them curled back on themselves and bunched up in other places. It just looked like crap all around.
Heres a few examples of improper installation procedures/products that gives you the “lifting edges” on the rear bow:
View attachment 84577
View attachment 84578
View attachment 84579
Just ruins the entire look of the car to my eye. Makes it look shabby, poorly assembled or just plain neglected. It doubly irritates me becuase I put the top up everytime I leave the car in a parking lot to go into a store or restaurant. Every time I put it up, that crap installation just pokes me right in the eye!
I pulled the cover off the rear bow and all it took was a gentle tug. Even the adhesive that was still “holding” was barely hanging on. Then, several days of cleaning the adhesive off the cover and the weather strip channel.
Tip: if you pull your top off and see a yellowish adhesive, its probably some PO committing the sin of contact cement. Get yourself a plastic gasket scraper and a tin of lacquer thinner. Soak a rag with the thinner (make sure you have good ventilation) and hold it against the cement. It will soften and you can “more or less) easily scrape it off. Just keep working your way across the bow, soak, scrape, repeat. Don’t worry about the black paint on the bow itself stripping off. The bow is aluminum and its not black paint: it’s anodized. Lacquer thinner shouldn’t effect it.
Make sure you cover the rear deck painted surfaces with something nice and thick like a beach towel or a good paint drop cloth. Lacquer thinner may damage the paint and at the very least, you don’t want to drop your scraper over the painted surfaces or drag a button on your clothes over it.
To re-bond the top to the rear bow, source some 3m 8005 adhesive. This is the correct bonding agent for convertible tops.
DON’T USE CONTACT CEMENT! IT’S NOT PROPERLY FORMULATED FOR THIS APPLICATION AND IT WILL EVENTUALLY SHIFT OR FAIL COMPLETELY! Leave the contact cement for applying wood veneer and countertop laminates, its not for automotive applications.
Spread a nice thin coat on the top fabric and the rear bow. Be careful you don’t get it on your fingers and touch the outer surface of the top, it will bond and put a big black mark in the fabric you won’t be able to get out. Don’t worry about putting it on the underside surface, it won’t soak through to the other side.
Only put it on the underside of the rear bow, you don’t need it on the top surface.
Allow it to go “tacky” and then start rolling the cover over and under the rear bow.
I use foil tape to hold it in place while the adhesive cures. It will hold when you first touch both surfaces together, but it takes 24hrs to get to full cure. if you don’t do something to hold the cover in place, the tension in the fabric can “pull” itself up and around the rear bow edge. This is usually how you get those curled corners even if you do everything else right: the adhesive isn’t given enough time to get to full cure.
the end result of all this work?
View attachment 84571
Nice and tight and straight right across the entire rear bow. Theres a couple spots that aren’t exactly right, but they should fall in line after leaving the top up (ie:stretched) for a couple days.
It’s a lot of “grunt work”, but worth it to get the top “right”.
When it gets laid up for winter this year I’ll have to peel and redo the front edge as well.
Yup, they got that wrong too….
- Thread starter
- #271
Well, pretty po’d today.
Had the vette out for a little run and stopped off at the grocery store on way home.
When I came back out, I noticed the hood looked funny even from across the parking lot. When I got closer I could see multiple deep and long scratches all over the hood.
It looks like someone spilled something on it and then tried to wipe it off with a dirty rag.
A sample of the damage:


The big scratch is obvious what happened, but those aren’t the “spider/swirl” marks that you often see in car paint. I’ve had those polished out long ago. Those are also damage from someone trying to “cover up” their messing with my car. That type of damage is all over the hood: more small scratches that you can count and multiple big, long, deep ones.
when I got home, I tried the orbital polisher and polish. No dice. They’re too deep to just polish out.
So out came the compound and compounding pad. After a couple rounds on a test spot, I was able to level out the scratches to where they are no longer visible. Sample of the “after compounding”:

Now I have to do the rest of the hood, approximately another 75% of it. I really could do without that right now as my back has been pretty messed up lately. Bending over that long, wide and low hood is really going to hurt my fragile old bod.
I actually would have prefered if they hadn’t tried to wipe it clean at all. The wiping is what caused all those scratches and had I been able to just wash it myself, it wouldn’t have gotten all scratched up.
Why can’t people just leave other people’s stuff alone?


Had the vette out for a little run and stopped off at the grocery store on way home.
When I came back out, I noticed the hood looked funny even from across the parking lot. When I got closer I could see multiple deep and long scratches all over the hood.
It looks like someone spilled something on it and then tried to wipe it off with a dirty rag.
A sample of the damage:
The big scratch is obvious what happened, but those aren’t the “spider/swirl” marks that you often see in car paint. I’ve had those polished out long ago. Those are also damage from someone trying to “cover up” their messing with my car. That type of damage is all over the hood: more small scratches that you can count and multiple big, long, deep ones.
when I got home, I tried the orbital polisher and polish. No dice. They’re too deep to just polish out.
So out came the compound and compounding pad. After a couple rounds on a test spot, I was able to level out the scratches to where they are no longer visible. Sample of the “after compounding”:
Now I have to do the rest of the hood, approximately another 75% of it. I really could do without that right now as my back has been pretty messed up lately. Bending over that long, wide and low hood is really going to hurt my fragile old bod.
I actually would have prefered if they hadn’t tried to wipe it clean at all. The wiping is what caused all those scratches and had I been able to just wash it myself, it wouldn’t have gotten all scratched up.
Why can’t people just leave other people’s stuff alone?
Last edited:
Dave91TM
Power User
Hi Tourmax.
Good posts and
You are correct, the centre arm rests are different in the 91 so mine hasn't broken, but the edges have started to warp and the cost to replace is high,
Nice work on the convertible top, reminds me when I did my weatherstrip, lots of elbow grease, time and patience. By the way I think it looks great with a tan top.
Too bad about the scratches, at least they polished out.
Firstly, thank you for your service.....Fords verses Chevys........... I've had 2 Mustangs. A '67 Fastback 289 2 brl three speed and an 88 5.0 LX 5spd. Both leaked at the rear main seals and smoked upon start from cheap valve guides.... Actually on Ford I had that was good and dependable was a 1981 F150 long bed. Copper and tan. 351 Cleavland 2 brl automatic. I used this truck for years in landscaping and plowing. Eventually it just rotted so badly from underneath. I spent hundreds having metal work done, but I couldn't save her. My guess was that the previous owner got this truck stuck in salt water a few times and never rinsed it off. There were actually small sea shells and barnacles stuck to the rear end. (LOL) The rear end started leaking from the rust and I fixed it with JB Weld. Lasted forever.......................Hello all.
I retired earlier this year from the military. RCAF, Search and Rescue. This was me:
View attachment 29836
That's me in the open door. That's from about ten years ago, we were landing at a friend's cottage near Bouctouche, NB for lunch.
But 29 years of that was enough. It's a young man's game and of the many things I may be, "young" is no longer one of them. I finally got so busted up (physically and entally) that the military medically released me. No regrets, it came with a pretty generous "golden parachute". Suffice to say, I'm in pretty decent financial shape until I go into the ground. LIke I said; no regrets. LIfe well lived, injuries well earned in the cause of something bigger than myself, pensioned off with honor and respect.
I've been a "car guy" my whole life. I was that 5 yer old who took Dad's lawn mower apart, but I was also the 5 year old that could put it back together and it would work. Machines are my thing, just comes natural. You can drop a bucket of parts in front of me, not tell me anything about it and I'll put it together and it will work. Everyone has a gift, mine is machines.
I currently have an 83 Mustang in my garage that's in the build up phase:
View attachment 29838View attachment 29839View attachment 29840
I've had it since new and it was bought pretty base because I was young and poor at the time. Hatchback, v6, automatic and the only option it had was a sunroof. It didn't even have a center console between the buckets! Now it's got a 302 5 speed, t-tops, full Maximum motorsports suspension and more than I can list in a Corvette thread! LOL! Suffice to say, it will out-handle the 88 'Vette I just bought. The Mustang is being built with an eye towards autcrossing it.
I also have several bikes. An 89 FJ1200 that's still on the lift being modified and an 83 Yamaha Venture that is now running a full VMax drivetrain. The 'Max is docile to ride, until you hit the throttle and the V-Boost kicks in, great fun! If you can keep it straight and upright that is.The "VentureMax" is another "too much done to list it all" machine:
View attachment 29841
But, with retirement came a desire for a nice Sunday driving car for me and the missus to just go for a toot when we felt like it. The Mustang is never going to be that car (wife doesn't like the body-style and too many connections to the ex-wife) and the bikes are never going to be "her thing". She had bikes when she was younger and has just grown out of it. She doesn't mind them and she will ride with me, it's just not her preferred way to travel when it's just us. I want her to enjoy her time with me as much as I do with her, so the bikes were "out".
We looked at lots of cars, some of them were: 77 MGB - was a huge ball o' fun and just a bare bones driving machine, but price wasn't right for what the car was. 68 Mustang convertible - rusted (literally nothing saveable except a couple front fenders) well beyond the point of my wanting to resurrect it. 69 mustang convertible - nice, but priced pretty high, even for a solid runner (and would need an easy 10G to bring it up to my standards) and so on. Most of what we looked at were typical Atlantic Canada overpriced rusted out junk or just plain stupidly overpriced if they were a runner at all. I actually got tired of owners trying to tell me how "rare and valuable" a C-code mustang was. Geez people, it's a c-code mustang. Just about as base a car as you can get without having the straight 6 in it.....SMH.
Then we ran across the 88:
View attachment 29837
Well, I'm not a "Vette guy". Heck, I'm not even a GM guy! Ford is my thing and GM's have always been nightmare machines for me, except for one old farm truck (89) that I dragged out of a field and used for snowplowing. That thing just would not die. But despite my incredibly poor track record with GMs, I was willing to have a look......
It was a private sale, even though a dealer had it on his lot. Dealer was doing a favor for a friend. Wanted 13,500.
I almost laughed in his face when he said that!
13,500 is just right out of the ballpark for that car. Heck, it was not even in the parking lot of the ballpark! But we looked at it anyways.
Problems jumped up right away. Brakes - nearly none. Right against the firewall and even then, it only slowed the car, they didn't actually stop it. The test drive was short, on back country roads and I kept far away from intersections or other vehicles. By the end of a test drive, I was stopping the car with the E-brake. Master cylinder was gone, brake fluid had turned jet black from the chewed up seals.
I got it up on a lift and it didn't look too bad. RH muffler was rotted out. The 700 R4 was obviously not original, it's painted a bright Ford blue. RH headlight motor was intermittent and didn't spin the light all the way around. There were several "bodges" under the hood electrically, as someone had run jumper wires from various relays here and there trying to get systems to work as they failed.
The sport seats didn't work, or at least most of the functions didn't work. Wipers only worked on low and "wash". The rear bow release for the top didn't work, you had to reach in and trip the latches manually. Radio worked, but it is a JVC stuffed in with an adapter kit. Speakers were a couple of ancient Alpine 6x9's in boxes shoved in the back of the cargo area. To say they sounded like crap would be generous.
Overall, the car was just....dirty.
There were other small annoyances, but it would take a while to list them all. It's an 88 though, you can't expect it to be perfect.
Had 120,000 kms on it.
RPO codes revealed it was supposed to be a "triple black", so the top had been changed at some point. I don't mind that as the saddle top breaks up the black nicely to my eye.
It's also a Z52 car, the best handling package you could order with a convertible that year. RPO's checked out for everything else. It's a fairly "loaded" car, even for a Vette.
Turns out the owner had several cars in his garage and didn't work on any of them. The Vette he had owned for about 7 years. The first year he put around 1k on the odo, and the next 6 years he only put around another 1,000 K on it. Obviously, the car sat for long periods of time. Not a good sign......
So we haggled a bit. I ended up paying 9 grand for it. Not a screaming deal, but didn't get raped either. I know if you hunt you can get them for less (5-10G seems to be the range), but they're not as common in NS and we liked the car, so we dealt with what we had in front of us. I also was pretty sure most of hte problems with the car, I could fix for very little money.Basically, the cost of replacement parts and a lot of what i saw wrong with the car were things I probably wouldn't even need to buy parts for.
PAid cash, signed the papers, called a flatbed and had it "delivered" to my house......
I love my C4. Your Convertible is choice. I'll take it if you ever want to part with it. She's already winking at me................LOL
Users who are viewing this thread
Total: 1 (members: 0, guests: 1)