

Hey guys,
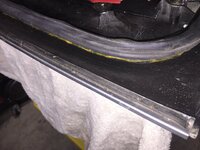
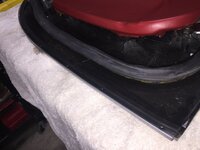
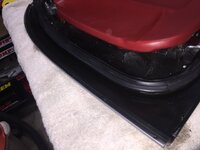
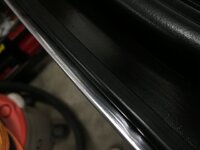
While working on my car this winter I noticed something with the T-tops that I have searched for but never found a single mention to. That is the leading rubber edge of your T-tops. In all the articles I’ve read trying to see if anyone has improved upon the weatherstripping design, I’ve never heard a single person talk about this seal. I believe GM put that seal around the leading edge of the T-tops to stop wind and water from going underneath the T-tops at speed but over time it shrinks, and breaks down.
Here is a write up following the replacement of that seal, the tools needed, and the time of the job. Hopefully you find this of use to you. I hope it will stop my high speed water leak and reduce wind noise but I’ll have to wait until summer to test and report back.
Tools needed:
- Small flat head screwdriver
- Small brush and cleaner
- Sealer
- Pliers
- Knife
Parts needed:
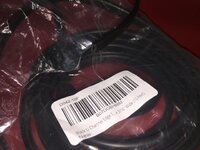
- U channel rubber seal 8.7mm wide by 4.8mm thick by 10 meters ($12 on Amazon.ca)
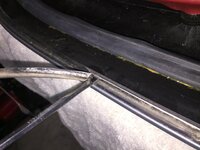
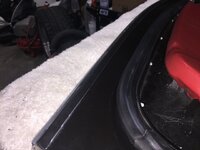
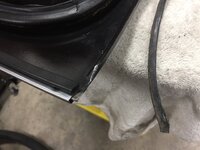
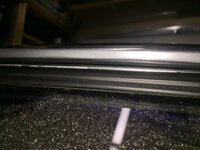
Step One: Wedge a small screwdriver in between the stainless trim and the old rubber seal and rotate. Once a leading edge of the old rubber seal is freed, work your way down the trim rotating a screw driver in the stainless steel groove, pulling the on the seal. Be careful to keep the screwdriver from touching the front edge of the trim as it will put dimples in the steel that will be visible once done.
Step Two: Clean the groove
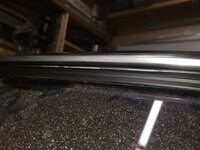
Step Three: Install the new U-Channel seal and cut to length
Step Four: Using your pliers press the seal into the groove and crimp the corners of the trim to hold the seal in place. Do this on both ends of the seal.
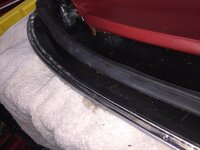
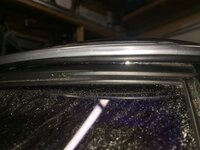
Step Five: Test fit T-top and look for a complete seal on the leading edge of your T-top. If there is a gap, remove the T-top, pull out the seal, stick the flat head screw driver in the groove and rotate it to expand the groove eliminating a gap. Test fit again and repeat if necessary.
Step Six: Pull the seal out of the stainless steel groove (note that the seal should remained crimped on the ends so the seal with not fall out). Now dab a small amount of sealer in various locations across the groove. If you use too much it may be a pain to remove it in the future. Too little and the seal may pop off while in use so use your judgement. Clean up any excess sealer, and allow to dry.
Time to complete job: 1 hour
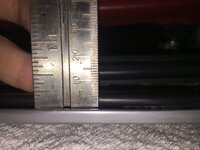
The difference in the height of the seal went from 2.5mm with the old seal to 5mm with the new seal.
While working on my car this winter I noticed something with the T-tops that I have searched for but never found a single mention to. That is the leading rubber edge of your T-tops. In all the articles I’ve read trying to see if anyone has improved upon the weatherstripping design, I’ve never heard a single person talk about this seal. I believe GM put that seal around the leading edge of the T-tops to stop wind and water from going underneath the T-tops at speed but over time it shrinks, and breaks down.
Here is a write up following the replacement of that seal, the tools needed, and the time of the job. Hopefully you find this of use to you. I hope it will stop my high speed water leak and reduce wind noise but I’ll have to wait until summer to test and report back.
Tools needed:
- Small flat head screwdriver
- Small brush and cleaner
- Sealer
- Pliers
- Knife
Parts needed:
- U channel rubber seal 8.7mm wide by 4.8mm thick by 10 meters ($12 on Amazon.ca)
Step One: Wedge a small screwdriver in between the stainless trim and the old rubber seal and rotate. Once a leading edge of the old rubber seal is freed, work your way down the trim rotating a screw driver in the stainless steel groove, pulling the on the seal. Be careful to keep the screwdriver from touching the front edge of the trim as it will put dimples in the steel that will be visible once done.
Step Two: Clean the groove
Step Three: Install the new U-Channel seal and cut to length
Step Four: Using your pliers press the seal into the groove and crimp the corners of the trim to hold the seal in place. Do this on both ends of the seal.
Step Five: Test fit T-top and look for a complete seal on the leading edge of your T-top. If there is a gap, remove the T-top, pull out the seal, stick the flat head screw driver in the groove and rotate it to expand the groove eliminating a gap. Test fit again and repeat if necessary.
Step Six: Pull the seal out of the stainless steel groove (note that the seal should remained crimped on the ends so the seal with not fall out). Now dab a small amount of sealer in various locations across the groove. If you use too much it may be a pain to remove it in the future. Too little and the seal may pop off while in use so use your judgement. Clean up any excess sealer, and allow to dry.
Time to complete job: 1 hour
The difference in the height of the seal went from 2.5mm with the old seal to 5mm with the new seal.
Attachments
-
 B5A2B73F-A27C-462E-83F6-70E313F5FC52.jpeg368.5 KB · Views: 47
 -
 41A531C0-1579-439C-97E2-406E45DB77DA.jpeg307.8 KB · Views: 49
 -
 BE1FF93F-2790-49F5-827E-13AF40FC1CEC.jpeg345.3 KB · Views: 46
 -
 5DF73D37-0343-482C-82F5-4C5DF28F836A.jpeg298.7 KB · Views: 46
 -
 D12B8181-0893-4119-B15B-A0D0AB5806BB.jpeg330 KB · Views: 46
 -
 99E9127F-0D55-47EE-BFAB-5F2926AC19C1.jpeg361 KB · Views: 43
 -
 FFAF02A2-7697-4175-82CD-FDE5120DD7BF.jpeg272.4 KB · Views: 36
 -
 338DC92A-915D-43E6-BE38-1A8CBC4466FC.jpeg278.8 KB · Views: 35
 -
 A0B25834-AC2D-4520-AAAB-58CB53329524.jpeg291.9 KB · Views: 37
 -
 F1D64A44-026C-45C5-90C7-C0E7D294D112.jpeg199.1 KB · Views: 36
 -
 C7777F28-383D-439A-9266-DDC7AC7099FB.jpeg275.6 KB · Views: 37
 -
 C5FBC174-1967-47E4-93FB-7AA87A4B4CDA.jpeg374.6 KB · Views: 35
 -
 D4CCA05C-55F2-4A3B-BD3F-9DF5E3138072.jpeg336.6 KB · Views: 31
 -
 8497944B-9DB9-4F36-A950-A2FA52B42082.jpeg335.1 KB · Views: 29
Last edited:


