Cadder61

Casual User
Jun 20, 2018
42
58
VetteCoins
882
Car
1975 CORVETTE L82
When I got my 75 last year, it had a non-functioning park brake - some of the guts had been removed by last owner after springs rusted out. Tore into it last fall (ask me how much fun I had beating the old rusted-solid levers out), replaced everything with stainless parts, got it all back together and had to promptly tear all apart again when turning the wheel by hand produced a loud snapping noise. Turned out one hold-down spring retainer had turned on the pin and popped off. After muttering a few (dozen) choice words, put it all back together again.
This year, was spinning the tires (in shop yet, not on road dammit) and got the same noise from same wheel again. Pulled apart again, retainer had not come off (yet) but back of wheelstuds in the hub were contacting the hold-down spring as they went by. Took everything out and started comparing new stainless parts to the old rusted original hold downs. Sure enough, new pins were about 1/16 inch longer than original. Considering there is only about 1/16 to 1/8 clearance between the hold downs and back of wheelstuds at the best of times, this extra length was enough to allow contact. In addition, the old pins had a distinct triangular shaped end like an arrowhead (nice solid contact to the retainer)- the new pins looked like someone mashed the end with a hammer. The old retainers had a slot that was barely wider than the end of the pin, so when they were in place and the pin turned 90 degrees, that retainer could not turn. On the new ones, the slot was noticeably wider than the pin end, so when put together the pin could wiggle back and forth and turn.
Fortunately my old hold-down springs and pins were salvageable, just had to take to the wire wheel to buff up. Put the old pins and springs in and I seem to have adequate clearance now. Just have to pull the new parts out of the other side and put the old parts back in again.
Has anyone else seen this? It would seem quality control is maybe hit and miss on these stainless park brake kits - wrong length pins and sloppy retainers. Or did I just get the result of someone's bad day?
 
Can't say for sure. When I did mine I had no clearance issues with my replacement parts. Albeit I have not driven my car since then. I would hope from a manufacturing standpoint that they are a one off or they will have alot of unhappy people (like yourself!)

T
 
  • Like
Reactions: Cadder61
Unfortunately the jobber stuff is often close but not like the original and a guy really has to watch and compare before using some of that stuff. No fun working on those park brakes either. When I did mine I just replaced the long springs that pull the shoes together and used the original hold down pins and retainers.
Yup, C3 park brakes are a joy to play with. Guess the consolation is that I now know this system and how it all goes together - there are a few shortcuts. And I will say that whoever invented long reach needle nose pliers still deserves high praise...
 
Had the exact same problem as you. Redid everything in stainless and it still wouldn’t hold. After this winter when I swapped my 6 speed manual in I had to make it work. I ended up taking each side off 5 or 6 times and here are some of the solutions I discovered to the problems.

Retaining pins too long - This one is big pain. I found that not only are some of the pins too long but the retaining cups are also deeper than original. This means that the clearance between them and your wheel studs becomes a problemand prevents free rotation of the wheel and can also be noted by a click when you turn the wheel. For one of the pins you can take it out and place a small washer behind it to reduce the length or you can squish the retaining cup in a vice if it’s too deep. Unfortunately there are two pins wedged in between the dust shield and caliper mount I believe. If these are an issue the only resolve is to try and squish the retaining cups or unfortunately remove the pins.

Pins won’t stay locked in retaining cups - Sometime the pins can rotate after you’ve finally locked them in and then you have to do it all over agin. I found that once I got them lined up I would take a flat head screw driver and give a tap on the top of the pins to seat them and it worked quite well. I still had issues with a few and didn’t trust them so I actually stuck some super glue in there. kind of a bubba thing to do but I was getting frustrated.

Getting those darn cups on the pins - So during my research I came across this tip. Take the spring and cup to your vise and clamp half of it in. Take some detal floss and wrap it around the spring and the cup (around 4-5 wraps with a knot each wrap will hold it). Then flip it over and do the same thing to the other side. Now the spring is compress and attached to the cup which makes installation so much easier. Once it’s on and the pin is rotated take a lighter and carefully burn the floss off. Make sure not to get too much heat on the spring or it will loose it’s spring-iness... That’s a word!

Stainless steel brake shoes - This is one I wish I knew a long time ago. Apparently the stainless steel parking brake shoes are incorrectly arched so they don’t make complete contact with the inside of the rotor. Since they are stainless I have also heard they flex slightly reducing the grabing force. I came to find out that the friction surface of the pad is actually smaller width and length wise and because it is riveted there is also a big reduction in contact area. The only resolve is to buy OEM steel ones. I picked some up at auto value (they were instock) for like $50.

Stainless steel parking brake actuating levers - The stainless steel parking brake levers are not the same as the original steel. They are more rounded which can cause the lever to slip off the catch on the parking brake shoes. I found that you can either buy the steel ones or take a dremel and make the ‘catch’ on the levers flatter so they won’t roll off the shoes.

Lastly make sure the adjuster cable is completely loose prior to adjusting each wheel. Also before starting your adjustments make sure both of the star adjusters in each wheel and completely turned in so you don’t get a false adjustment and make sure you spin the wheels before so you know how tough it is to turn the wheels without any drag. This ensures that during your adjustment, when you’ve adjusted the star screw so the wheel is locked, you can back it off only enough to where it feels as though there is no resistance.

Then adjust the parking brake cable so there is no resistance on the wheel with the handle down, a d a 50lb pull to get to the 14th knotch when you pull the handle. After doing all of that my e-brake works amazingly. Almost like a new car... well it’ll hold it on a very steep incline.

I heard from the local vender in Calgary (Western Corvette) that Willcox or Ecklers was redoing their stainless steel parking brake kits because of all the compaints they’ve been getting but he said they won’t be ready until September.

Hope this helps. Unfortunately I deleted all my pictures of the lever and the shoes. I never delete my pictures of anything but I thought who the heck am I ever going to show this too or need this for. ‘Sigh’
 
Last edited:
Had the exact same problem as you. Redid everything in stainless and it still wouldn’t hold. After this winter when I swapped my 6 speed manual in I had to make it work. I ended up taking each side off 5 or 6 times and here are some of the solutions I discovered to the problems.

Retaining pins too long - This one is big pain. I found that not only are some of the pins too long but the retaining cups are also deeper than original. This means that the clearance between them and your wheel studs becomes a problemand prevents free rotation of the wheel and can also be noted by a click when you turn the wheel. For one of the pins you can take it out and place a small washer behind it to reduce the length or you can squish the retaining cup in a vice if it’s too deep. Unfortunately there are two pins wedged in between the dust shield and caliper mount I believe. If these are an issue the only resolve is to try and squish the retaining cups or unfortunately remove the pins.

Pins won’t stay locked in retaining cups - Sometime the pins can rotate after you’ve finally locked them in and then you have to do it all over agin. I found that once I got them lined up I would take a flat head screw driver and give a tap on the top of the pins to seat them and it worked quite well. I still had issues with a few and didn’t trust them so I actually stuck some super glue in there. kind of a bubba thing to do but I was getting frustrated.

Getting those darn cups on the pins - So during my research I came across this tip. Take the spring and cup to your vise and clamp half of it in. Take some detal floss and wrap it around the spring and the cup (around 4-5 wraps with a knot each wrap will hold it). Then flip it over and do the same thing to the other side. Now the spring is compress and attached to the cup which makes installation so much easier. Once it’s on and the pin is rotated take a lighter and carefully burn the floss off. Make sure not to get too much heat on the spring or it will loose it’s spring-iness... That’s a word!

Stainless steel brake shoes - This is one I wish I knew a long time ago. Apparently the stainless steel parking brake shoes are incorrectly arched so they don’t make complete contact with the inside of the rotor. Since they are stainless I have also heard they flex slightly reducing the grabing force. I came to find out that the friction surface of the pad is actually smaller width and length wise and because it is riveted there is also a big reduction in contact area. The only resolve is to buy OEM steel ones. I picked some up at auto value (they were instock) for like $50.

Stainless steel parking brake actuating levers - The stainless steel parking brake levers are not the same as the original steel. They are more rounded which can cause the lever to slip off the catch on the parking brake shoes. I found that you can either buy the steel ones or take a dremel and make the ‘catch’ on the levers flatter so they won’t roll off the shoes.

Lastly make sure the adjuster cable is completely loose prior to adjusting each wheel. Also before starting your adjustments make sure both of the star adjusters in each wheel and completely turned in so you don’t get a false adjustment and make sure you spin the wheels before so you know how tough it is to turn the wheels without any drag. This ensures that during your adjustment, when you’ve adjusted the star screw so the wheel is locked, you can back it off only enough to where it feels as though there is no resistance.

Then adjust the parking brake cable so there is no resistance on the wheel with the handle down, a d a 50lb pull to get to the 14th knotch when you pull the handle. After doing all of that my e-brake works amazingly. Almost like a new car... well it’ll hold it on a very steep incline.

I heard from the local vender in Calgary (Western Corvette) that Willcox or Ecklers was redoing their stainless steel parking brake kits because of all the compaints they’ve been getting but he said they won’t be ready until September.

Hope this helps. Unfortunately I deleted all my pictures of the lever and the shoes. I never delete my pictures of anything but I thought who the heck am I ever going to show this too or need this for. ‘Sigh’
Thanks for the detailed response, lots of really good info there. I used steel shoes- read on some forums about issues with stainless - plus got some brand name shoes on Amazon for a third the price the jobbers here wanted.
I had also read the idea of tying down the springs but I found for me that the method out of the service manual worked best - push the shoes back against the shield and place the spring. I then lined up the adjustment hole on the spindle, pushed the spring down with a pair of needle nose pliers and grabbrd the head of the pin at the same time and gave it a half twist. Bit of a trick to push and turn at same time but didn't take long to get the knack of it.
We'll see how well everything worked when I can get it on the road.
 
  • Like
Reactions: ddgermann
That is the post of the year IMO. ☝
@Nik hack your bots and send this man some big vette coins man. 😂

There's a shortage on VetteCoins right now Derek... Maybe we will recall some for Cody from the richest member....
1564844888168.png
 
Had the exact same problem as you. Redid everything in stainless and it still wouldn’t hold. After this winter when I swapped my 6 speed manual in I had to make it work. I ended up taking each side off 5 or 6 times and here are some of the solutions I discovered to the problems.

Retaining pins too long - This one is big pain. I found that not only are some of the pins too long but the retaining cups are also deeper than original. This means that the clearance between them and your wheel studs becomes a problemand prevents free rotation of the wheel and can also be noted by a click when you turn the wheel. For one of the pins you can take it out and place a small washer behind it to reduce the length or you can squish the retaining cup in a vice if it’s too deep. Unfortunately there are two pins wedged in between the dust shield and caliper mount I believe. If these are an issue the only resolve is to try and squish the retaining cups or unfortunately remove the pins.

Pins won’t stay locked in retaining cups - Sometime the pins can rotate after you’ve finally locked them in and then you have to do it all over agin. I found that once I got them lined up I would take a flat head screw driver and give a tap on the top of the pins to seat them and it worked quite well. I still had issues with a few and didn’t trust them so I actually stuck some super glue in there. kind of a bubba thing to do but I was getting frustrated.

Getting those darn cups on the pins - So during my research I came across this tip. Take the spring and cup to your vise and clamp half of it in. Take some detal floss and wrap it around the spring and the cup (around 4-5 wraps with a knot each wrap will hold it). Then flip it over and do the same thing to the other side. Now the spring is compress and attached to the cup which makes installation so much easier. Once it’s on and the pin is rotated take a lighter and carefully burn the floss off. Make sure not to get too much heat on the spring or it will loose it’s spring-iness... That’s a word!

Stainless steel brake shoes - This is one I wish I knew a long time ago. Apparently the stainless steel parking brake shoes are incorrectly arched so they don’t make complete contact with the inside of the rotor. Since they are stainless I have also heard they flex slightly reducing the grabing force. I came to find out that the friction surface of the pad is actually smaller width and length wise and because it is riveted there is also a big reduction in contact area. The only resolve is to buy OEM steel ones. I picked some up at auto value (they were instock) for like $50.

Stainless steel parking brake actuating levers - The stainless steel parking brake levers are not the same as the original steel. They are more rounded which can cause the lever to slip off the catch on the parking brake shoes. I found that you can either buy the steel ones or take a dremel and make the ‘catch’ on the levers flatter so they won’t roll off the shoes.

Lastly make sure the adjuster cable is completely loose prior to adjusting each wheel. Also before starting your adjustments make sure both of the star adjusters in each wheel and completely turned in so you don’t get a false adjustment and make sure you spin the wheels before so you know how tough it is to turn the wheels without any drag. This ensures that during your adjustment, when you’ve adjusted the star screw so the wheel is locked, you can back it off only enough to where it feels as though there is no resistance.

Then adjust the parking brake cable so there is no resistance on the wheel with the handle down, a d a 50lb pull to get to the 14th knotch when you pull the handle. After doing all of that my e-brake works amazingly. Almost like a new car... well it’ll hold it on a very steep incline.

I heard from the local vender in Calgary (Western Corvette) that Willcox or Ecklers was redoing their stainless steel parking brake kits because of all the compaints they’ve been getting but he said they won’t be ready until September.

Hope this helps. Unfortunately I deleted all my pictures of the lever and the shoes. I never delete my pictures of anything but I thought who the heck am I ever going to show this too or need this for. ‘Sigh’
Thanks for the details .. The park brake is on my list of to-do’s and I’ll be referring back to your post to hopefully avoid pitfalls.
 
Thanks for the details .. The park brake is on my list of to-do’s and I’ll be referring back to your post to hopefully avoid pitfalls.
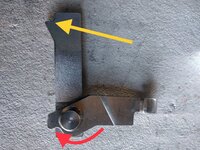
No problem. Here’s a picture of that lever I was talking about in my previous post that contributed the most issues to my parking brake system. If you haven’t bought the replacement parts yet you can just buy the OEM steel one. If you do decided to buy the stainless, the area on my picture marked with the red arrow needs to be demelled down so there is a flat clatch and it slopes towards the lever basically just dremeling the rounded corner flat. That corner is so rounded that on occasion the parking brake shoe will slip off it loosing all your clamping force. I also dremeled the area with the yellow arrow so it slopes down towards the lever to avoid it slipping off the shoe as well.
 

Attachments

  • 3140810C-AD48-4613-85A1-36C80377FFBF.jpeg
    3140810C-AD48-4613-85A1-36C80377FFBF.jpeg
    644.6 KB · Views: 31
  • Informative
Reactions: ddgermann
i have a 78 and since the whole trailing arm needed to be rebuilt, and i decided to go with a single offset arm, i sent it out to be redone, when it come back the springs and cups were falling off. same thing the pins looked like they were just hammered out rather than being formed in a proper die.
ended up reusing the old parts in some spots
 
Old Thread: Hello . There have been no replies in this thread for 100 days.
Content in this thread may no longer be relevant.
Perhaps it would be better to start a new thread instead.

Similar threads

Users who are viewing this thread