Pilots fly, and that's what they should stick to. Drivers drive and again ditto.

Pilots and drivers that also have mechanical knowledge on what they are operating that they own should and could tinker with equipment if they so choose if they feel the outcome will benefit from such actions. It's called modding which a lot of people do here and elsewhere on their vehicles.

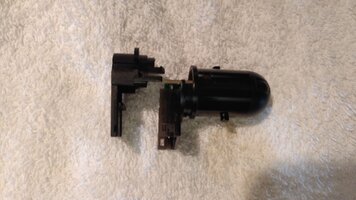
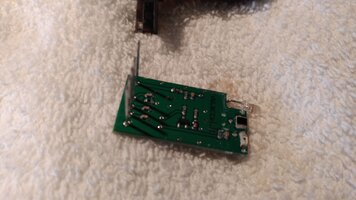
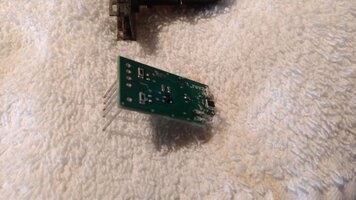
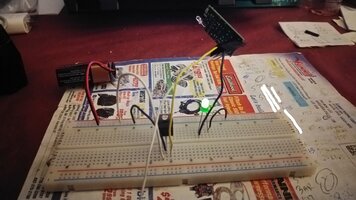
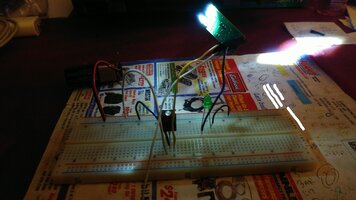
Sensor ordered, experiment starts next week once I figure out how to proceed.
 
  • Like
Reactions: LE BARON
I picked up the sensor today and I have it apart already. I have some pics that I'll upload later. Basically this sensor is made by a company called littelfuse. They supply sensors and other stuff to the auto sector and manufacturers that specify certain functions with sensors for their needs and this company produces them according to the needs of their customer (GM in this case).


There are 4 pins to a tiny circuit board inside that dome thingie you see on the dash. The circuit board sits inside a white gooey paste stuff (kinda like silicone) that fills the inside of the dome part of the case. It is easily removed but is a bit tacky (the pics I'll upload later will show what I'm talking about).
 
Last edited:
Pics of the disassembled light sensor

That silicone dome stuff covers up the top part of the circuit board (where the red LED light is). I believe it covers up the photo diode also and is probably calibrated to account for the diode being covered by the silicone. If I place just the board back into the casing and plug it into my car I will be very surprised if the diode is now exposed to more sunlight and keeps the headlights off. I'll even take it giving me a few extra seconds (like my C6 Z06) when I pull into the garage and get the car shut down before the lights come on automatically. That would be interesting and saves me having to mess with the board.
 

Attachments

  • IMG_20211102_160826.jpg
    IMG_20211102_160826.jpg
    1.4 MB · Views: 37
  • IMG_20211102_160909.jpg
    IMG_20211102_160909.jpg
    1.5 MB · Views: 21
  • IMG_20211102_160924.jpg
    IMG_20211102_160924.jpg
    1.4 MB · Views: 20
  • IMG_20211102_161022.jpg
    IMG_20211102_161022.jpg
    1.8 MB · Views: 18
  • IMG_20211102_161228.jpg
    IMG_20211102_161228.jpg
    1.3 MB · Views: 17
  • IMG_20211102_161247.jpg
    IMG_20211102_161247.jpg
    831.9 KB · Views: 24
Last edited:
So I tried yesterday to remove the trim piece on the dash so I could access the sensor that's there now and didn't have much luck getting it off. The below pics shows what the SM says to do and I have those interior trim tools but no matter what I did I couldn't get that piece to start popping off the main dash.

I obviously don't want to mangle that part (it's over $100 and currently B/O from GM) so I'm trying to remove it nicely. My car is also going to be stored soon so if I can't get this part off I'll have to wait till spring. I might drive it today later maybe I'll drop by my friend's place (shop foreman at a different brand dealership) and he might have some ideas how to remove it.

If anyone has pulled that part off and know how to do it without wrecking stuff the info is appreciated.
 

Attachments

  • IMG_20211104_053107.jpg
    IMG_20211104_053107.jpg
    2.4 MB · Views: 21
  • IMG_20211104_053046.jpg
    IMG_20211104_053046.jpg
    2.7 MB · Views: 23
Last edited:
My car is currently baking in my driveway. This is my last attempt to try and remove that grille on the dash and get access to the sensor (I had tried several more times since the above posting). My friend at his dealership suggest getting the dash heated up so the part is more "flexible" and it just might be enough to pop it off.

If it doesn't work out it'll be spring time before I try some other method to get the sensor out.
 

Attachments

  • IMG_20211108_122815.jpg
    IMG_20211108_122815.jpg
    1.7 MB · Views: 18
Last edited:
Success!!!! Baking the car in the sun did the trick. Popped up pass. side corner without much effort and work my way to the driver's side and thank God didn't damage the part or the area of the dash it goes in.

I swapped my purchased sensor with the OE one, put it into the grille and just placed it back into the dash without popping it in. It sits there nicely and no worries about dropping the sensor and wiring into the dash.

Sherway Gardens is near me so I drove the car there and went into the partial under roof parking area, normally once I get the car in there within 2-3 seconds the lights will come on and this time I was able to drive around for like 15-20 secs. before they came on. I then parked the car under the train bridge around West Mall to see if the lights will come on and they didn't. Finally I went home drove the car into the garage, again usually when I get in there the lights are on immediately this time it was about 15-20 secs before they came on so for now I'm pretty happy about that. Looks like removing that dome white silicone thingy puts more light to the photo diode so I'll keep testing the next few days while it's still nice out to confirm the results I got just now. Stay tuned.
 

Attachments

  • IMG_20211108_142348.jpg
    IMG_20211108_142348.jpg
    2.4 MB · Views: 14
  • IMG_20211108_142418.jpg
    IMG_20211108_142418.jpg
    1.1 MB · Views: 21
It looks like today will be the last day I'm driving my car as it will be put away most likely tomorrow or Friday so I had 2 more days of driving and testing the modded light sensor in the car.

Yesterday was a little cloudy with not much sun when I went out with the car. After a bit of driving I stopped the car under a dark bridge. Expecting the lights to come on after a fair bit of delay that didn't happen within 2-3 secs the lights were on. Once I drove out from under the dark bridge lights went out fairly quickly. Again a good test was when I drove it back into my garage it was again about 10-15 secs before the lights would come on so that is much better than before where they would come on immediately after driving in.

Today was more sunny than yesterday so again after driving a while I parked it under the same dark bridge and the lights would come after a longer delay than yesterday but the delay wasn't substantial. Once again when I drove it into my garage I now had the time to shut off all my accessories before shutting the car off without the lights coming on so it's now like my C6 Z06.

So the takeaway from this is..............yes removing that white silicone stuff in the sensor does help in keeping the lights from coming on like before but if you are in a fairly dark area (like that bridge I was under) the difference from stock is almost nil, but in my garage or driving around Sherway under the roof parking area the lights will stay off for longer than the previous factory setup.

Over the winter I'll do some voltage checks and see if there is a way to add a different photo diode that will generate the steady voltage needed to make the car and BCM think it is daylight all the time AND not mess up the HVAC readings for that system.

I hope the sun does not bake that photocell now that it does not have the silicone to protect it/control the amount of light that goes into it.
You have a good point, only time will tell next year if not having that silicone will wreck my sensor on there currently. I will say that I usually don't park my car outside for long periods and if I do I place a sunshade inside. The real test is if I'm on a road trip with the sun shining down on the dash for hours whether that will heat up the sensor inside that dome holder enough to wreck it.
 
Got the items I needed earlier today and I got the sensor to work in the house mocked up on the breadboard with a little light that will come on when no light is shining on it and off when I held a flashlight to the diode. Now in the house and this mock up on the board the voltages are going to be "slightly" different than when it's powered up in the car but it gives me a close enough scenario where I'm able to test it.

According to the SM, the sensor gets a reference voltage from the BCM (5V) and through the photo diode depending on lighting conditions it will send a voltage of anywhere from 0.4V to 5V to the HVAC module where it goes to a ground after the module. In the house (with the light on) I'm getting an output voltage of about 2.1-2.2V and with the flashlight shining on the diode it drops down to 1.7-1.9V which is enough to turn the light off.

Light from a flashlight (what I'm using in the house) is different than actual sunlight so I expect the voltages to be different, and I'm sure there's probably a circuit of some kind in the BCM where there could be a built in delay before it will command the lights to be on or off based on light input. As of right now the lower the output voltage # below 2V the light will stay off, above 2V it will come on so the 2V cutoff seems to be where it dictates whether the lights will be on or off. To keep the lights off permanently an output voltage of around 1V should do the trick.

I'll upload a video sometime tomorrow of my mad experiment so you can see what the deal is with trying to gain manual control of these stupid auto hdlts.
 

Attachments

  • IMG_20211202_174318_LI.jpg
    IMG_20211202_174318_LI.jpg
    1 MB · Views: 19
  • IMG_20211202_174436_LI.jpg
    IMG_20211202_174436_LI.jpg
    1,024 KB · Views: 19
Ever since I got my C7 back from dealer from getting a new motor put in, I have had issues. One being lights dimming randomly and go dim way to early in the day for my eyesite lol. Lately they have been stuck on dim regardless of lighting outside... anyways I just ordered the new sensor but while waiting for it to get here next week, i decided to unplug mine in the car and now my lights are bright again. I havent noticed anything else not working and I still get the temperature reading in the car as I thought this sensor was for that also but maybe not.
 
Old Thread: Hello . There have been no replies in this thread for 100 days.
Content in this thread may no longer be relevant.
Perhaps it would be better to start a new thread instead.

Similar threads

Users who are viewing this thread