- Jul 8, 2012
- 116
- 10
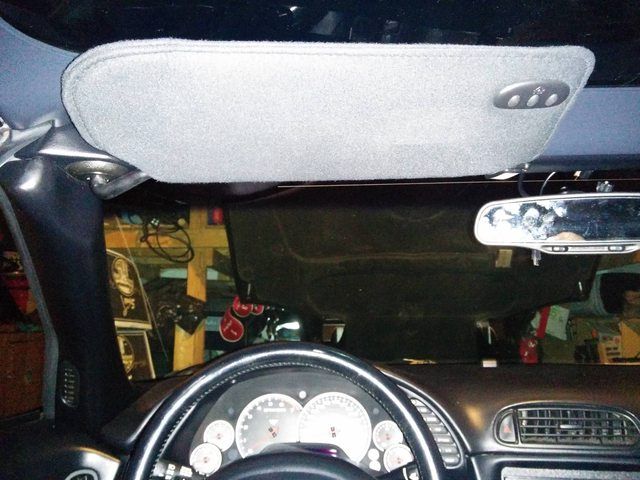
The C5 in some respects was ahead of its time and came equipped with many luxuries that were not available in most cars for it's time (think TPMS, climate control, DIC, HUD etc etc) so it puzzled me that it did not come equipped with a homelink or other garage door opener. I've never been a fan of carrying my clunky old remote in the car. I know it's been done before but us Canadians need to have our own DIY knowledge base!  Here's my tutorial on this clean and cheap mod.
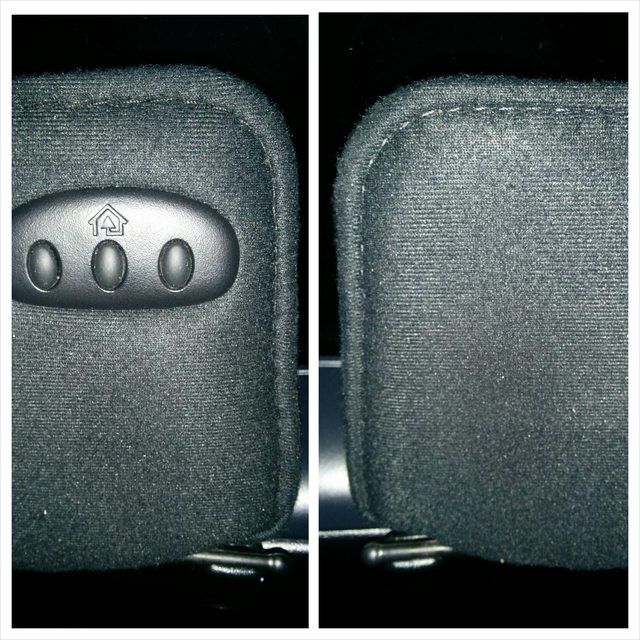
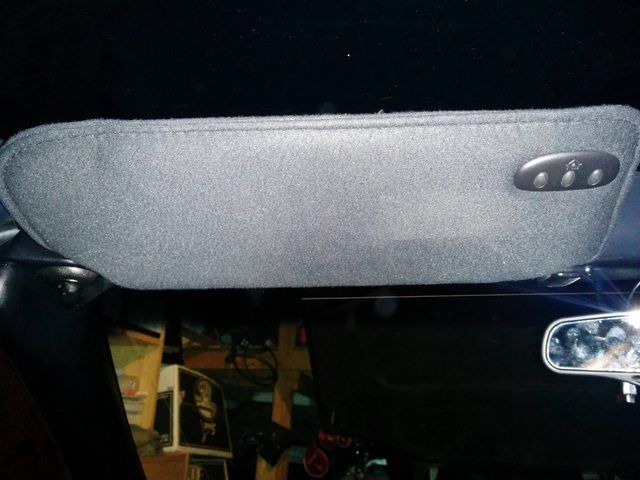
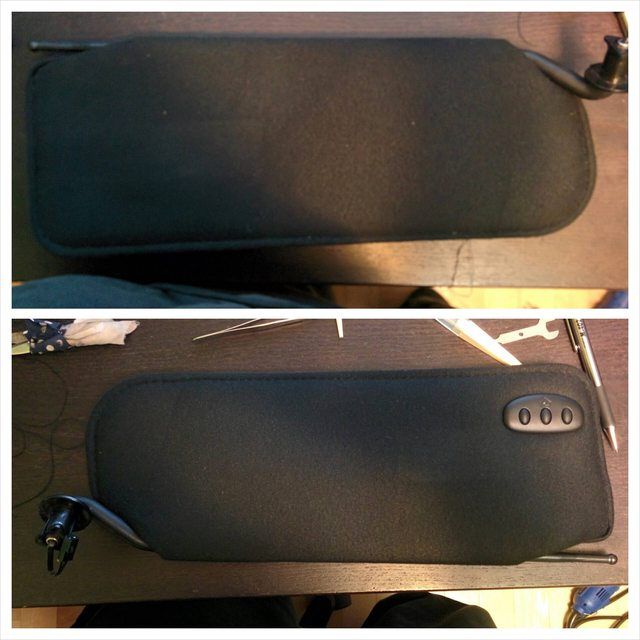
For those not interested in the full tutorial, here's the before and after, more pictures below of the process and final results!
Tools Needed
- Homelink device (bought this off ebay for $20)
- flat head screwdriver
- small utility knife
- wire cutter/stripper
- saw or rotary tool/dremel with cutting attachment
- electrical tape or shrink tubing
- double sided tape
- needle and thread (optional if you want to sew it up yourself OR pay someone to sew it up for you)
Total Cost: $20-30 + labour for stitching assuming you already have all the tools
I will skip the removal of the visor, you can find resources on this online and it's simple enough...jab the flat head screwdriver into the slit of the pivot point on the visor and twist, it pops right out.
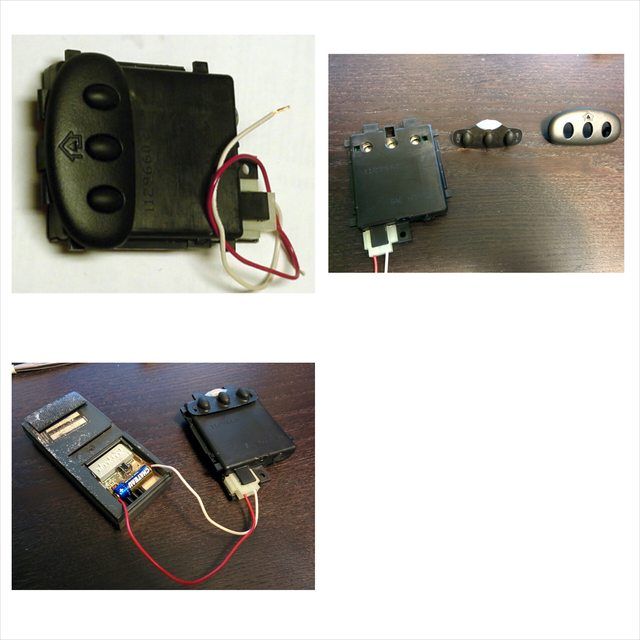
I started off by taking apart the homelink button trim pieces and also testing the electronics by hooking it up to the battery of my garage opener accessed through the back plate. Now is a perfect time to train the homelink to verify it works since you have it all hooked up anyway. It's also a great way to figure out which wire is +ve and which is -ve (ground) when the wire colours are slightly ambiguous like mine
NOTE: the plastic trim piece just pops off with a little bit of elbow grease and a small flathead screwdriver to pry it off.
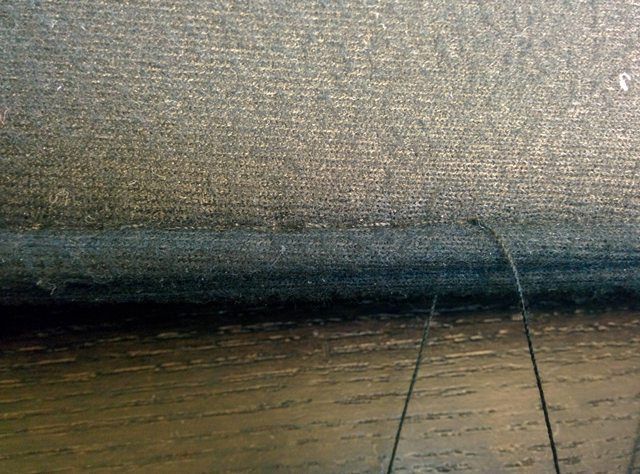
Remove the stitching on the visor (I used this opportunity to see how the stitching worked so i could replicate it when sewing it back up). Once it's opened up place your homelink in position of where you would like it to sit and then trace the outline of it on the particle board to be cut. You can see i left a small piece of the board in tact at the bottom. I left that there for rigidity so the visor wouldn't be able to "flop" around compared to if i were to just lop off the entire section.
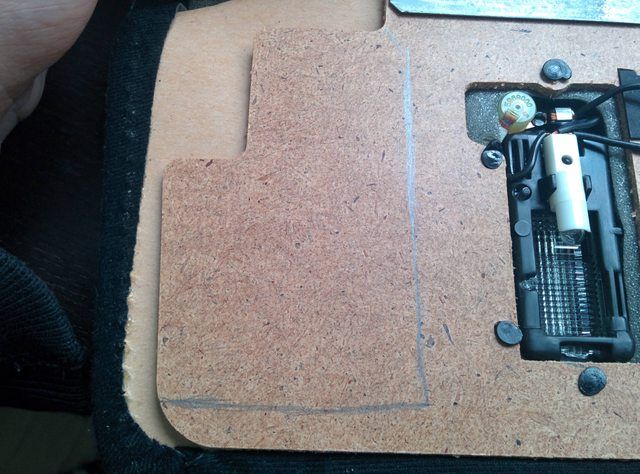
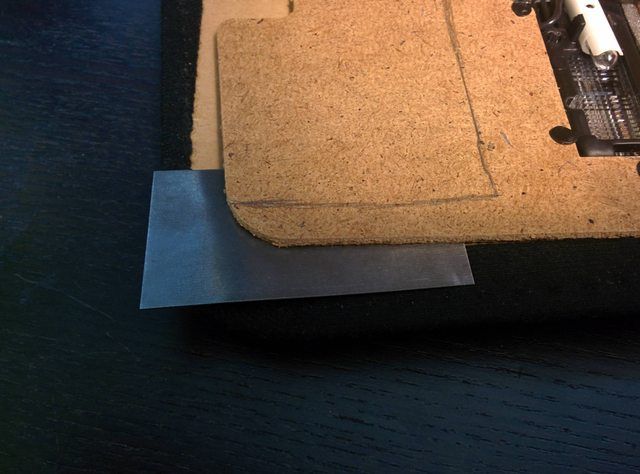
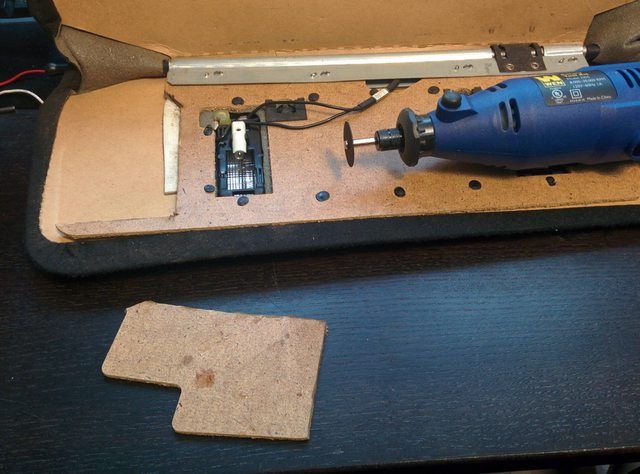
Take your dremel and carefully cut along the outline. I wanted to make sure i didn't accidentally cut the carboard and lining of the visor so i placed a metal plate under the board as a precaution. It is also important to take your time and be careful...measure twice (or 10 times) and cut once! Check the fitment and make adjustments as necessary. I ended up cutting a little bit more than i traced and then filed down the edges so the fit felt nicer
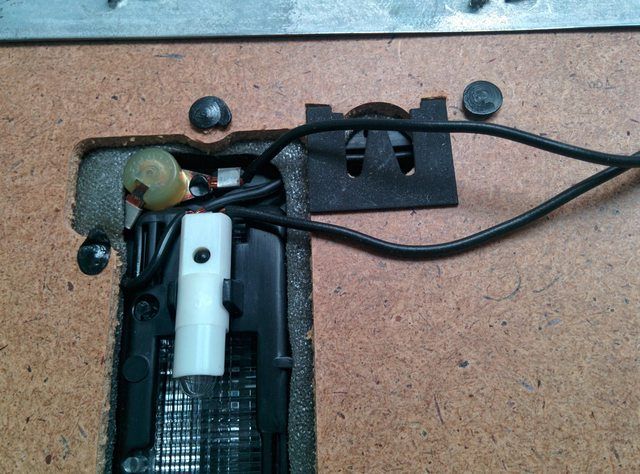
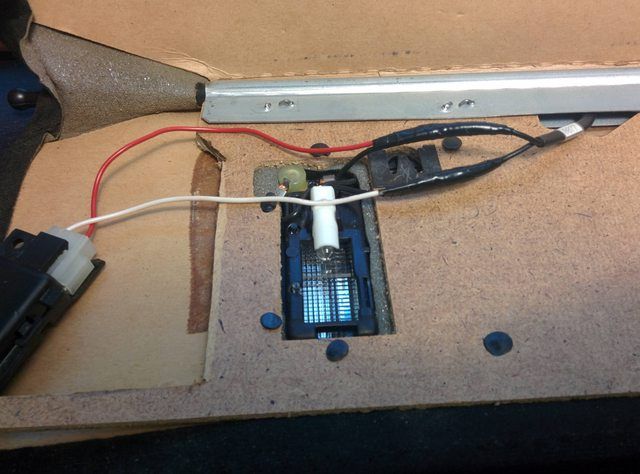
Now comes the fun part, as you can see, my visor had black wires only...which is not terribly helpful! in the picture below the circular clear object in the top left is the switch for the vanity mirror when the lid is flipped open. directly to the right of it you will see a wire that is attached to a plate connected to this switch, this is your +ve wire and it is constant power even when the car is off. Perfect for your homelink! Make sure to tap into this wire before the switch on the left! if you splice the wires after, the homelink will only be powered when the vanity mirror lights are on which we do not want. Directly below the +ve wire is the -ve (ground) wire which goes straight into the -ve terminal of the vanity light.
Cut and splice the wires, I decided not to cut the wires and simply removed a section of the insulation on the wires, then thread the homelink wires inbetween the exposed wiring. If done correctly this will act similiar to a knot and allows you to skip soldering and is less bulky compared to cutting and splicing in my opinion. shrink tube or electrical tape the wires. If you want to be sure, before you tape it up and sew it all up, reconnect the visor to the car and test the homelink to make sure you have wired it correctly
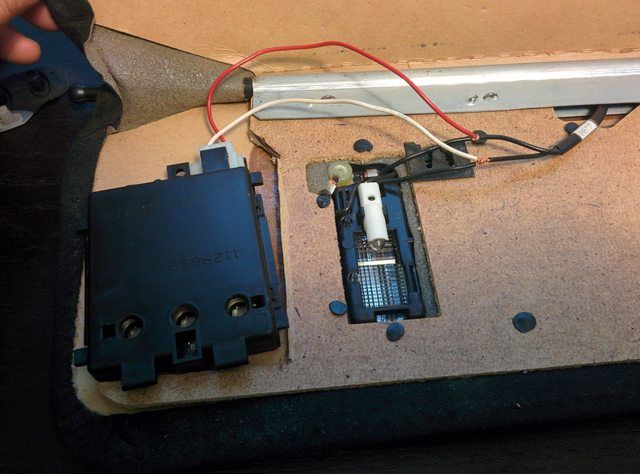
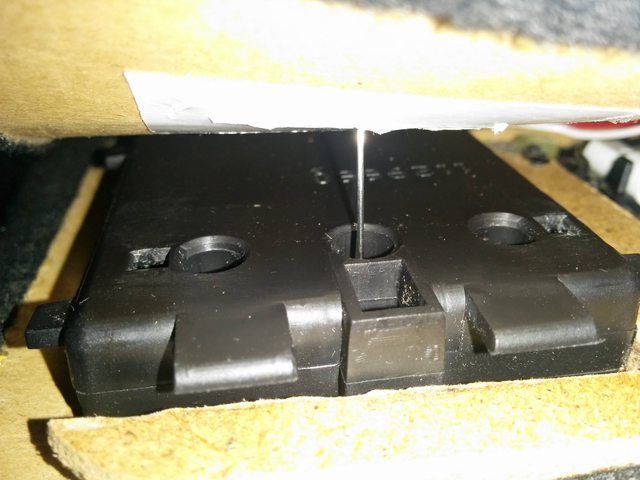
take some double sided tape and secure the homelink device in place. now to cut the visor so the button trim can be installed. It's kind of awkward to do so what i did was i took a needle and placed it where the buttons were, closed the visor so the needle would penetrate on the other side and make small holes to mark where i needed to cut.
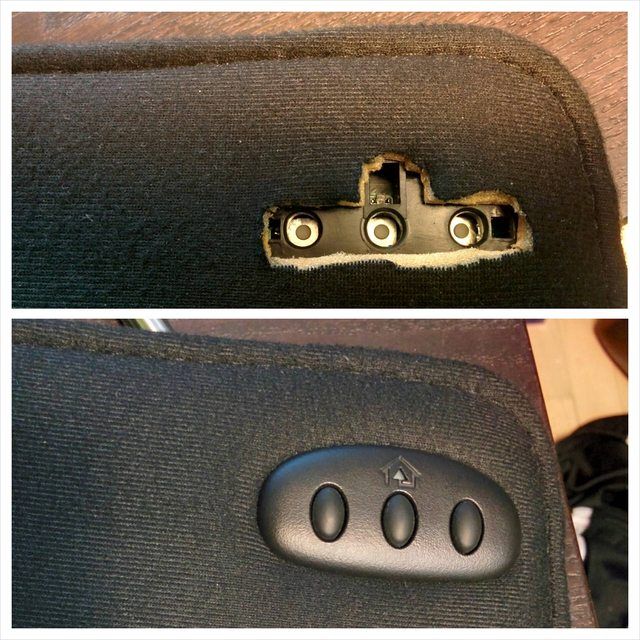
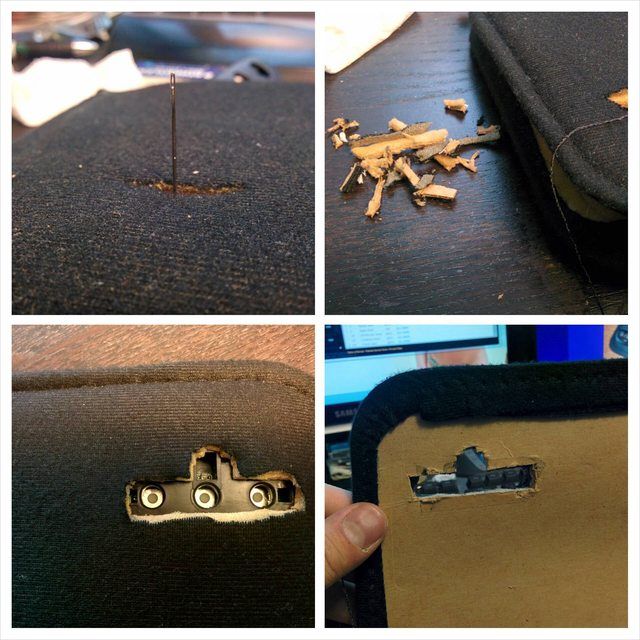
cut CAREFULLY. I suggest start by connected the 3 needle holes and then taking a small and sharp pair of scissors (i used the one in my swiss army knife) cut a little bit off at a time, close the visor to check fit and then cut some more. it is imperative that you don't cut too much of the fabric because there's no going back in this step! the final cuts should expose the 3 buttons on the homelink, the 2 holes where the button trim tabs lock into place on the sides of the buttons and the LED light above the middle button. You can see that i definitely took my time and measured about 50 times and made a lot of adjustment cuts. slow and steady wins the race!
 Here's my tutorial on this clean and cheap mod.
For those not interested in the full tutorial, here's the before and after, more pictures below of the process and final results!

Tools Needed
- Homelink device (bought this off ebay for $20)
- flat head screwdriver
- small utility knife
- wire cutter/stripper
- saw or rotary tool/dremel with cutting attachment
- electrical tape or shrink tubing
- double sided tape
- needle and thread (optional if you want to sew it up yourself OR pay someone to sew it up for you)
Total Cost: $20-30 + labour for stitching assuming you already have all the tools
I will skip the removal of the visor, you can find resources on this online and it's simple enough...jab the flat head screwdriver into the slit of the pivot point on the visor and twist, it pops right out.
I started off by taking apart the homelink button trim pieces and also testing the electronics by hooking it up to the battery of my garage opener accessed through the back plate. Now is a perfect time to train the homelink to verify it works since you have it all hooked up anyway. It's also a great way to figure out which wire is +ve and which is -ve (ground) when the wire colours are slightly ambiguous like mine
NOTE: the plastic trim piece just pops off with a little bit of elbow grease and a small flathead screwdriver to pry it off.

Remove the stitching on the visor (I used this opportunity to see how the stitching worked so i could replicate it when sewing it back up). Once it's opened up place your homelink in position of where you would like it to sit and then trace the outline of it on the particle board to be cut. You can see i left a small piece of the board in tact at the bottom. I left that there for rigidity so the visor wouldn't be able to "flop" around compared to if i were to just lop off the entire section.

Take your dremel and carefully cut along the outline. I wanted to make sure i didn't accidentally cut the carboard and lining of the visor so i placed a metal plate under the board as a precaution. It is also important to take your time and be careful...measure twice (or 10 times) and cut once! Check the fitment and make adjustments as necessary. I ended up cutting a little bit more than i traced and then filed down the edges so the fit felt nicer


Now comes the fun part, as you can see, my visor had black wires only...which is not terribly helpful! in the picture below the circular clear object in the top left is the switch for the vanity mirror when the lid is flipped open. directly to the right of it you will see a wire that is attached to a plate connected to this switch, this is your +ve wire and it is constant power even when the car is off. Perfect for your homelink! Make sure to tap into this wire before the switch on the left! if you splice the wires after, the homelink will only be powered when the vanity mirror lights are on which we do not want. Directly below the +ve wire is the -ve (ground) wire which goes straight into the -ve terminal of the vanity light.

Cut and splice the wires, I decided not to cut the wires and simply removed a section of the insulation on the wires, then thread the homelink wires inbetween the exposed wiring. If done correctly this will act similiar to a knot and allows you to skip soldering and is less bulky compared to cutting and splicing in my opinion. shrink tube or electrical tape the wires. If you want to be sure, before you tape it up and sew it all up, reconnect the visor to the car and test the homelink to make sure you have wired it correctly


take some double sided tape and secure the homelink device in place. now to cut the visor so the button trim can be installed. It's kind of awkward to do so what i did was i took a needle and placed it where the buttons were, closed the visor so the needle would penetrate on the other side and make small holes to mark where i needed to cut.

cut CAREFULLY. I suggest start by connected the 3 needle holes and then taking a small and sharp pair of scissors (i used the one in my swiss army knife) cut a little bit off at a time, close the visor to check fit and then cut some more. it is imperative that you don't cut too much of the fabric because there's no going back in this step! the final cuts should expose the 3 buttons on the homelink, the 2 holes where the button trim tabs lock into place on the sides of the buttons and the LED light above the middle button. You can see that i definitely took my time and measured about 50 times and made a lot of adjustment cuts. slow and steady wins the race!

Last edited:

