Hi Guys,
Just wanted to start a new thread regarding this issue I finally solved after five years.
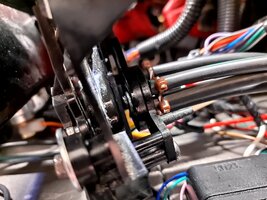
The issue was regarding the heater/AC vacuum control switch that is located in the center console. When I first bought my car, my old switch was faulty and I could hear the vacuum leaking while the car was running. I replaced the switch but nothing ever worked like it was suppose to. Everything just felt like the heat was on all the time. A year later I replaced all the lines and the fittings but still no change. A couple years after that I added AC back into my car with a brand new and improved system and it kept the interior bearable but not cold.
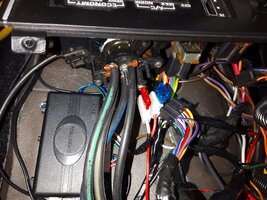
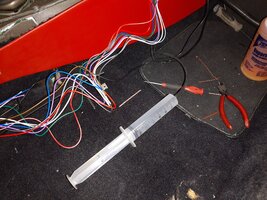
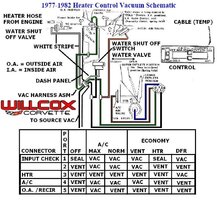
So, this year I decided I would test all of the vacuum lines individually. I used a big medical syringe to draw vacuum on the system. It took a few times of drawing the syringe to get enough vacuum on the lines to actuate everything but it worked! So after I confirmed that there were no leaks from the lines or diaphragms I focused on the switch. I reconnected everything and placed the syringe on the source vacuum port an tried to draw a vacuum but it didn't hold any vacuum and I could hear the air escaping around the switch. To confirm this I sprayed a little soapy solution on it and sure enough it was leaking. Today I bought a brand new switch and thought my trouble would be over but the same thing happened. I decided to take the old switch apart to see what the issue was and I found a couple issues. First, the switch has a silicone seal that has channels molded into it to direct the vacuum. However the surface that the silicone seal seals against is quite rough so I smoothed the surface with some 1500 sand paper and a little bit of cutting polish. I also made sure to sand fast to get some heat into it to make the surface nice and smooth. The second issue is the fact that this switch is held together with a thin metal spring washer and a plastic locking pin. The tension in this setup is not enough to create a good seal. So instead I put it back together with a machine screw, and a couple washers and nuts. This way I could also vary the amount of tension I applied to get a good seal. I installed the switch and placed the syringe on the vacuum supply port and tightened the diaphragm until I had a good seal. I then went around and figured out which vacuum line was suppose to go in which port. Unsurprisingly these remanufactured switches have no numbers on the ports and they do not match the diagrams online (I'll post a picture below of which lines go to which ports). Finally I tested everything and it all works and holds vacuum!!! Finally I have a working vacuum system with a functioning air recirculation.
Hopefully this write up helps some of you whos system doesn't work.
PS. The pictures I took were pretty crappy. I had dealt with this issue for an hour and a half tonight and didn't want to take it apart for some better pictures") . Hopefully they're good enough. If not let me know and I will take apart my new diaphragm and do the same thing and post some better pictures.
. Hopefully they're good enough. If not let me know and I will take apart my new diaphragm and do the same thing and post some better pictures.
Just wanted to start a new thread regarding this issue I finally solved after five years.
The issue was regarding the heater/AC vacuum control switch that is located in the center console. When I first bought my car, my old switch was faulty and I could hear the vacuum leaking while the car was running. I replaced the switch but nothing ever worked like it was suppose to. Everything just felt like the heat was on all the time. A year later I replaced all the lines and the fittings but still no change. A couple years after that I added AC back into my car with a brand new and improved system and it kept the interior bearable but not cold.
So, this year I decided I would test all of the vacuum lines individually. I used a big medical syringe to draw vacuum on the system. It took a few times of drawing the syringe to get enough vacuum on the lines to actuate everything but it worked! So after I confirmed that there were no leaks from the lines or diaphragms I focused on the switch. I reconnected everything and placed the syringe on the source vacuum port an tried to draw a vacuum but it didn't hold any vacuum and I could hear the air escaping around the switch. To confirm this I sprayed a little soapy solution on it and sure enough it was leaking. Today I bought a brand new switch and thought my trouble would be over but the same thing happened. I decided to take the old switch apart to see what the issue was and I found a couple issues. First, the switch has a silicone seal that has channels molded into it to direct the vacuum. However the surface that the silicone seal seals against is quite rough so I smoothed the surface with some 1500 sand paper and a little bit of cutting polish. I also made sure to sand fast to get some heat into it to make the surface nice and smooth. The second issue is the fact that this switch is held together with a thin metal spring washer and a plastic locking pin. The tension in this setup is not enough to create a good seal. So instead I put it back together with a machine screw, and a couple washers and nuts. This way I could also vary the amount of tension I applied to get a good seal. I installed the switch and placed the syringe on the vacuum supply port and tightened the diaphragm until I had a good seal. I then went around and figured out which vacuum line was suppose to go in which port. Unsurprisingly these remanufactured switches have no numbers on the ports and they do not match the diagrams online (I'll post a picture below of which lines go to which ports). Finally I tested everything and it all works and holds vacuum!!! Finally I have a working vacuum system with a functioning air recirculation.
Hopefully this write up helps some of you whos system doesn't work.
PS. The pictures I took were pretty crappy. I had dealt with this issue for an hour and a half tonight and didn't want to take it apart for some better pictures
. Hopefully they're good enough. If not let me know and I will take apart my new diaphragm and do the same thing and post some better pictures.